


OVERVIEW
WP856 operating system is developed based on AndroidTM platform. Besides inheriting the Android interface functions, more interfaces have been supported from users requirements. This document describes how to use the additional APIs for user application development on WP856.
Google Play Services
WP856 is a Google certified device. Google Play Services and associated APIs are available to applications. More detail please refer to Google Play services.
APPLICATION BUILDING
As these additional APIs exposed based on AOSP APIs, so users can start building the apps with Android Studio (or other IDE) just like regular Android application development.
USE APIS
All APIs are currently based on Android broadcast intent. Users can find and use the corresponding intent action and extras to send or receive to implement corresponding functions.
Account API
Account API can be used to obtain account information, modify account information and monitor account changes.
Main intent action list
Below is a list of main intent action for Account API:
API | Direction | Description |
“com.gs.intent.action.GET_ACCOUNT_INFO_LIST” | Send | This is used to obtain account information. |
“com.gs.intent.action.ACCOUNT_INFO_LIST” | Receive | |
“com.gs.intent.action.ACCOUNT_UPDATE” | Send | This is used to update account information. |
“com.gs.intent.action.ACCOUNT_CHANGED” | Receive | This is used to monitor account information changes. |
Account Information
Users can get account information by sending broadcast with the intent with action “com.gs.intent.action.GET_ACCOUNT_INFO_LIST” and listening the intent which action is “com.gs.intent.action.ACCOUNT_INFO_LIST”.
The “com.gs.intent.action.GET_ACCOUNT_INFO_LIST” intent extra is defined below:
EXTRA_TEXT String | EXTRA type | Description |
“query” | String(json) | The query json to filter the account info. |
The “query” json defined below:
Key | Value type | Description |
type | String | The account type. “sip”: sip account. |
allUsable | boolean | Query all usable account or not. |
The “query” json example :
{
"type": "sip",
"allUsable":true
}
The “com.gs.intent.action.ACCOUNT_INFO_LIST” intent extra defined below:
EXTRA_TEXT String | EXTRA type | Description |
info | String(json) | The account list information queried by the client. |
The “info” json defined below:
Key | Value type | Description |
type | String | The account type. “sip”: sip account. |
allUsable | boolean | Query all usable account or not. |
accountList | JSONArray | The account list which client want query. |
The “accountList” JSONArray item defined below:
Key | Value type | Description |
“id” | int | The account id. |
“type” | String | The account type. “sip”:sip account. |
“name” | String | The name is associated with each account which displayed on the device. |
“sipServer” | String | The sip server address that the account register to. It can be URL or IP address, and port of the SIP server. This is provided by your VoIP service provider (ITSP). |
“sipUserId” | String | The sip user id, always provided by VoIP. Generally it is the phone number. |
“sipAuthId” | String | SIP service subscriber’s ID used for authentication. It can be different from the SIP User ID. |
“sipDisplayName” | String | The display name of the account which set by the sip server. Generally it will show on the incoming call. |
“activated” | boolean | Check if the account is activated. |
“registerStatus” | String | The register status of the account. “registered”, “unregistered”, “registering”. |
Example of “info” json:
{
	"type": "sip",
	"allUsable": false,
	"accountList": [{
			"id": 1,
			"type": "sip",
			"name": "sip1",
			"sipServer": "192.168.120.204:50",
			"sipUserId": "10086",
			"sipAuthId": "10086",
			"sipDisplayName": "dev10086",
			"activated": true,
			"registerStatus": "registered"
		},
		{
			"id": 2,
			"type": "sip",
			"name": "sip2",
			"sipServer": "192.168.120.204:50",
			"sipUserId": "10087",
			"sipAuthId": "10087",
			"sipDisplayName": "dev10087",
			"activated": false,
			"registerStatus": "unregistered"
		}
	]
}
Get all sip account information
Here is an example on how to use Account Info APIs to get all sip account infomation:
- Start listening for the account information.
private AccountInfoReceiver mAccountInfoReceiver;

mAccountInfoReceiver = new AccountInfoReceiver();
IntentFilter intentFilter = new IntentFilter();
intentFilter.addAction("com.gs.intent.action.ACCOUNT_INFO_LIST");
registerReceiver(mAccountInfoReceiver,intentFilter);- Stop listening for the account information.
unregisterReceiver(mAccountInfoReceiver);- Start requesting the account information.
String query = null;
try {
    JSONObject jsonObject = new JSONObject();
    jsonObject.put("type", "sip");
    jsonObject.put("allUsable", false);
    query = jsonObject.toString();
} catch (JSONException e) {
    e.printStackTrace();
}
Intent intent = new Intent("com.gs.intent.action.GET_ACCOUNT_INFO_LIST");
intent.putExtra("query",query);
sendBroadcast(intent);- Parse the account information.
//@build.gradle
dependencies {
    implementation 'com.google.code.gson:gson:2.10.1'
}
public static class Account{
public int id;
public String type;
public String name;
public String sipServer;
public String sipUserId;
public String sipAuthId;
public String sipDisplayName;
public boolean activated;
public String registerStatus;
}
public static class Info{
String type;
boolean allUsable;
List<AccountInfoProxy.Account> accountList;
}
public static class AccountInfoReceiver extends BroadcastReceiver {
@Override
public void onReceive(Context context, Intent intent) {
if ("com.gs.intent.action.ACCOUNT_INFO_LIST".equals(intent.getAction())) {
String jsonStr = intent.getStringExtra("info");
if(!TextUtils.isEmpty(jsonStr)){
Gson gson = new Gson();
Info info = gson.fromJson(jsonStr, Info.class);
}
}
}
}Monitor Account Status
Users can monitor account status by listening the intent which action is “com.gs.intent.action.ACCOUNT_CHANGED”.
The “com.gs.intent.action.ACCOUNT_CHANGED” intent extra defined below:
EXTRA_TEXT String | EXTRA type | Description |
“account” | String(json) | The account that have been changed or updated. All information will be included except for the authentication password of the changed account. |
The “account” json is defined below:
Key | Value type | Description |
“id” | int | The account id. |
“type” | String | The account type. “sip”:sip account. |
“name” | String | The name associated with each account which displayed on the device. |
“sipServer” | String | The sip server address used for account registration. It can be the URL, IP address, and port of the SIP server. This is provided by your VoIP service provider (ITSP). |
“sipUserId” | String | The sip user id, always provided by VoIP. Generally it is the phone number. |
“sipAuthId” | String | SIP service subscriber’s ID used for authentication. It can be different from the SIP User ID. |
“activated” | boolean | Check if the account is activated. |
“registerStatus” | String | The register status of the account. “registered”, “unregistered”, “registering”. |
The “account” json example:
[{
		"id": 1,
		"type": "sip",
		"name": "sip1",
		"sipServer": "192.168.120.204:50",
		"sipUserId": "10086",
		"sipAuthId": "10086",
		"sipDisplayName": "dev10086",
		"activated": true,
		"registerStatus": "registered"
	},
	{
		"id": 2,
		"type": "sip",
		"name": "sip2",
		"sipServer": "192.168.120.204:50",
		"sipUserId": "10087",
		"sipAuthId": "10087",
		"sipDisplayName": "dev10087",
		"activated": false,
		"registerStatus": "unregistered"
	}
]
Here is an example on how to use monitor account status APIs.
Start Account Status Monitor
private AccountInfoReceiver mAccountInfoReceiver;

mAccountInfoReceiver = new AccountInfoReceiver();
IntentFilter intentFilter = new IntentFilter();
intentFilter.addAction("com.gs.intent.action.ACCOUNT_CHANGED");
registerReceiver(mAccountInfoReceiver,intentFilter);
Stop Account Status Monitor
unregisterReceiver(mAccountInfoReceiver);Monitor Account using AccountStatusListener
//@build.gradle
dependencies {
    implementation 'com.google.code.gson:gson:2.10.1'
}
public static class Account{
public int id;
public String type;
public String name;
public String sipServer;
public String sipUserId;
public String sipAuthId;
public String sipDisplayName;
public boolean activated;
public String registerStatus;
}
public static class AccountInfoReceiver extends BroadcastReceiver {
@Override
public void onReceive(Context context, Intent intent) {
if ("com.gs.intent.action.ACCOUNT_CHANGED".equals(intent.getAction())) {
String jsonStr = intent.getStringExtra("accountList");
if(!TextUtils.isEmpty(jsonStr)){
Gson gson = new Gson();
List<Account> accountList = gson.fromJson(jsonStr, new TypeToken<List<Account>>() {
}.getType());
}
}
}
}Update Account
Account information can be updated by sending the intent with action “com.gs.intent.action.ACCOUNT_UPDATE”.
The “com.gs.intent.action.ACCOUNT_UPDATE” intent extra is defined below:
EXTRA_TEXT String | EXTRA type | Description |
accountList | String(json) | The account list which need to be updated. |
The “accountList” JSONArray item defined below:
Key | Value type | Description |
“id” | int | The id of the account |
“type” | String | The account type. “sip”:sip account. |
“name” | String | The name associated with each account which displayed on the device. |
“sipServer” | String | The sip server address that the account register to. It can be URL or IP address, and port of the SIP server. This is provided by your VoIP service provider (ITSP). |
“sipUserId” | String | The sip user id, always provided by VoIP. Generally it is the phone number. |
“sipAuthId” | String | SIP service subscriber’s ID used for authentication. It can be different from the SIP User ID. |
“sipDisplayName” | String | The display name of the account which set by the sip server. Generally it will show on the incoming call. |
“sipAuthPassword” | String | The account password required for the phone to authenticate with the ITSP (SIP) server before the account can be registered. |
“activated” | boolean | Active the account or not. |
Here is an example showing how to update Account function:
//@build.gradle
   dependencies {
    implementation 'com.google.code.gson:gson:2.10.1'
}
   public static class Account{
       public int id;
       public String type;
       public String name;
       public String sipServer;
       public String sipUserId;
       public String sipAuthId;
       public String sipDisplayName;
       public boolean activated;
       public String registerStatus;
       public String sipAuthPassword;
   }
   private int mExistSipAccountId;    List<Account> accounts = new ArrayList<>();
   Account account = new Account();
   account.id = mExistSipAccountId;
   account.type = "sip";
   account.name = "test-3632999";
   account.sipServer = "192.168.125.254";    account.sipUserId = "3632999";
   account.sipAuthId = "3632999";
   account.sipAuthPassword = "123456";
   accounts.add(account);

   Gson gson = new Gson();
   String jsonStr = gson.toJson(accounts);
   Intent intent = new Intent("com.gs.intent.action.ACCOUNT_UPDATE");
   intent.putExtra("accountList",jsonStr);
   sendBroadcast(intent);
Phone Call API
Call API can be used to make calls, operate calls and monitor call status.
Main intent action list
Here is a list of main intent action for Call API:
API | Direction | Description |
“com.gs.intent.action.PHONE_START_CALL” | Send | This is used to make and start an outgoing call.
|
“com.gs.intent.action.PHONE_START_CALL_RESULT” | Receive | |
“com.gs.intent.action.PHONE_CALL_ADDED” | Receive | This is used to monitor whether an outgoing call created or an incoming call received. |
“com.gs.intent.action.PHONE_CALL_STATUS_CHANGED” | Receive | This is used to monitor call information/status changes. |
“com.gs.intent.action.PHONE_OPERATE_CALL” | Send | By sending this action, the user can perform various operations on the call, such as accept/reject/hold/mute/end/redial/sendDTMF. |
“com.gs.intent.action.PHONE_CALL_REMOVED” | Receive | This is used to monitor call ending. |
“com.gs.intent.action.PHONE_GET_CALL_INFO” | Send | This is used to obtain call information.
|
“com.gs.intent.action.PHONE_CALL_INFO” | Receive |
Make a Call
Users can make a call by sending broadcast with the intent which action is “com.gs.intent.action.PHONE_START_CALL” and listening the intent which action is “com.gs.intent.action.PHONE_START_CALL_RESULT”.
The “com.gs.intent.action.PHONE_START_CALL” intent extra is defined below:
EXTRA_TEXT String | EXTRA type | Description |
“request_info” | String(json) | The outgoing call info. |
The “request_info” json defined below:
Key | Value type | Description |
“reqId” | String | The client app should make it unique, because the result will carry this id, so that the client app can check whether it is the result of the desired call. |
“accountId” | int | The local account id. It is optinal. When not set or set to -1, dynamic accounts are used. |
“callMode” | String | The call mode. It is optinal. It can be “sip”,”ip”,”paging”. Default is “sip”. |
“isVideo” | boolean | Whether the call should be video dialing. It is optinal. It can be “video”,”audio”,”auto”. Default is “auto”. |
“remoteNumber” | String | The remote number. It is required. |
The “request_info” json example :
   {

       "reqId": "com.gs.apidemo.myphone-01",

       "accountId": "10077",

       "callMode": "sip",

       "isVideo": "auto",

       "remoteNumber": "10086"

   }
The “com.gs.intent.action.PHONE_START_CALL_RESULT” intent extra defined below:
EXTRA_TEXT String | EXTRA type | Description |
“response_info” | String(json) | The call start result info. |
The “response_info” json is defined below:
Key | Value type | Description |
“reqId” | String | The start id entered by the client before. |
“lineId” | int | The id of the call line. It is required only when start call success. |
“resultCode” | int | The result code. It is required. “0” :success, other is the errorCode. |
The “response_info” json example :
//Start success.

//Can get more call info by listening action "com.gs.intent.action.PHONE_CALL_ADDED".

   {

       "reqId": "com.gs.apidemo.myphone-01",

       "lineId": 1

   }

//Start fail

   {

       "reqId": "com.gs.apidemo.myphone-01",

       "resultCode": 404

   }
Here is an example on how to use Call function API to make a call:
- Start listening to the call start result.
private PhoneCallReceiver mPhoneCallReceiver;

mPhoneCallReceiver = new PhoneCallReceiver();
IntentFilter intentFilter = new IntentFilter();
intentFilter.addAction("com.gs.intent.action.PHONE_START_CALL_RESULT");
registerReceiver(mPhoneCallReceiver,intentFilter);- Stop listening to the call start result.
unregisterReceiver(mPhoneCallReceiver);- Make and start a call.
 public static class DialInfo {
       public String reqId;
       public int accountId;
       public String callMode;
       public String isVideo;
       public String remoteNumber;
   }
   private int mExistSipAccountId;    DialInfo dialingInfo = new DialInfo();
   dialingInfo.accountId = mExistSipAccountId;
   dialingInfo.remoteNumber = "10086";
   dialingInfo.callMode = "sip";
   dialingInfo.isVideo = "video";
   dialingInfo.reqId = getPackageName()+System.currentTimeMillis();

   Gson gson = new Gson();
   String jsonStr = gson.toJson(dialingInfo);
   Intent intent = new Intent("com.gs.intent.action.PHONE_START_CALL");
   intent.putExtra("request_info", jsonStr);
   sendBroadcast(intent);
- Receive and parse the call start result.
//@build.gradle
   dependencies {
    implementation 'com.google.code.gson:gson:2.10.1'
}
  public static class StartResult {
       public String reqId;
       public int lineId;
       public int resultCode;
   }
   public static class PhoneCallReceiver extends BroadcastReceiver {
       @Override
       public void onReceive(Context context, Intent intent) {
           if ("com.gs.intent.action.PHONE_START_CALL_RESULT".equals(intent.getAction())) {
               String jsonStr = intent.getStringExtra("response_info");
               if(!TextUtils.isEmpty(jsonStr)){
                   Gson gson = new Gson();
                   StartResult result = gson.fromJson(jsonStr, StartResult.class);
               }
           }
       }
   }
Call added
When an outgoing call is made and started successfully, or an incoming call is received, the client app will be notified by listening to the intent which action is “com.gs.intent.action.PHONE_CALL_ADDED”.
The “com.gs.intent.action.PHONE_CALL_ADDED” intent extra is defined below:
EXTRA_TEXT String | EXTRA type | Description |
“info” | String(json) | The call line info. |
The “info” json is shown below:
Key | Value type | Description |
“lineId” | int | The id of the call line. |
“accountId” | int | The local account id. |
“callMode” | String | The mode of the call. It can be: “sip”,”ip”,”paging”. |
“callDirection” | String | The call direction. It can be: “incoming”,”outgoing”. |
“createTime” | long | The call createtime. |
“startTime” | long | The call connect time. |
“localNumber” | String | The local number. |
“remoteNumber” | String | The remote number. |
“remoteName” | String | The name of the remote. |
“localMuted” | boolean | Local mute status. |
“videoOn” | boolean | Video is enabled for this call. |
“status” | String | The call line status. It can be: “idle”:The line is idle, “dialing”:The line is on dialing, “ringing”:The line is on ringing, “preview”:Has the user performed a preview of the incoming call, “calling”:The line is on calling, “connected”:The line is connected, “hold”:The line is on hold, “transfered”:The line has been transferred, “failed”:Failed calling for the line, “ringback”:The phone is ringing back for the line.
|
The “info” json example :
//outgoing call
{
	"lineId": 2,
	"accountId": "10077",
	"callMode": "sip",
	"callDirection": "outgoing",
	"createTime": "1714292980000",
	"startTime": "1714292995000",
	"localNumber": "10077",
	"remoteNumber": "10086",
	"remoteName": "dev-10086",
	"localMuted": false,
	"videoOn": false,
	"status": "calling"
}

//incoming call
{
	"lineId": 2,
	"accountId": "10077",
	"callMode": "sip",
	"callDirection": "incoming",
	"createTime": "1714292980000",
	"startTime": "1714292995000",
	"localNumber": "10077",
	"remoteNumber": "10086",
	"remoteName": "dev-10086",
	"localMuted": false,
	"videoOn": false,
	"status": "ringing"
}
Here is an example on how to use the API to listen call adding:
- Start monitoring call adding.
private PhoneCallReceiver mPhoneCallReceiver;

mPhoneCallReceiver = new PhoneCallReceiver();
IntentFilter intentFilter = new IntentFilter();
intentFilter.addAction("com.gs.intent.action.PHONE_CALL_ADDED");
registerReceiver(mPhoneCallReceiver,intentFilter);- Stop monitoring call adding.
unregisterReceiver(mPhoneCallReceiver);- Receive and parse the added call.
//@build.gradle
dependencies {
    implementation 'com.google.code.gson:gson:2.10.1'
}
public static class CallInfo {
public int lineId;
public String accountId;
public String callMode;
public String callDirection;
public long createTime;
public long startTime;
public String localNumber;
public String remoteNumber;
public String remoteName;
public boolean localMuted;
public boolean videoOn;
public String status;
}
public static class PhoneCallReceiver extends BroadcastReceiver {
@Override
public void onReceive(Context context, Intent intent) {
if ("com.gs.intent.action.PHONE_CALL_ADDED".equals(intent.getAction())) {
String jsonStr = intent.getStringExtra("info");
if(!TextUtils.isEmpty(jsonStr)){
Gson gson = new Gson();
CallInfo callInfo = gson.fromJson(jsonStr, CallInfo.class);
}
}
}
}Monitor Call
When call information/status changes, the client app will be notified by listening to the intent which action is “com.gs.intent.action.PHONE_CALL_STATUS_CHANGED”.
The “com.gs.intent.action.PHONE_CALL_STATUS_CHANGED” intent extra defined below:
EXTRA_TEXT String | EXTRA type | Description |
“info” | String(json) | The call line info. |
The “info” json is defined below:
Key | Value type | Description |
“lineId” | int | The id of the call line. |
“accountId” | int | The local account id. |
“startTime” | long | The call connect time. |
“remoteNumber” | String | The remote number. |
“remoteName” | String | The name of the remote. |
“localMuted” | boolean | Local mute status. |
“videoOn” | boolean | Video is enabled for this call. |
“status” | String | The call line status. It can be: “idle”:The line is idle, “dialing”:The line is on dialing, “ringing”:The line is on ringing, “preview”:Has the user performed a preview of the incoming call, “calling”:The line is on calling, “connected”:The line is connected, “hold”:The line is on hold, “transfered”:The line has been transferred, “failed”:Failed calling for the line, “ringback”:The phone is ringing back for the line.
|
The “info” json example :
{
    "lineId": 1,
    "status":"connected"
}
Here is an example on how to use the API to listen to call changes:
- Start monitoring call changes.
private PhoneCallReceiver mPhoneCallReceiver;

mPhoneCallReceiver = new PhoneCallReceiver();
IntentFilter intentFilter = new IntentFilter();
intentFilter.addAction("com.gs.intent.action.PHONE_CALL_STATUS_CHANGED");
registerReceiver(mPhoneCallReceiver,intentFilter);
- Stop monitoring call changes.
unregisterReceiver(mPhoneCallReceiver);- Receive and parse the call changes.
public static class PhoneCallReceiver extends BroadcastReceiver {
    @Override
    public void onReceive(Context context, Intent intent) {
        if ("com.gs.intent.action.PHONE_CALL_STATUS_CHANGED".equals(intent.getAction())) {
            String jsonStr = intent.getStringExtra("info");
            if(!TextUtils.isEmpty(jsonStr)){
                try {
                    JSONObject object = new JSONObject(jsonStr);
                    if(!object.has("lineId")){
                        return;
                    }
                    int lineId = object.getInt("lineId");
                    if(object.has("status")){
                        Log.d(TAG,"Call["+lineId+"] status changed to "+object.getString("status"));
                    }
                } catch (JSONException e) {
                    e.printStackTrace();
                }
            }
        }
    }
}
Operate a Call
By sending the broadcast with the intent with action “com.gs.intent.action.PHONE_OPERATE_CALL”, the user can perform various operations on the call, such as accept/reject/hold/mute/end/redial/sendDTMF.
The “com.gs.intent.action.PHONE_OPERATE_CALL” intent extra is defined below:
EXTRA_TEXT String | EXTRA type | Description |
“request_info” | String(json) | The request info to operate the call. |
The “request_info” json is shown below:
Key | Value type | Description |
“action” | String | The detail action to operate the call. It is required. It can be “accept”, “reject”, “hold”,”unhold”, “muteSelf”,”unmuteSelf” “end”, “redial”, “sendDTMF”. Here the “redial” action only support for the added but failed calling. So the lineId should already be generated. Please refer ApiDemo for more details. |
“lineId” | int | The call line id. It is required except when action is “dtmf”. |
“dtmfStr” | String | The key that will be operated for DTMF. It is required only when the action is “sendDTMF”. When it is auto mode, the DTMF key will be auto send to remote by definite frequency. When it is in manual mode, the DTMF key sent to the remote will not contain the play DTMF tone, users can add their own playback tone logic, please refer to the ApiDemo. |
“isPress” | boolean | Now press the dtmf key. It only needs to be set if the action is “sendDTMF” and the mode is “manual”. When it is null, it will be taken as DTMF “auto” mode. |
“isVideo” | isVideo | Whether accept the call with video enabled. It is required only when “action” is “accept”. When it is a audio call, set “isVideo” true to accept the call will success, but the call is still audio call.
|
The “request_info” json example :
//Accept
{
    "action":"accept",
"lineId":2,
"isVideo":"false"
}
//Reject
{
    "action":"reject",
    "lineId":2
}
//Hold
{
    "action":"hold",
    "lineId":2
}
//Unhold
{
    "action":"unhold",
    "lineId":2
}
//Mute self
{
    "action":"muteSelf",
    "lineId":2
}
//Unmute self
{
    "action":"unmuteSelf",
    "lineId":2
}
//End
{
    "action":"end",
    "lineId":2
}
//Redial
{
    "action":"redial",
    "lineId":2
}

//manual dtmf
{
    "action":"sendDTMF",
    "dtmf":"1",
    "isPress":true
}
{
    "action":"sendDTMF",
    "dtmfStr":"1",
    "isPress":false
}

//auto dtmf
{
    "action":"sendDTMF",
    "dtmfStr":"1"
}
Here is an example on how to use Call function API to operate a call:
- Demo for operating a call except sendDTMF and accept.
public enum Operate{
    ACCEPT("accept"),
    REJECT("reject"),
    HOLD("hold"),
    UNHOLD("unhold"),
    UNMUTE_SELF("unmuteSelf"),
    MUTE_SELF("muteSelf"),
    END("end"),
    REDIAL("redial");
    private final String action;
    Operate(String action){
        this.action = action;
    }
}
private int mExistCallLineId;

    try {
        JSONObject jsonObject = new JSONObject();
        jsonObject.put("lineId", mExistCallLineId);
        jsonObject.put("action", operate.action);
        Intent intent = new Intent("com.gs.intent.action.PHONE_OPERATE_CALL");
        intent.putExtra("request_info", jsonObject.toString());
        sendBroadcast(intent);
    } catch (JSONException e) {
        e.printStackTrace();
}- Accept call demo:
    public void acceptCall(int lineId, boolean isVideo) {
    try {
        JSONObject jsonObject = new JSONObject();
        jsonObject.put("lineId", lineId);
        jsonObject.put("isVideo", isVideo);
        jsonObject.put("action", Operate.ACCEPT.action);
        Intent intent = new Intent("com.gs.intent.action.PHONE_OPERATE_CALL");
        intent.putExtra("request_info", jsonObject.toString());
        logSendIntent(intent);
        mContext.sendBroadcast(intent);
    } catch (JSONException e) {
        e.printStackTrace();
    }
}- DTMF auto mode demo:
try {
           JSONObject jsonObject = new JSONObject();
           jsonObject.put("action", "sendDTMF");
           jsonObject.put("dtmfStr", dtmf);
           Intent intent = new Intent("com.gs.intent.action.PHONE_OPERATE_CALL");
           intent.putExtra("request_info", jsonObject.toString());
           mContext.sendBroadcast(intent);
       } catch (JSONException e) {
           e.printStackTrace();
       }
- DTMF manual mode demo:
public void sendDtmfManual(String dtmf, boolean isPress) {
       try {
           JSONObject jsonObject = new JSONObject();
           jsonObject.put("action", "sendDTMF");
           jsonObject.put("dtmfStr", dtmf);
           jsonObject.put("isPress", isPress);
           Intent intent = new Intent("com.gs.intent.action.PHONE_OPERATE_CALL");
           intent.putExtra("request_info", jsonObject.toString());
           sendBroadcast(intent);
       } catch (JSONException e) {
           e.printStackTrace();
       }
   }

   ToneGenerator mToneGenerator = null;
   try {
       mToneGenerator = new ToneGenerator(AudioManager.STREAM_SYSTEM, ToneGenerator.MAX_VOLUME * 8 / 10);
       mToneGenerator.startTone(ToneGenerator.TONE_DTMF_1);
   } catch (Throwable ex) {
   }
   sendDtmfManual("1",true);
   try {
       Thread.sleep(500);
   } catch (InterruptedException e) {
       e.printStackTrace();
   }
   sendDtmfManual("1",false);
   if(mToneGenerator != null){
       mToneGenerator.stopTone();
       mToneGenerator.release();
   }
Call removed
When an outgoing call end successfully, or an incoming call is rejected, the client app will be notified by listening the intent which action is “com.gs.intent.action.PHONE_CALL_REMOVED”.
The “com.gs.intent.action.PHONE_CALL_REMOVED” intent extra defined below:
EXTRA_TEXT String | EXTRA type | Description |
“info” | String(json) | The call line info. |
The “info” json is defined below:
Key | Value type | Description |
“lineId” | int | The id of the call line. |
The “info” json example :
   {

       "lineId":1

   }
Here is an example on how to use the API to listen call removing:
- Start monitoring call removing.
private PhoneCallReceiver mPhoneCallReceiver;

mPhoneCallReceiver = new PhoneCallReceiver();
IntentFilter intentFilter = new IntentFilter();
intentFilter.addAction("com.gs.intent.action.PHONE_CALL_REMOVED");
registerReceiver(mPhoneCallReceiver,intentFilter);
- Stop monitoring call removing.
unregisterReceiver(mPhoneCallReceiver);- Receive and parse the removed call.
//@build.gradle
dependencies {
    implementation 'com.google.code.gson:gson:2.10.1'
}
public static class PhoneCallReceiver extends BroadcastReceiver {
@Override
public void onReceive(Context context, Intent intent) {
if ("com.gs.intent.action.PHONE_CALL_REMOVED".equals(intent.getAction())) {
String jsonStr = intent.getStringExtra("info");
if(!TextUtils.isEmpty(jsonStr)){
try {
JSONObject object = new JSONObject(jsonStr);
if(!object.has("lineId")){
return;
}
int lineId = object.getInt("lineId");
Log.d(TAG,"Call["+lineId+"] removed.");
} catch (JSONException e) {
e.printStackTrace();
}
}
}
}
}Call information
Users can get call detail information by sending broadcast with the intent with action “com.gs.intent.action.PHONE_GET_CALL_INFO” and listening to the intent with action “com.gs.intent.action.PHONE_CALL_INFO”.
The “com.gs.intent.action.PHONE_CALL_INFO” intent extra defined below:
EXTRA_TEXT String | EXTRA type | Description |
“infos” | String(json) | The call line info list. |
The “infos” JSONArray item is defined as the same as “info” which defined on the chapter “Call added”.
The “infos” json example :
[{
		"lineId": 2,
		"accountId": "10077",
		"callMode": "sip",
		"callDirection": "incoming",
		"createTime": "1714292980000",
		"startTime": "1714292995000",
		"localNumber": "10077",
		"remoteNumber": "10086",
		"remoteName": "dev-10086",
		"localMuted": false,
		"videoOn": false,
		"status": "ringing"
	},
	{
		"lineId": 3,
		"accountId": "10077",
		"callMode": "sip",
		"callDirection": "incoming",
		"createTime": "1714292980000",
		"startTime": "1714292995000",
		"localNumber": "10077",
		"remoteNumber": "10088",
		"remoteName": "dev-10088",
		"localMuted": false,
		"videoOn": false,
		"status": "hold"
	}
]
Here is an example on how to use Call function API to get call detail information:
- Start listening to the call information result.
private PhoneCallReceiver mPhoneCallReceiver;

mPhoneCallReceiver = new PhoneCallReceiver();
IntentFilter intentFilter = new IntentFilter();
intentFilter.addAction("com.gs.intent.action.PHONE_CALL_INFO");
registerReceiver(mPhoneCallReceiver,intentFilter);
- Stop listening to the call information result.
unregisterReceiver(mPhoneCallReceiver);- Request call information.
Intent intent = new Intent("com.gs.intent.action.PHONE_GET_CALL_INFO");
mContext.sendBroadcast(intent);- Receive and parse the call information result.
//@build.gradle
dependencies {
    implementation 'com.google.code.gson:gson:2.10.1'
}
public static class CallInfo {
public int lineId;
public String accountId;
public String callMode;
public String callDirection;
public long createTime;
public long startTime;
public String localNumber;
public String remoteNumber;
public String remoteName;
public boolean localMuted;
public boolean videoOn;
public String status;
}
public static class PhoneCallReceiver extends BroadcastReceiver {
@Override
public void onReceive(Context context, Intent intent) {
if ("com.gs.intent.action.PHONE_CALL_INFO".equals(intent.getAction())) {
String jsonStr = intent.getStringExtra("infos");
if(!TextUtils.isEmpty(jsonStr)){
Gson gson = new Gson();
List<CallInfo> callInfoList = gson.fromJson(jsonStr, new TypeToken<List<CallInfo>>() {
}.getType());
}
}
}
}SMS API
SMS API can be used to send SMS, delete SMS and receive SMS.
Main intent action list
Here is a list of main intent action for SMS API:
API | Direction | Description |
“com.gs.intent.action.SEND_SMS” | Send | This is used to send SMS. |
“com.gs.intent.action.SMS_SEND_RESULT” | Receive | |
“android.provider.Telephony.SMS_RECEIVED” | Receive | This is used to receive SMS. |
“com.gs.intent.action.DELETE_SMS” | Send | This is used to delete SMS.
|
“com.gs.intent.action.SMS_DELETE_RESULT” | Receive |
Send SMS
Users can send a SMS by sending broadcast with the with action “com.gs.intent.action.SEND_SMS” and listening to the intent with action “com.gs.intent.action.SMS_SEND_RESULT”.
The “com.gs.intent.action.SEND_SMS” intent extra is defined below:
EXTRA_TEXT String | EXTRA type | Description |
“send_id” | String | The client app should make it unique, because the result will carry this id, so that the client app can check whether it is the result of the desired message. |
“sms” | String(json) | The sms that client app want to send. |
The “sms” json is shown below:
Key | Value type | Description |
“from” | int | The account id of the one who send the SMS. |
“to” | String | When it is a single SMS, it is the number of the account who receive the SMS. |
“content” | String | The content of the SMS. |
The “sms” json example :
// single sms demo
    {
        "from": 10087,
        "to": "10086",
        "content": "hello"
    }
// group sms demo
    {
        "from": 10087,
        "to": "10086_,10088",
        "content":  "hello"
    }
The “com.gs.intent.action.SMS_SEND_RESULT” intent extra is defined below:
EXTRA_TEXT String | EXTRA type | Description |
“send_id” | String | The send id previously entered by the client. |
“to” | String | When it is a single SMS, it is the number of the account who receive the SMS. |
“sms_result” | String(json) | The result of the SMS. |
The “sms_result” JSONArray item is shown below:
Key | Value type | Description |
“to” | String | When it is a single SMS, it is the number who receive the SMS. |
“sms_id” | long | The id of the SMS when sending successfully. |
The “sms_result” json example :
// single sms demo
[{
    "to": "10086",
    "sms_id": 10
}]

// group sms demo
[{
    "sms_id": 18,
    "to": "10086"
}, {
    "sms_id": -1,
    "to": "10088"
}]
Here is an example on how to use the API to send a SMS:
- Start listening to the send result.
private SmsReceiver mSmsReceiver;

mSmsReceiver = new SmsReceiver();
IntentFilter intentFilter = new IntentFilter();
intentFilter.addAction("com.gs.intent.action.SMS_SEND_RESULT");
registerReceiver(mSmsReceiver, intentFilter);- Stop listening to the send result.
unregisterReceiver(mSmsReceiver);- Request sending a SMS.
//@build.gradle
dependencies {
    implementation 'com.google.code.gson:gson:2.10.1'
}
public static class Sms{
public int from;
public String to;
public String content;
}
private String mSendId;
private int mExistAccountId;
Intent intent = new Intent("com.gs.intent.action.SEND_SMS");
mSendId = getPackageName()+System.currentTimeMillis();
intent.putExtra("send_id", mSendId);
Gson gson = new Gson();
Sms sms= new Sms();
sms.from = mExistAccountId;
sms.content = content;
sms.to = "10086";
String jsonStr = gson.toJson(sms);
intent.putExtra("sms", jsonStr);
sendBroadcast(intent);- Receive and parse the SMS send result.
//@build.gradle
dependencies {
    implementation 'com.google.code.gson:gson:2.10.1'
}
public class SmsReceiver extends BroadcastReceiver {
@Override
public void onReceive(Context context, Intent intent) {
if ("com.gs.intent.action.SMS_SEND_RESULT".equals(intent.getAction())) {
String sendId = intent.getStringExtra("send_id");
if (!TextUtils.isEmpty(mSendId) && mSendId.equals(sendId)) {
String to = intent.getStringExtra("to");
if(TextUtils.isEmpty(to)){
return;
}
boolean isGroupMsg = to.contains("_,");
String jsonResult = intent.getStringExtra("sms_result");
if(!TextUtils.isEmpty(jsonResult)){
Gson gson = new Gson();
List<SendResult> list = gson.fromJson(jsonResult, new TypeToken<List<SendResult>>() {
}.getType());
if (isGroupMsg) {
Log.d(TAG,"group SMS send result, group:" + to + ",result:" + list );
} else {
Log.d(TAG,"single SMS send result,to:" + to + ",result:" + list);
}
}
}
}
}
}Delete SMS
Users can delete a SMS by sending broadcast with the intent with action “com.gs.intent.action.DELETE_SMS” and listening to the intent with action “com.gs.intent.action.SMS_DELETE_RESULT”.
The “com.gs.intent.action.DELETE_SMS” intent extra is defined below:
EXTRA_TEXT String | EXTRA type | Description |
“sms_id” | long | The id of the SMS. When deleting the SMS of the specified type, “sms_id” no need to be carried. |
“sms_type” | String | The type of the SMS which app want to delete. It can be When deleting a specified SMS by id, “sms_type” no need to be carried. |
The “com.gs.intent.action.SMS_DELETE_RESULT” intent extra is defined below:
EXTRA_TEXT String | EXTRA type | Description |
“sms_id” | long | The id of the SMS which is handled. It is not carried, when deleting a type of SMS. |
“sms_type” | String | The type of the SMS which is handled. It is not carried, when deleting a specified SMS by id. |
“success” | boolean | True means successful deletion. |
“error” | String | The error message when the SMS delete fail. |
Here is an example on how to use the API to delete SMS:
- Start listening to the delete result.
private SmsReceiver mSmsReceiver;

mSmsReceiver = new SmsReceiver();
IntentFilter intentFilter = new IntentFilter();
intentFilter.addAction("com.gs.intent.action.SMS_DELETE_RESULT");
registerReceiver(mSmsReceiver, intentFilter);- Stop listening to the delete result.
unregisterReceiver(mSmsReceiver);- Request deleting a SMS or a type of SMS.
//@build.gradle
dependencies {
    implementation 'com.google.code.gson:gson:2.10.1'
}
//Delete a specifed SMS by id
Intent intent = new Intent("com.gs.intent.action.DELETE_SMS");
intent.putExtra("sms_id", mSelectedSmsId);
sendBroadcast(intent);
//Delete a type of SMS
Intent typeIntent = new Intent("com.gs.intent.action.DELETE_SMS");
typeIntent.putExtra("sms_type", "in");
sendBroadcast(typeIntent);
- Receive and parse the SMS deletion result.
//@build.gradle
dependencies {
    implementation 'com.google.code.gson:gson:2.10.1'
}
public class SmsReceiver extends BroadcastReceiver {
@Override
public void onReceive(Context context, Intent intent) {
if ("com.gs.intent.action.SMS_DELETE_RESULT".equals(intent.getAction())) {
long smsId = intent.getLongExtra("sms_id", -1);
String smsType = intent.getStringExtra("sms_type");
boolean success = intent.getBooleanExtra("success", false);
String error = intent.getStringExtra("erroe");
if (smsId >= 0) {
if(success){
Log.d(TAG,"SMS delete success,msgId:" + smsId);
}else{
Log.d(TAG,"SMS delete fail,smsId:" + smsId+",error:"+error);
}
} else if (!TextUtils.isEmpty(smsType)) {
if(success){
Log.d(TAG,"SMS delete success,smsType:" + smsType);
}else{
Log.d(TAG,"SMS delete fail,smsType:" + smsType+",error:"+error);
}
}
}
}
}Receive SMS
When a SIP SMS received, the client app will be notified by listening to the intent with action “android.provider.Telephony.SMS_RECEIVED”. This action is the same as the action of receiving SIM SMS which defined by AOSP and exposed on android.provider.Telephony.Sms.Intents.SMS_RECEIVED_ACTION.
The “android.provider.Telephony.SMS_RECEIVED” intent extra for SIP SMS is defined below:
EXTRA_TEXT String | EXTRA type | Description |
“id” | long | The id of the SMS which is received. |
“number” | String | The number who send the SMS. |
“content” | String | The content of the SMS. |
“account” | int | The account who receive the SMS. |
Here is an example on how to use the API to receive SIP SMS:
- Start listening to SMS receiving .
private SmsReceiver mSmsReceiver;

mSmsReceiver = new SmsReceiver();
IntentFilter intentFilter = new IntentFilter();
intentFilter.addAction(android.provider.Telephony.Sms.Intents.SMS_RECEIVED_ACTION);
registerReceiver(mSmsReceiver, intentFilter);- Stop listening SMS receiving.
unregisterReceiver(mSmsReceiver);- Receive and parse the received SMS.
public interface ReceiveSms {
    String ID = "id";
    String NUMBER = "number";
    String CONTENT = "content";
    String ACCOUNT_ID = "account";
}
public class SmsReceiver extends BroadcastReceiver {
    @Override
    public void onReceive(Context context, Intent intent) {
        if (SMS_RECEIVED_ACTION.equals(intent.getAction())) {
            long id = intent.getLongExtra(ReceiveSms.ID, -1);
            String number = intent.getStringExtra(ReceiveSms.NUMBER);
            int accountId = intent.getIntExtra(ReceiveSms.ACCOUNT_ID, -1);
            String content = intent.getStringExtra(ReceiveSms.CONTENT);

            Log.d(TAG, "Received SMS, msgId:" + id + ", from:" + number + ", to accountId:" + accountId + ", content:" + content);
        }
    }
}
Device API
Device API can be used to obtain device information.
Main intent action list
Here is a list of main intent action for device API:
API | Direction | Description |
“com.gs.intent.action.GET_DEVICE_INFO” | Send | This is used to get device information |
“com.gs.intent.action.DEVICE_INFO” | Receive |
Device Information
Users can get device information by sending broadcast with the intent which action is “com.gs.intent.action.GET_DEVICE_INFO” and listening to the intent which action is “com.gs.intent.action.DEVICE_INFO”.
The “com.gs.intent.action.GET_DEVICE_INFO” intent extra is defined below:
EXTRA_TEXT String | EXTRA type | Description |
“query” | String(json) | The query json to filter the device info. It can be: “pn”: Product number. “sn”: Serial number. “systemVersion”: Firmware system version. “wifiMac”: Wi-Fi MAC. null: All device information. |
The “com.gs.intent.action.DEVICE_INFO” intent extra defined below:
EXTRA_TEXT String | EXTRA type | Description |
device_info | String(json) | The device info queried by the client |
The “device_info” json defined below:
Key | Value type | Description |
“pn” | String | The product number of the device. |
“sn” | String | The serial number of the device. |
“systemVersion” | String | The system version of the firmware. |
“wifiMac” | String | The wifi mac address of the device. |
The “device_info” json example :
{
    "pn": "PN88787",
    "sn": "SN9090909",
    "systemVersion": "1.0.0.1",
    "wifiMac": "ec74d722947e"
}
Here is an example on how to use the API to get device information:
- Start listening to the result.
private DeviceInfoReceiver mDeviceInfoReceiver;

mDeviceInfoReceiver = new DeviceInfoReceiver();
IntentFilter intentFilter = new IntentFilter();
intentFilter.addAction("com.gs.intent.action.DEVICE_INFO");
registerReceiver(mDeviceInfoReceiver, intentFilter);- Stop listening to the result.
unregisterReceiver(mDeviceInfoReceiver);- Request the device information.
sendBroadcast(new Intent("com.gs.intent.action.GET_DEVICE_INFO"));- Receive and parse the device information.
//@build.gradle
dependencies {
    implementation 'com.google.code.gson:gson:2.10.1'
}
public static class DeviceInfo{
public String pn;
public String sn;
public String systemVersion;
public String wifiMac;
}
public class DeviceInfoReceiver extends BroadcastReceiver {
@Override
public void onReceive(Context context, Intent intent) {
if ("com.gs.intent.action.DEVICE_INFO".equals(intent.getAction())) {
String jsonStr = intent.getStringExtra("device_info");
Gson gson = new Gson();
DeviceInfo deviceInfo = gson.fromJson(jsonStr, DeviceInfo.class);
}
}
}Button API
There are 3 hardware buttons that can be customized: Left Button, Right Button, Custom Button. Users can open Settings and map the hardware button to the specific function button.
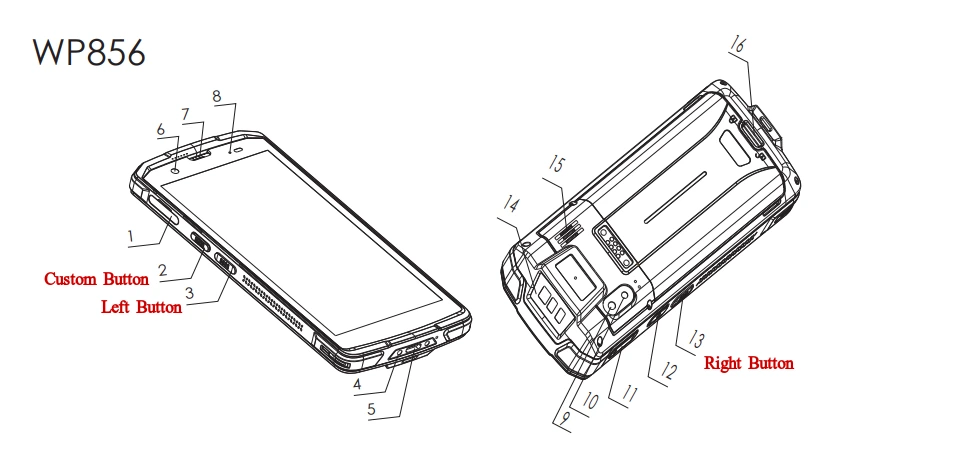
Button customization
The specific function buttons are defined by system and only can be configured on Settings/Smart Assist/Button customization. The Left Button, Right Button and the Custom Button can be mapped to a same function button. When one of the hardware buttons is processing a click event, the other buttons will ignore their own click events.
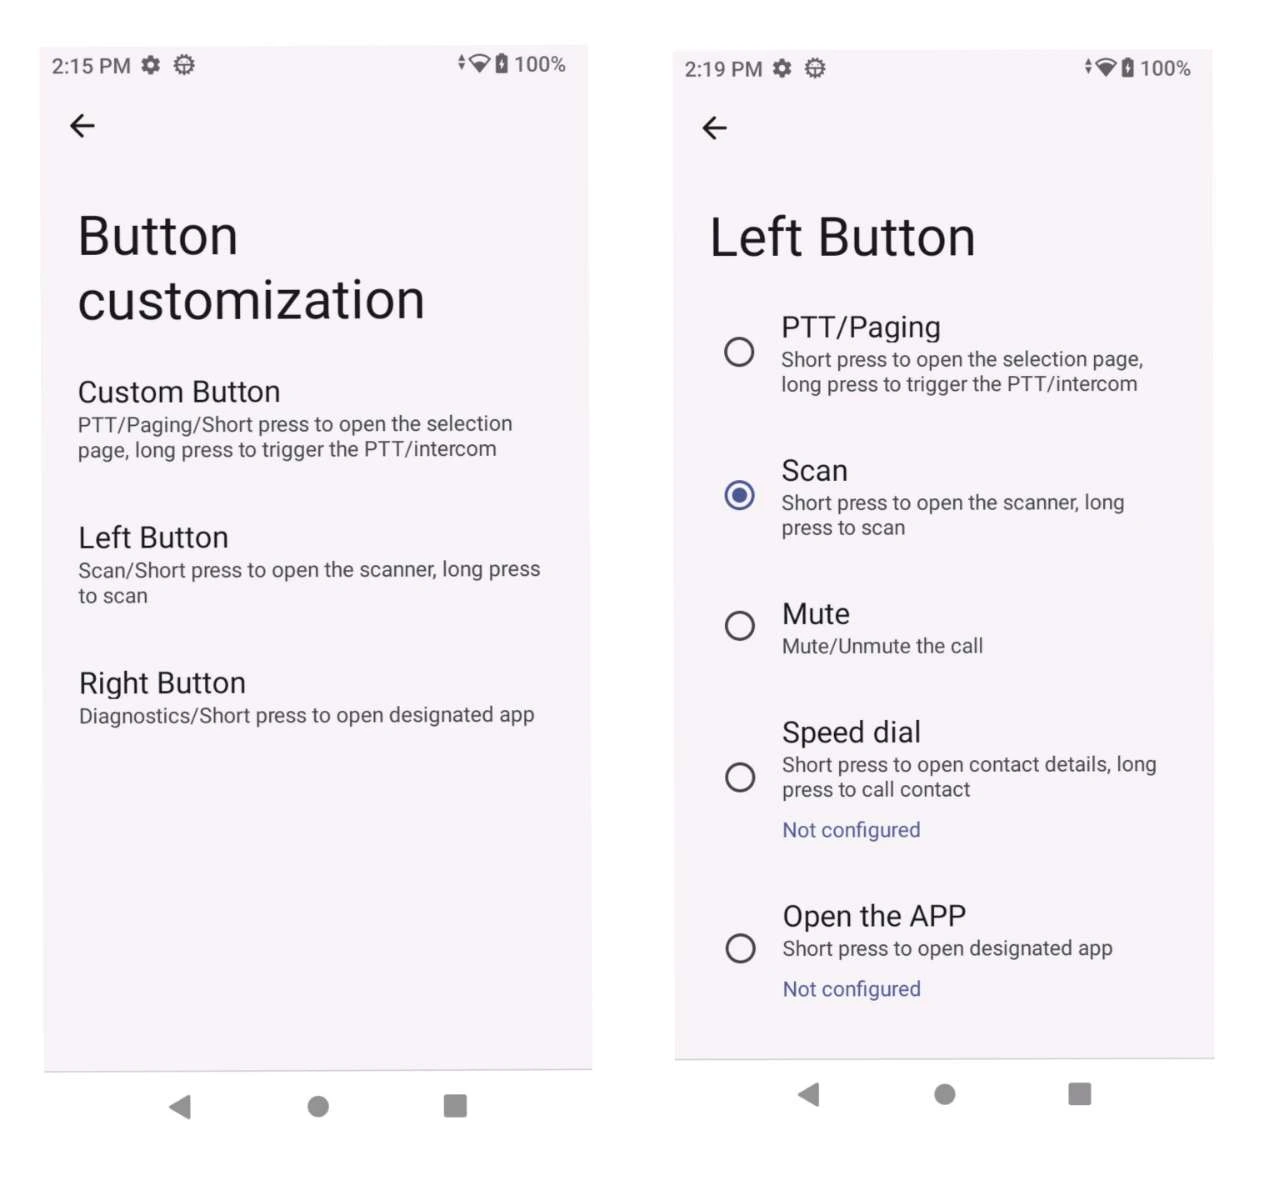
Below is a table listing the WP856 current supported specific function buttons:
Fuction Button | Description |
PTT Button | Short press to open the selection page, long press to trigger the PTT/intercom. |
Alarm Button | Short press to open the status page, long press to trigger alarm. |
Speed-Dial Button | Short press to open contact details, long press to call the contact. The contact can be changed on the Settings. |
Scan Button | Trigger a scan based on current reading mode. |
Mute Button | Mute/Unmute the call. |
Launch-APP Button | Short press to open designated app. |
Below is a table describing the default function buttons:
Fuction Button | Description |
Custom Button | PTT Button |
Left Button | Scan Button |
Right Button | Scan Button |
Function Button Intent
When a hardware button is pressed, the click event of the corresponding function button it maps to will be sent via a broadcast intent. The client app can listen for the intent to monitor the click event.
The table below lists the click intent actions:
Fuction Button | Intent Action |
PTT Button | “com.gs.intent.action.PTT_BUTTON” |
Alarm Button | “com.gs.intent.action.ALARM_BUTTON” |
Speed-Dial Button | “com.gs.intent.action.SPEED_DIAL_BUTTON” |
Scan Button | “com.gs.intent.action.SCAN_BUTTON” |
Mute Button | “com.gs.intent.action.MUTE_BUTTON” |
Launch-APP Button | “com.gs.intent.action.LAUNCH_APP_BUTTON” |
The table below shows the extra of the intent:
EXTRA_TEXT String | EXTRA type | Description |
“down” | boolean | Is the button key down. |
“up” | boolean | Is the button key up. |
“long_press” | boolean | Is the button long press. |
Here is an example on how to use the API to monitor click event of the function button:
- Start listening to click event.
private ButtonClickReceiver mButtonClickReceiver;

mButtonClickReceiver = new ButtonClickReceiver();
IntentFilter intentFilter = new IntentFilter();
intentFilter.addAction("com.gs.intent.action.PTT_BUTTON");
intentFilter.addAction("com.gs.intent.action.ALARM_BUTTON");
intentFilter.addAction("com.gs.intent.action.SPEED_DIAL_BUTTON");
intentFilter.addAction("com.gs.intent.action.SCAN_BUTTON");
intentFilter.addAction("com.gs.intent.action.MUTE_BUTTON");
intentFilter.addAction("com.gs.intent.action.LAUNCH_APP_BUTTON");
registerReceiver(mButtonClickReceiver, intentFilter);- Stop listening to click event.
unregisterReceiver(mButtonClickReceiver);- Monitor click event of function button.
public enum CustomSoftButton{
    PTT("com.gs.intent.action.PTT_BUTTON"),
    ALARM("com.gs.intent.action.ALARM_BUTTON"),
    SPEED_DIAL("com.gs.intent.action.SPEED_DIAL_BUTTON"),
    SCAN("com.gs.intent.action.SCAN_BUTTON"),
    MUTE("com.gs.intent.action.MUTE_BUTTON"),
    LAUNCH_APP("com.gs.intent.action.LAUNCH_APP_BUTTON");
    private final String action;
    private CustomSoftButton(String action){
        this.action = action;
    }

    public String getAction() {
        return action;
    }
    public static CustomSoftButton find(String action){
        for (CustomSoftButton temp: CustomSoftButton.values()){
            if(temp.action.equals(action)){
                return temp;
            }
        }
        return null;
    }
}
public class ButtonClickReceiver extends BroadcastReceiver {
    @Override
    public void onReceive(Context context, Intent intent) {
        boolean down = intent.getBooleanExtra("down",false);
        boolean up = intent.getBooleanExtra("up",false);
        boolean longPress =  intent.getBooleanExtra("long_press",false);
        CustomSoftButton button = CustomSoftButton.find(intent.getAction());
        Log.d(TAG,button + "down:"+down+",up:"+up+",longPress:"+longPress);
    }
}
Scanner API
Scanner API can be used to start/stop/monitor scanning, configure and monitor scan settings, and receive scan result.
Main intent action list
Here is a list of main intent action for Scanner API:
API | Direction | Description |
“com.gs.intent.action.START_SCAN” | Send | This is used to start scanning. |
“com.gs.intent.action.STOP_SCAN” | Send | This is used to stop scanning. |
“com.gs.intent.action.SCAN_STATUS_CHANGED” | Receive | This is used to monitor scan status. |
“com.gs.intent.action.SCAN_SET_CFG” | Send | This is used to configure scan settings. |
“com.gs.intent.action.SCAN_CFG_CHANGED” | Receive | This is used to monitor scan configuration. |
“com.gs.intent.action.SCAN_GET_CFG” | Send | This is used to get all scan configuration.
|
“com.gs.intent.action.SCAN_CFG_INFO” | Receive | |
“com.gs.intent.action.SCAN_RESULT” | Receive | This is the default action for receiving scan result. |
Start Scan
Users can start scanning by sending broadcast with the intent which action is “com.gs.intent.action.START_SCAN”.
The “com.gs.intent.action.START_SCAN” intent extra defined below:
EXTRA_TEXT String | EXTRA type | Description |
“timeout” | long | The timeout (in milliseconds) of this scanning. When it is set to -1, the common settings of scanning timeout will take effective. Value range is -1~9000. |
Here is an example on how to use scan API to start scan:
long timeout = 50000;
Intent intent = new Intent("com.gs.intent.action.START_SCAN");
intent.putExtra("timeout", timeout);
sendBroadcast(intent);
Stop Scan
Users can stop scanning by sending broadcast with the intent which action is “com.gs.intent.action.STOP_SCAN”.
Here is an example on how to use scan API to stop scan:
Intent intent = new Intent("com.gs.intent.action.STOP_SCAN");
sendBroadcast(intent);
Monitor Scan status
Users can monitor scan status by listening for the intent which action is “com.gs.intent.action.SCAN_STATUS_CHANGED”.
The “com.gs.intent.action.SCAN_STATUS_CHANGED” intent extra is defined below:
EXTRA_TEXT String | EXTRA type | Description |
status | String | The status of scanning. It does not include the scan status triggered by the scan button. Users can monitor the scan button status by listening to “com.gs.intent.action.SCAN_BUTTON”, for more details refer to “Button API”. It can be: “scanning”, |
Here is an example on how to use scan API to monitor scan status:
- Start monitoring the scan status.
private ScanReceiver mScanReceiver;

mScanReceiver = new ScanReceiver();
IntentFilter intentFilter = new IntentFilter();
intentFilter.addAction("com.gs.intent.action.SCAN_STATUS_CHANGED");
registerReceiver(mScanReceiver, intentFilter);- Stop monitoring scan status.
unregisterReceiver(mScanReceiver);- Receive and check the scan status.
public class ScanReceiver extends BroadcastReceiver {
    @Override
    public void onReceive(Context context, Intent intent) {
    if ("com.gs.intent.action.SCAN_STATUS_CHANGED".equals(intent.getAction())) {
            String status = intent.getStringExtra("status");
            boolean isOnScanning = "scanning".equals(status);
            Log.d(TAG,"isOnScanning:"+isOnScanning);
        }
    }
Configure scan settings
User can configure a set of scan settings by sending a broadcast with the intent which action is “com.gs.intent.action.SCAN_SET_CFG”.
The “com.gs.intent.action.SCAN_SET_CFG” intent extra defined below:
EXTRA_TEXT String | EXTRA type | Description |
“profile” | String | The name of the profile for configure (optional). If not set, the effective profile will be used. The name of the default profile is “Default Profile”. It is not required when “action” is “restoreSettings”, “enableScan”, or “disableScan”. |
“action” | String | The configure action. It can be:
|
“request_info” | String(json) | The request info to configure scan common settings. It is required only when the “action” is “modify”. It is non-required when “action” is “add”,”delete”,”restoreSettings”,”enableScan” or “disableScan”. |
The “request_info” json is defined below:
Key | Value type | Description |
“enable” | boolean | Enable this profile or not. |
“codingSettings” | JSONObject | The settings for coding. |
“outputModeSettings” | JSONObject | The settings for output mode. |
“inputModeSettings” | JSONObject | The settings for input mode. |
“decodePromptSettings” | JSONObject | Prompt settings when decoding is successful. |
“codeParamSettings” | JSONArray | Code param settings. Please note that only those that require updates need to be carried. The supported code list can be found by “com.gs.intent.action.SCAN_GET_CFG” with “query” set to “supportCodeParamList” . More detail see the chapter “scan configuration”. The settings of an invalid barcode type will be ignored. |
The “codingSettings” json defined below:
Key | Value type | Description |
“encoding” | String | The encoding format for recognized barcode data. It can be “UTF-8”, “GBK”, “ISO-8859-1”, “windows-1251”, “AUTO”, |
“enablePrefix” | boolean | Enable barcode data prefix or not. |
“prefix” | String | The prefix of the barcode data. |
“enableSuffix” | boolean | Enable barcode data suffix or not. |
“suffix” | String | The suffix of the barcode data. |
The “outputModeSettings” json is defined below:
Key | Value type | Description |
“outputMode” | String | The output mode for the barcode data. It can be:
|
“broadcastAdditional” | boolean | Will also output by sending broadcast or not. It will take effective only when “outputMode” is “emulateKey” or “filling”. Note: when “outputMode” is “usbHid”,”bluetoothHid” or “network”, broadcast output is automatically enabled. |
“recoverable” | boolean | Should cover the last output or not. It will be effective only when “outputMode” is “emulateKey” or “filling”. |
“emulateEnterKeyDown” | boolean | whether the Enter key press down event should also be output after outputting barcode data. |
“emulateEnterKeyUp” | boolean | whether the Enter key press up event should also be output after outputting barcode data. |
“enableSendEditorAction” | boolean | Whether to send editor action or not after outputting barcode data. |
“outputEditorAction” | String | The output editor action which will be automatically sent after outputting barcode data. It is required only when “enableSendEditorAction” is set to true. It can be:
|
“emulateKeyModeSettings” | JSONObject | The settings for emulate key mode. It will take effective only when “outputMode” is “emulateKey” or “usbHid” or “bluetoothHid”. |
“fillingModeSettings” | JSONObject | The settings for filling mode. It will take effective only when “outputMode” is “filling”. |
“broadcastModeSettings” | JSONObject | The settings for broadcast mode. It will take effective only when “outputMode” is “broadcast”. |
“customBroadcast” | JSONObject | The settings for custom broadcast. The broadcast is for receiving scan result. It includes an Extra named “SCAN_STATE”, this extra text name can not be customized. It take effective when “outputMode” is “broadcast”, or when “broadcastAdditional” is true. |
“networkModeSettings” | JSONObject | The settings for network mode. It is required only when “outputMode” is “network”. |
“enableLaunchBrowser” | boolean | Whether to automatically launch the browser when scanned data contains “http://” or “https://”. |
“enableLaunchWifiSettings” | boolean | Whether to automatically launch the Wi-Fi settings when the scanned data is the Wi-Fi SSID. |
“enableLaunchAccountSettings” | boolean | Whether to automatically launch the Account settings when scanned data is UCM QR code. |
The “emulateKeyModeSettings” json is shown below:
Key | Value type | Description |
“outputIntervalTime” | int | The output interval of the emulate key (in milliseconds). Default is 30. Value range is 1-100. |
The “fillingModeSettings” json is defined below:
Key | Value type | Description |
“outputASCII1_31AsKey” | boolean | Whether to also output by emuating key for ASCII 1~31 after outputting barcode data. |
“outputASCII32_126AsKey” | boolean | Whether to also output by emuating key for for ASCII 32~126 after outputting barcode data. |
The “broadcastModeSettings” json is defined below:
Key | Value type | Description |
“outputFailResult” | boolean | Whether to output scan failure results through broadcast. |
The “customBroadcast” json is defined below:
Key | Value type | Description |
“action” | String | The action of the output broadcast intent for barcode data. Default is “com.gs.intent.action.SCAN_RESULT”. |
“barcode1” | String | The intent Extra text name for barcode1 data. Default is “SCAN_BARCODE1”. |
“barcode2” | String | The intent Extra text name for barcode2 data. Default is “SCAN_BARCODE2”. |
“barcodeType” | String | The intent Extra text name for barcode type. Barcode type is also called code id which is defined on “codeParamSettings”. Users can get all supported codeId list by get API, more detail see the chapter “Scan configuration”. Default is “SCAN_BARCODE_TYPE”. |
“sBarcodeType” | String | The intent Extra text name for barcode type name. Barcode type name is also called “label” which is defined on “supportCodeParamList”, for more details see the chapter “Scan configuration”. Default is “SCAN_BARCODE_TYPE_NAME”. |
The “networkModeSettings” json is defined below:
Key | Value type | Description |
“protocol” | int | The network protocol type. It can be: 1: TCP. 2: UDP. |
“barcode1” | String | The server’s ip where to output result. |
“barcode2” | String | The server’s port where to output result. Value range: 0~65535. |
The “inputModeSettings” json is defined below:
Key | Value type | Description |
“inputMode” | String | The input mode of scanning. It is only for the scan button. The start/stop scan API is not affected. It can be:
|
“intervalTime” | long | The interval between adjacent scans during continuous scanning(in milliseconds). Default is 50. Value range is >=0. |
“timeout” | long | The scan timeout(in milliseconds). If the barcode is not recognized within the set time during a single scan, the scan will automatically stop. Default is 3000. Value range is 0~9000. |
“nonRepeatTimeout” | long | The timeout for inputting non duplicate barcodes(in milliseconds). If duplicate barcodes are scanned, there is no need to input data during the timeout period. Default is 5000. Value range is >=0. |
The “decodePromptSettings” json is defined below:
Key | Value type | Description |
“enableBeep” | boolean | Whether to enable the beep for prompt. |
“enableVibrate” | boolean | Whether to enable the vibrate for prompt. |
“enableLed” | boolean | Whether to enable the led indication for prompt. |
The “codeParamSettings” JSONArray item is defined below:
Key | Value type | Description |
“codeId” | String | The code id. |
“property” | String | The code property. The supported property can be retreived by “com.gs.intent.action.SCAN_GET_CFG” with “query” set to “supportCodeParamList” . For more details see the section “scan configuration”. |
“value” | String | The code property value. |
The “request_info” json example :
//disable profile
{
	"enable": false
}

//Make a set of settings
{
	"enable": true,
	"codingSettings": {
		"encoding": "UTF-8",
		"enablePrefix": true,
		"prefix": "0A0B",
		"enableSuffix": false,
		"suffix": ""
	},
	"outputModeSettings": {

		"outputMode": "emulateKey",
		"broadcastAdditional": true,
		"recoverable": true,
		"emulateEnterKeyDown": true,
		"emulateEnterKeyUp": true,
		"enableSendEditorAction": true,
		"outputEditorAction": "DONE",
		"emulateKeyModeSettings": {
			"outputIntervalTime": 100
		},
		"fillingModeSettings": null,
		"broadcastModeSettings": null,
		"customBroadcast": {
			"action": "com.scan.output.ACTION_SCAN_RESULT",
			"barcode1": "barcode1",
			"barcode2": "barcode2",
			"barcodeType": "barcodeType",
			"sBarcodeType": "sBarcodeType"
		},
		"networkModeSettings": null,
		"enableLaunchBrowser": true,
		"enableLaunchWifiSettings": true,
		"enableLaunchAccountSettings": true
	},
	"inputModeSettings": {
		"inputMode": "downUp",
		"intervalTime": 1000,
		"timeout": 3500,
		"nonRepeatTimeout": 1000
	},
	"decodePromptSettings": {
		"enableBeep": true,
		"enableVibrate": true,
		"enableLed": false
	},
	"codeParamSettings": [{
		"id": "CODE128",
		"property": "Enable",
		"value": "1"
	}]
}
Here is an example on how to use scan API to configure scan settings:
- Request configure scan settings.
//@build.gradle
dependencies {
    implementation 'com.google.code.gson:gson:2.10.1'
}
public void requestSetConfig(String profileName, String action, Profile profile){
Intent intent = new Intent("com.gs.intent.action.SCAN_SET_CFG");
intent.putExtra("profile", profileName);
intent.putExtra("action", action);
Gson gson = new Gson();
String jsonStr = gson.toJson(profile);
intent.putExtra("request_info", jsonStr);
mContext.sendBroadcast(intent);
}
public enum Action{
Modify("modify"),
Add("add"),
Remove("delete"),
RestoreSettings("restoreSettings"),
EnableScan("enableScan"),
DisableScan("disableScan");
public final String value;
Action(String value){
this.value = value;
}
}
//Request update current effective profile
Profile profile = new Profile();
newProfile.codingSettings = new CodingSettings();
newProfile.codingSettings.encoding = "UTF-8";
newProfile.codingSettings.enablePrefix = true;
newProfile.codingSettings.prefix = "0A0B";
requestSetConfig(null,Action.Modify.value, profile);
//Request add a profile
Profile newProfile = new Profile();
newProfile.enable = false;
newProfile.codingSettings = new CodingSettings();
newProfile.codingSettings.encoding = "UTF-8";
newProfile.codingSettings.enablePrefix = true;
newProfile.codingSettings.prefix = "0A0B";
newProfile.outputModeSettings = new OutputModeSettings();
newProfile.outputModeSettings.outputMode = "emulateKey";
newProfile.outputModeSettings.broadcastAdditional = true;
newProfile.outputModeSettings.recoverable = true;
newProfile.outputModeSettings.emulateEnterKeyDown = true;
newProfile.outputModeSettings.emulateEnterKeyUp = true;
newProfile.outputModeSettings.enableSendEditorAction = true;
newProfile.outputModeSettings.outputEditorAction = "DONE";
newProfile.outputModeSettings.emulateKeyModeSettings = new EmulateKeyModeSettings();
newProfile.outputModeSettings.emulateKeyModeSettings.outputIntervalTime = 100;
newProfile.outputModeSettings.fillingModeSettings = new FillingModeSettings();
newProfile.outputModeSettings.fillingModeSettings.outputASCII1_31AsKey = false;
newProfile.outputModeSettings.fillingModeSettings.outputASCII32_126AsKey = false;
newProfile.outputModeSettings.broadcastModeSettings = new BroadcastModeSettings();
newProfile.outputModeSettings.broadcastModeSettings.outputFailResult = false;
//Use default
newProfile.outputModeSettings.customBroadcast = null;
newProfile.outputModeSettings.enableLaunchBrowser = true;
newProfile.outputModeSettings.enableLaunchWifiSettings = true;
newProfile.outputModeSettings.enableLaunchAccountSettings = true;
newProfile.inputModeSettings = new InputModeSettings();
newProfile.inputModeSettings.inputMode = "downUp";
newProfile.inputModeSettings.intervalTime = 1000;
newProfile.inputModeSettings.timeout = 3500;
newProfile.inputModeSettings.nonRepeatTimeout = 1000;
newProfile.decodePromptSettings = new DecodePromptSettings();
newProfile.decodePromptSettings.enableBeep = true;
newProfile.decodePromptSettings.enableVibrate = true;
newProfile.decodePromptSettings.enableLed = true;
newProfile.codeParamSettings = new ArrayList<>();
CodeParamSettings codeParamSettings = new CodeParamSettings();
codeParamSettings.id = "CODE128";
codeParamSettings.property = "Enable";
codeParamSettings.value = "1";
newProfile.codeParamSettings.add(codeParamSettings);
requestSetConfig("demo-test",Action.Add.value, newProfile);
//Remove a profile
requestSetConfig("demo-test",Action.Remove.value, null);
//restore settings
requestSetConfig(null,Action.RestoreSettings.value, null);
//enable scan function
requestSetConfig(null,Action.EnableScan.value, null);
//disable scan function
requestSetConfig(null,Action.DisableScan.value, null);Monitor scan configuration
Users can monitor scan configuration by listening for the intent which action is “com.gs.intent.action.SCAN_CFG_CHANGED”.
The “com.gs.intent.action.SCAN_CFG_CHANGED” intent extra is defined below:
EXTRA_TEXT String | EXTRA type | Description |
“profile” | String | The name of the profile for configure (optional). When it’s not set, changes come from the effective profile. The name of the default profile is “Default Profile”. |
“action” | String | The action of how the changes come from. It can be:
|
“status” | String | The status of this change. It can be:
|
“info” | String(json) | The information for “modify” previously entered by the client. If the modification is made in another way (not via the com.gs.intent.action.SCAN_SET_CFG API), this “info” will be empty. It is required when the change is successful and the “action” is “modify”. |
The “info” json is defined as the same as “request_info” which is found on the chapter “Configure scan settings”.
The “info” json example :
//a single item
{
	"enable": false
}

//a set of settings.
{
	"enable": true,
	"codingSettings": {
		"encoding": "UTF-8",
		"enablePrefix": true,
		"prefix": "0A0B",
		"enableSuffix": false,
		"suffix": ""
	},
	"outputModeSettings": {

		"outputMode": "emulateKey",
		"broadcastAdditional": true,
		"recoverable": true,
		"emulateEnterKeyDown": true,
		"emulateEnterKeyUp": true,
		"enableSendEditorAction": true,
		"outputEditorAction": "DONE",
		"emulateKeyModeSettings": {
			"outputIntervalTime": 100
		},
		"fillingModeSettings": null,
		"broadcastModeSettings": null,
		"customBroadcast": {
			"action": "com.scan.output.ACTION_SCAN_RESULT",
			"barcode1": "barcode1",
			"barcode2": "barcode2",
			"barcodeType": "barcodeType",
			"sBarcodeType": "sBarcodeType"
		},
		"networkModeSettings": null,
		"enableLaunchBrowser": true,
		"enableLaunchWifiSettings": true,
		"enableLaunchAccountSettings": true
	},
	"inputModeSettings": {
		"inputMode": "downUp",
		"intervalTime": 1000,
		"timeout": 3500,
		"nonRepeatTimeout": 1000
	},
	"decodePromptSettings": {
		"enableBeep": true,
		"enableVibrate": true,
		"enableLed": false
	},
	"codeParamSettings": [{
		"id": "CODE128",
		"property": "Enable",
		"value": "1"
	}]
}
Here is an example on how to use scan API to monitor scan configuration:
- Start monitoring scan configuration.
private ScanReceiver mScanReceiver;

mScanReceiver = new ScanReceiver();
IntentFilter intentFilter = new IntentFilter();
intentFilter.addAction("com.gs.intent.action.SCAN_CFG_CHANGED");
registerReceiver(mScanReceiver, intentFilter);- Stop monitoring scan configuration.
unregisterReceiver(mScanReceiver);- Receive and parse the changed configuration.
//@build.gradle
dependencies {
    implementation 'com.google.code.gson:gson:2.10.1'
}
public class CodingSettings {
public String encoding;
public boolean enablePrefix;
public String prefix;
public boolean enableSuffix;
public String suffix;
}
public class EmulateKeyModeSettings {
public int outputIntervalTime;
}
public class FillingModeSettings {
public boolean outputASCII1_31AsKey;
public boolean outputASCII32_126AsKey;
}
public class BroadcastModeSettings {
public boolean outputFailResult;
}
public class CustomBroadcast {
public String action;
public String barcode1;
public String barcode2;
public String barcodeType;
public String sBarcodeType;
}
public class OutputModeSettings {
public String outputMode;
public boolean broadcastAdditional;
public boolean recoverable;
public boolean emulateEnterKeyDown;
public boolean emulateEnterKeyUp;
public boolean enableSendEditorAction;
public String outputEditorAction;
public EmulateKeyModeSettings emulateKeyModeSettings;
public FillingModeSettings fillingModeSettings;
public BroadcastModeSettings broadcastModeSettings;
public CustomBroadcast customBroadcast;
public boolean enableLaunchBrowser;
public boolean enableLaunchWifiSettings;
public boolean enableLaunchAccountSettings;
}
public class InputModeSettings {
public String inputMode;
public int intervalTime;
public int timeout;
public int nonRepeatTimeout;
}
public class DecodePromptSettings {
public boolean enableBeep;
public boolean enableVibrate;
public boolean enableLed;
}
public class CodeParamSettings {
public String id;
public String property;
public String value;
}
public class ScanReceiver extends BroadcastReceiver {
@Override
public void onReceive(Context context, Intent intent) {
if ("com.gs.intent.action.SCAN_CFG_CHANGED".equals(intent.getAction())) {
String profileName = intent.getStringExtra("profile");
String action = intent.getStringExtra("action");
String jsonStr = intent.getStringExtra("info");
String status = intent.getStringExtra("status");
Log.d(TAG,"Profile["+profileName +"] changed by action:"+action+",status:"+status);Scan configuration
Users can get scan configuration by sending broadcast with the intent which action is “com.gs.intent.action.SCAN_GET_CFG” and listening the intent which action is “com.gs.intent.action.SCAN_CFG_INFO”.
The “com.gs.intent.action.SCAN_GET_CFG” intent extra is defined below:
EXTRA_TEXT String | EXTRA type | Description |
“profile” | String | The name of the profile for query (optional).
|
“action” | String | The information for query. It can be:
|
The “com.gs.intent.action.SCAN_CFG_INFO” intent extra is defined below:
EXTRA_TEXT String | EXTRA type | Description |
“query” | String | The query information previously entered by the client. |
“profile” | String | The name of the profile previously entered by the client. It is non-required when “query” is “overview” or “supportCodeParamList”. |
“info” | String(json) | The information of profile. It is non-required when “query” is “overview” or “supportCodeParamList”. |
“overview” | String(json) | The scan enable status and all profile name list. It is required only when “query” is “overview”. |
“supportCodeParamList” | String(json) | The information and specification of the supported items of code. It is required only when “query” is “supportCodeParamList”. |
Get overview information
When querying the overview information, the “overview” json is defined below:
Key | Value type | Description |
“scanEnable” | boolean | Scan enable status. |
“profileList” | JSONArray | All profile name list. |
The “profileList” JSONArray item is defined below:
Key | Value type | Description |
“name” | String | The name of the profile. |
“effective” | boolean | Effective status. |
The “overview” json example :
{
	"scanEnable": true,
	"profileList": [{
		"name": "Default Profile",
		"effective": "true"
	}]
}
Here is an example on how to use scan API to get overview information:
- Start listening to the result.
private ScanReceiver mScanReceiver;

mScanReceiver = new ScanReceiver();
IntentFilter intentFilter = new IntentFilter();
intentFilter.addAction("com.gs.intent.action.SCAN_CFG_INFO");
registerReceiver(mScanReceiver, intentFilter);- Stop listening to the result.
unregisterReceiver(mScanReceiver);- Start request the overview information.
Intent intent = new Intent("com.gs.intent.action.SCAN_GET_CFG");
intent.putExtra("profile", profileName);
intent.putExtra("query", "overview");
mContext.sendBroadcast(intent);- Parse the overview information
//@build.gradle
dependencies {
    implementation 'com.google.code.gson:gson:2.10.1'
}
public static class Overview{
public boolean scanEnabled;
public List<SimpleProfile> profileList;
}
public static class SimpleProfile{
public String name;
public boolean effective;
}
public class ScanReceiver extends BroadcastReceiver {
@Override
public void onReceive(Context context, Intent intent) {
if ("com.gs.intent.action.SCAN_CFG_INFO".equals(intent.getAction())) {
String query = intent.getStringExtra("query");
if("overview".equals(query)){
String jsonStr = intent.getStringExtra("overview");
Gson gson = new Gson();
Overview overview = gson.fromJson(jsonStr, Overview.class);
Log.d(TAG,"Get overview:"+overview);
}
}
}
}Get profile information
When querying profile, the “info” json is defined the same as “request_info” which is found on the chapter “Configure scan settings”.
The “info” json example :
//all settings  of the profile
{
	"enable": true,
	"codingSettings": {
		"encoding": "UTF-8",
		"enablePrefix": true,
		"prefix": "0A0B",
		"enableSuffix": false,
		"suffix": ""
	},
	"outputModeSettings": {

		"outputMode": "emulateKey",
		"broadcastAdditional": true,
		"recoverable": true,
		"emulateEnterKeyDown": true,
		"emulateEnterKeyUp": true,
		"enableSendEditorAction": true,
		"outputEditorAction": "DONE",
		"emulateKeyModeSettings": {
			"outputIntervalTime": 100
		},
		"fillingModeSettings": {
			"outputASCII1_31AsKey": false,
			"outputASCII32_126AsKey": false
		},
		"broadcastModeSettings": {
			"outputFailResult": true
		},
		"customBroadcast": {
			"action": "com.scan.output.ACTION_SCAN_RESULT",
			"barcode1": "barcode1",
			"barcode2": "barcode2",
			"barcodeType": "barcodeType",
			"sBarcodeType": "sBarcodeType"
		},
		"networkModeSettings": null,
		"enableLaunchBrowser": true,
		"enableLaunchWifiSettings": true,
		"enableLaunchAccountSettings": true
	},
	"inputModeSettings": {
		"inputMode": "downUp",
		"intervalTime": 1000,
		"timeout": 3500,
		"nonRepeatTimeout": 1000
	},
	"decodePromptSettings": {
		"enableBeep": true,
		"enableVibrate": true,
		"enableLed": false
	},
	"codeParamSettings": [{
		"id": "CODE128",
		"property": "Enable",
		"value": "1"
	}]
}
Here is an example on how to use scan API to get scan configuration:
- Start listening to the result.
private ScanReceiver mScanReceiver;

mScanReceiver = new ScanReceiver();
IntentFilter intentFilter = new IntentFilter();
intentFilter.addAction("com.gs.intent.action.SCAN_CFG_INFO");
registerReceiver(mScanReceiver, intentFilter);- Stop listening to the result.
unregisterReceiver(mScanReceiver);- Start requesting the scan configuration.
Intent intent = new Intent("com.gs.intent.action.SCAN_GET_CFG");
intent.putExtra("profile", profileName);
intent.putExtra("query", "profile");
mContext.sendBroadcast(intent);- Parse the scan configuration.
//@build.gradle
dependencies {
    implementation 'com.google.code.gson:gson:2.10.1'
}
public class CodingSettings {
public String encoding;
public boolean enablePrefix;
public String prefix;
public boolean enableSuffix;
public String suffix;
}
public class EmulateKeyModeSettings {
public int outputIntervalTime;
}
public class FillingModeSettings {
public boolean outputASCII1_31AsKey;
public boolean outputASCII32_126AsKey;
}
public class BroadcastModeSettings {
public boolean outputFailResult;
}
public class CustomBroadcast {
public String action;
public String barcode1;
public String barcode2;
public String barcodeType;
public String sBarcodeType;
}
public static class NetworkModeSettings {
public int protocol;
public String serverIp;
public int serverPort;
}
public class OutputModeSettings {
public String outputMode;
public boolean broadcastAdditional;
public boolean recoverable;
public boolean emulateEnterKeyDown;
public boolean emulateEnterKeyUp;
public boolean enableSendEditorAction;
public String outputEditorAction;
public EmulateKeyModeSettings emulateKeyModeSettings;
public FillingModeSettings fillingModeSettings;
public BroadcastModeSettings broadcastModeSettings;
public CustomBroadcast customBroadcast;
public boolean enableLaunchBrowser;
public boolean enableLaunchWifiSettings;
public boolean enableLaunchAccountSettings;
}
public class InputModeSettings {
public String inputMode;
public int intervalTime;
public int timeout;
public int nonRepeatTimeout;
}
public class DecodePromptSettings {
public boolean enableBeep;
public boolean enableVibrate;
public boolean enableLed;
}
public class CodeParamSettings {
public String id;
public String property;
public String value;
}
public class Profile {
public boolean enable;
public CodingSettings codingSettings;
public OutputModeSettings outputModeSettings;
public InputModeSettings inputModeSettings;
public DecodePromptSettings decodePromptSettings;
public List<CodeParamSettings> codeParamSettings;
}
public class ScanReceiver extends BroadcastReceiver {
@Override
public void onReceive(Context context, Intent intent) {
if ("com.gs.intent.action.SCAN_CFG_INFO".equals(intent.getAction())) {
String query = intent.getStringExtra("query");
if("profile".equals(query)){
String name = intent.getStringExtra("profile");
String jsonStr = intent.getStringExtra("info");
Gson gson = new Gson();
Profile profile = gson.fromJson(jsonStr, Profile.class);
Log.d(TAG,"Get the scan settings profile:"+name+" info:"+jsonStr );
}
}
}
}Get supported code param information
When query the supported code param list, the “supportCodeParamList” json is defined below:
Key | Value type | Description |
“code_id” | String | The code id of this set of options. |
“label” | String | The label of the main item. |
“id” | String | The property of the main item. |
“category” | String | The category of this set of options. It can be:
|
“view_type” | String | The view type of the main item. It can be:
|
“data_type” | String | The data type of the main item. It can be: “int”. |
“values” | String | The valid range of the property value for the main item. |
“default” | String | The default value of the property value for the main item. |
“index” | String | The index of the main item. |
“items” | JSONArray | The sub items of this set of options. |
The “items” JSONArray item is defined below:
Key | Value type | Description |
“id” | String | The property of the item. |
“label” | String | The lable of the item. |
“view_type” | String | The view type of the item. It can be:
|
“data_type” | String | The data type of the item. It can be “int”. |
“values” | String | The valid range of the property value for the item. |
“value_labels” | String | The valid range of the property value labels for the item. |
“default” | String | The default value of the property value for the item. |
“index” | String | The index of the item. |
Here is an example on how to use scan API to get supported code param list:
- Start listening to the result.
private ScanReceiver mScanReceiver;

mScanReceiver = new ScanReceiver();
IntentFilter intentFilter = new IntentFilter();
intentFilter.addAction("com.gs.intent.action.SCAN_CFG_INFO");
registerReceiver(mScanReceiver, intentFilter);- Stop listening to the result.
unregisterReceiver(mScanReceiver);- Start requesting the supported code param list.
Intent intent = new Intent("com.gs.intent.action.SCAN_GET_CFG");
intent.putExtra("profile", profileName);
intent.putExtra("query", "supportCodeParamList");
mContext.sendBroadcast(intent);- Parse the scan code param list.
//@build.gradle
dependencies {
    implementation 'com.google.code.gson:gson:2.10.1'
}
public static class CodeParam {
private String code_id;
private String label;
private String id;
private String category;
private String view_type;
private String data_type;
private String values;
private String value_labels;
@SerializedName("default")
private String defaultValue;
private String index;
private List<CodeParamItem> items;
@Override
public String toString() {
return "CodeParam{" +
"code_id='" + code_id + '\'' +
", label='" + label + '\'' +
", id='" + id + '\'' +
", category='" + category + '\'' +
", view_type='" + view_type + '\'' +
", data_type='" + data_type + '\'' +
", values='" + values + '\'' +
", value_labels='" + value_labels + '\'' +
", defaultValue='" + defaultValue + '\'' +
", index='" + index + '\'' +
", items=" + items +
'}';
}
}
public static class CodeParamItem {
private String id;
private String label;
private String view_type;
private String data_type;
private String values;
private String value_labels;
@SerializedName("default")
private String defaultValue;
private String index;
@Override
public String toString() {
return "CodeParamItem{" +
"id='" + id + '\'' +
", label='" + label + '\'' +
", view_type='" + view_type + '\'' +
", data_type='" + data_type + '\'' +
", values='" + values + '\'' +
", value_labels='" + value_labels + '\'' +
", defaultValue='" + defaultValue + '\'' +
", index='" + index + '\'' +
'}';
}
}
public class ScanReceiver extends BroadcastReceiver {
@Override
public void onReceive(Context context, Intent intent) {
if ("com.gs.intent.action.SCAN_CFG_INFO".equals(intent.getAction())) {
String query = intent.getStringExtra("query");
if("supportCodeParamList".equals(query)){
String jsonStr = intent.getStringExtra("supportCodeParamList");
Gson gson = new Gson();
List<CodeParam> codeParamList = gson.fromJson(jsonStr, new TypeToken<List<CodeParam>>() {}.getType());
Log.d(TAG,"Get the supported code param list:"+codeParamList);
}
}
}
}Receive scan result
Users can monitor scan result by listening for the specific intent. The default action is “com.gs.intent.action.SCAN_RESULT”. This intent can be custom, more detail please refer to the chapter “Configure scan settings”.
Here is an example on how to use default API to receive scan result:
- Start monitoring scan result .
private ScanReceiver mScanReceiver;

mScanReceiver = new ScanReceiver();
IntentFilter intentFilter = new IntentFilter();
intentFilter.addAction("com.gs.intent.action.SCAN_RESULT");
registerReceiver(mScanReceiver, intentFilter);- Stop monitoring scan result.
unregisterReceiver(mScanReceiver);- Receive and parse the scan result.
public class ScanReceiver extends BroadcastReceiver {
    @Override
    public void onReceive(Context context, Intent intent) {
    if ("com.gs.intent.action.SCAN_RESULT".equals(intent.getAction())) {
  String scanState = intent.getStringExtra("SCAN_STATE");
            String barcode1 = intent.getStringExtra("SCAN_BARCODE1");
            String barcode2 = intent.getStringExtra("SCAN_BARCODE2");
            String barcodeType = intent.getStringExtra("SCAN_BARCODE_TYPE");
            String barcodeTypeName = intent.getStringExtra("SCAN_BARCODE_TYPE_NAME");

            Log.d(TAG,"scanSate:"+scanState+",barcode1:"+barcode1+",barcode2:"+barcode2+",barcodeType:"+barcodeType+",barcodeTypeName:"+barcodeTypeName);
        }
    }
DEVELOP APPS WITH ADB
WP856 support adb debugging and wireless debugging just like most Android devices. More detail on adb tool can be find in Configure on-device developer options which shows a way of development through adb network connection.
Enable Developer options
Find the Build number option on Settings→About phone. Tap the Build Number option seven times until you see the message You are now a developer!. This enables developer options on your device. Now you will find the Developer options on Settings→System.
Enable USB debugging on your device
Enable USB debugging in the device system settings under Developer options.
ADB Connect
Use the command “adb connect IP” to connect to the device. For example:
adb connect 192.168.100.1
Check ADB Connect Status
Use the command “adb devices” to check the adb connect status. If below content is displayed, it means connection is successful:
List of devices attached
192.168.100.1:5555 device
ADB Disconnect
Use the command “adb disconnect” to disconnect all devices.
API DEMO
In the SDK package, users can find a Demo Application using the SDK APIs of WP856, named ApiDemo.
SUPPORTED DEVICES
Model | Android OS | Supported | Firmware |
WP856 | Android13 | Yes | 1.0.0.1 or Higher |
CHANGE LOG
This section documents significant changes from previous versions of API Specification for WP856. Only major new features or major document updates are listed here. Minor updates for corrections or editing are not documented here.
API Version 1.0.3
- This is the initial version.
COPYRIGHT
©2025 Grandstream Networks, Inc. https://www.grandstream.com
All rights reserved. Information in this document is subject to change without notice. Reproduction or transmittal of the entire or any part, in any form or by any means, electronic or print, for any purpose without the express written permission of Grandstream Networks, Inc. is not permitted.
The latest electronic version of this guide is available for download here:
https://www.grandstream.com/support
Grandstream is a registered trademark and the Grandstream logo is a trademark of Grandstream Networks, Inc. in the United States, Europe, and other countries.
CAUTION
Changes or modifications to this product not expressly approved by Grandstream, or operation of this product in any way other than as detailed by this guide, could void your manufacturer warranty.
WARNING
Please do not use a different power adapter with devices as it may cause damage to the products and void the manufacturer warranty.