


Wave Desktop supports the functions of Wave administrator.
Wave administrator can configure Wave related functions as an enterprise administrator (UCM administrator). Currently, you can configure LiveChat’s Chatbot, view and message records, and enable the third-party integration interface for sending messages.
PREREQUISITES
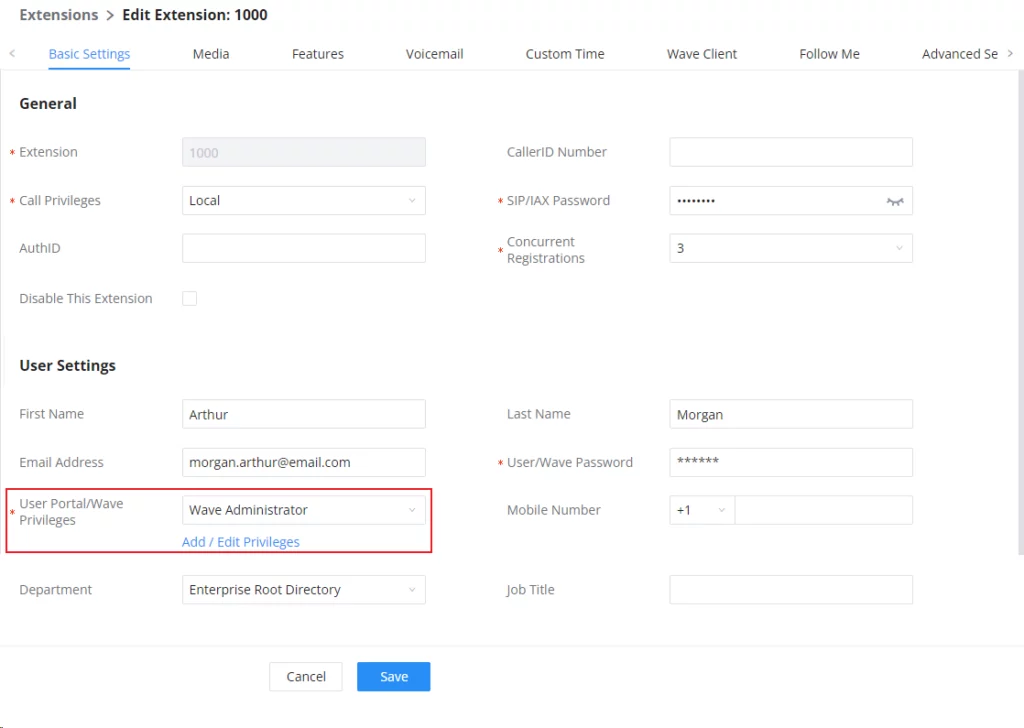
The UCM administrator should enable the Wave Administrator privileges for the specific extension by accessing the administrator web UI of the UCM, then navigate to Extension/Trunk > Extensions, then on “User Portal/Wave Privileges”, select “Wave Administrator” as shown in the figure below.
OPEN MANAGEMENT PORTAL
Chatbot
To configure the Chatbot feature please refer to the Chatbot Configuration Guide: https://documentation.grandstream.com/knowledge-base/live-chat-chatbot-admin-guide/
Integration
Third-party systems can send notification messages to Wave users through the following interfaces.
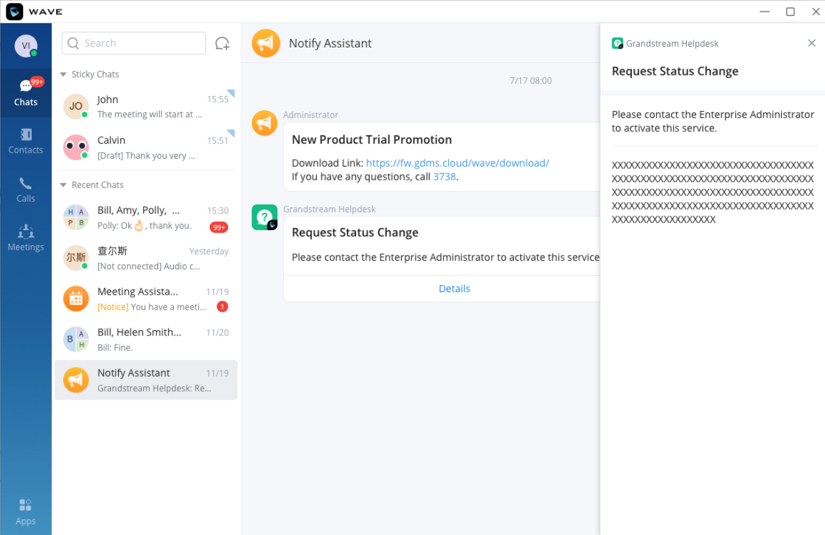
For example, the third-party system “Helpdesk” sends notifications to Wave users when there is a new ticket or the ticket status changes, and then the “Helpdesk” system uses the interface to send notification messages to the specified extension or email address.
These extension users can receive notification messages when they log in to the Wave desktop or mobile client, as follows:
Enable Interface Link
To set an Interface Link please follow the steps below:
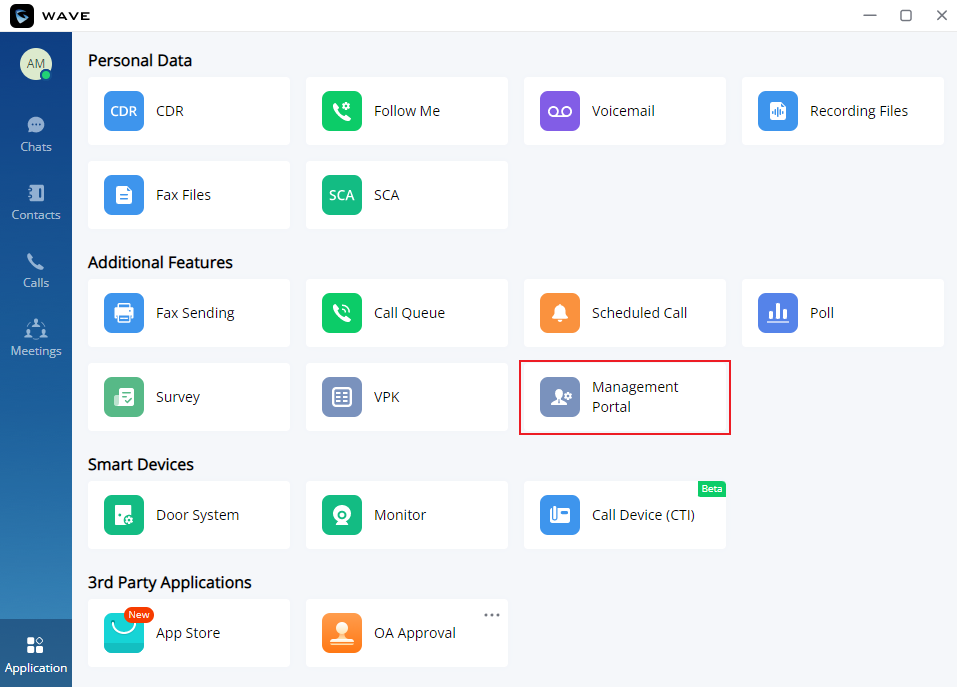
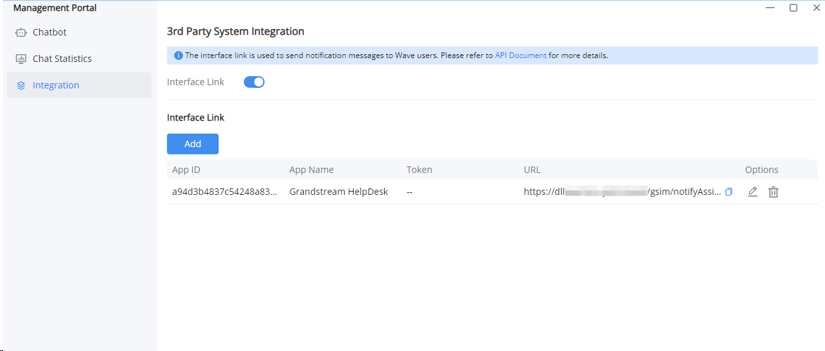
- Log in to the Wave client, and the Wave administrator opens the management page in Application > Management Portal > Integration.
- Click to enable interface link. After enabling, all the following interface links will be valid. Otherwise, all interface links will be invalid.
Add Interface Link
Users can create different interface links for different third-party systems to facilitate the management of the use of third-party systems.
- Log in to the Wave client, and the Wave administrator opens the management page in Application > Management Portal > Integration.
- Click “Add” to add a new interface link.
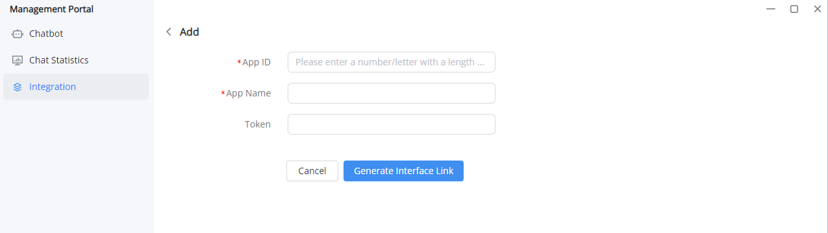
APP ID | Enter your APP ID for unique identification. It can be a random string or your custom Wave add-in app ID. If you want to send a notification message to a Wave user, who can start the Wave add-in to parse the detailed data, you can enter your custom add-in APP ID in the Wave app store. Note: To learn how to upload a custom add-in to Wave’s application store, please refer to the following link: https://doc.grandstream.dev/WAVE/EN/#api-Overview-Introduction |
App Name | Enter a name, which will be displayed when the Wave client receives notification messages. |
Token | Optional, you can enter a random string for authentication when using the interface. Parameters for calling the interface: secret=”my_token”; |
Interface Link | An interface link corresponding to this APP ID will be generated for use by third-party systems. |
How to Call the Interface
Third-party systems can call the interface link through the following method to send notification messages to Wave users.
Post:
/gsim/notifyingAssistant/:urlToken
Request example:
curl -i /gsim/notifyingAssistant/:urlToken
Header:
Field Name | Type | Description |
X-Hub-Signature-256 | string | Optional. This parameter is required only when “token” is set when adding a new interface link. |
Parameter:
Field | Type | Required | Length | Description |
to | array<string> | yes | 1~500 | The extension or email address that receives the notification message |
title | string | yes | 1~128 | The title of the notification message, which will be displayed in the Wave notification assistant |
description | string | yes | 1~500 | The message content will be directly displayed as a message in the Wave notification assistant |
target | string | no | 0~36 | Optional. If you want the new notification message of the same object (such as the same ticket) to overwrite the old notification message, you can fill in the ID of this object (such as the ticket ID).
|
messageType | string | yes | 1~128 | The message content format can be: “json”, “text”, the default is “text”. |
data | string | no | 0~4000 | The details of the notification will not be directly displayed in the notification assistant. If you click the “Details” button, it will be parsed.
|
Request Parameter Example:
#!/bin/bash

body='{"to":["1001"],"title":"my title...","description":"my description...","data":"{}","target":"208806031344000888888"}';
secret="my_token";
signature=$(echo -n "$body" | openssl -sha256 -hmac "$secret"| awk '{print $2}');
curl -X POST -d "$body" -k "https://c074ad2abcd.a.gdms.cloud/gsim/notifyAssistant/0-aae3e891849641069cfc37ea3d677d98-c074ad2a4b5c" -H "X-Hub-Signature-256: sha256=$signature";
Body Example:
{
	"to": [
		"support@test.com",
		"1001"
	],
	"title": "my title...",
	"description": "my description...",
	"messageType": "json",
	"target":"208806031344000888888",
	"data": "{\"TicketID\":\"123456\",\"TicketNumber\":\"654321\",\"ProductMode\":\"xxx\",  \"TicketTitle\":\"[title]\",\"TicketDescription\":\"[description]\",\"MacAddress\":\"[MAC]\",\"Bug\":\"[bug]\",\"TicketURL\":\"[...]\"}"
}
Response:
Field Name | Type | Description |
im | object | |
action | string | interface name |
type | string | resp |
tid | number | response id |
errorCode | number | error code |
errorInfo | string | error detail |
Response Parameter Example:
{
     "im": {
          "action": "notifyAssistant",
          "type": "resp",
          "tid": 1709082631725,
          "errorCode": 0,
          "errorInfo": "success"
     }
}
Error Code List:
Error Code | Description |
600 | Webhook disabled |
599 | Data invalid length |
598 | Description invalid length |
597 | Title invalid length |
548 | Request body too long |
508 | Redis operation unknown error |
506 | Invalid key |
503 | Server abnormality |
501 | Server internal DB error |
468 | UCM device info is invalid |
431 | Stream read failed, failed to read webhook request body |
426 | User permission denied, the current user does not have permission |
420 | User not found |
411 | Error data type |
402 | Unknown action, it may be because the current UCM firmware version does not support this function |
400 | Illegal request parse json fail, the json format is incorrect and json parsing failed |
Edit/Delete Interface Link
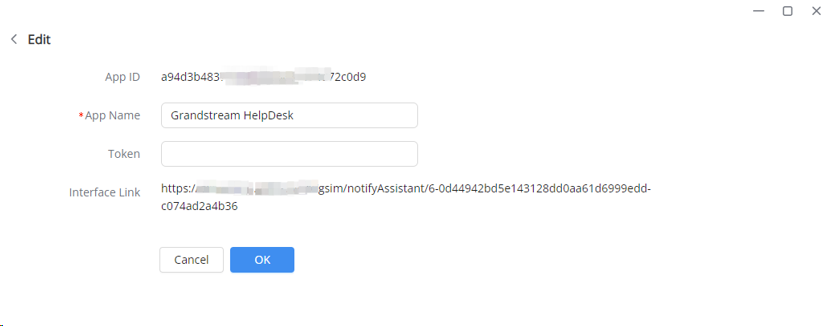
- Log into Wave Desktop client and open the management page in Application > Management Portal Integration
- Click the button
 to edit the interface link.Only the APP Name and Token can be edited, and the others cannot be edited.
- Click on the button
 to delete the interface. After deletion, the link to this interface will be invalid.
