


Overview
The GWN7605CLR is an outdoor Wi-Fi access point with a Phoenix Connector that provides stable elecrtical connection, supports quick dissasembly and installation, and is convenient for maintenance. The GWN7605CLR comes equipped with dual-band 2×2:2 MU-MIMO technology and a sophisticated antenna design for extended coverage range of up to 150 meters. It offers IP66-level weatherproof capabilities to ensure equipment stability. It uses a controller -less distributed network management architecture in which the controller is embedded within the product’s Web user interface for easy administration of locally deployed Wi-Fi APs. The GWN7605CLR is also supported by GDMS Networking and GWN Manager, Grandstream’s cloud and on -premise Wi-Fi management platform. Powered by market-leading technology for advanced QoS, fast roaming, mesh networks, captive portals, support for 100+ concurrent clients and 2×1 Gigabit Ethernet ports with PoE+, the GWN7605CLR is an ideal Wi-Fi access point for low-latency jitter-sensitive real-time applications (such as voice/video-over-Wi-Fi devices & applications) in low-to-medium user density scenarios
Package Contents
The GWN7605CLR package includes the following components required for installation and setup:
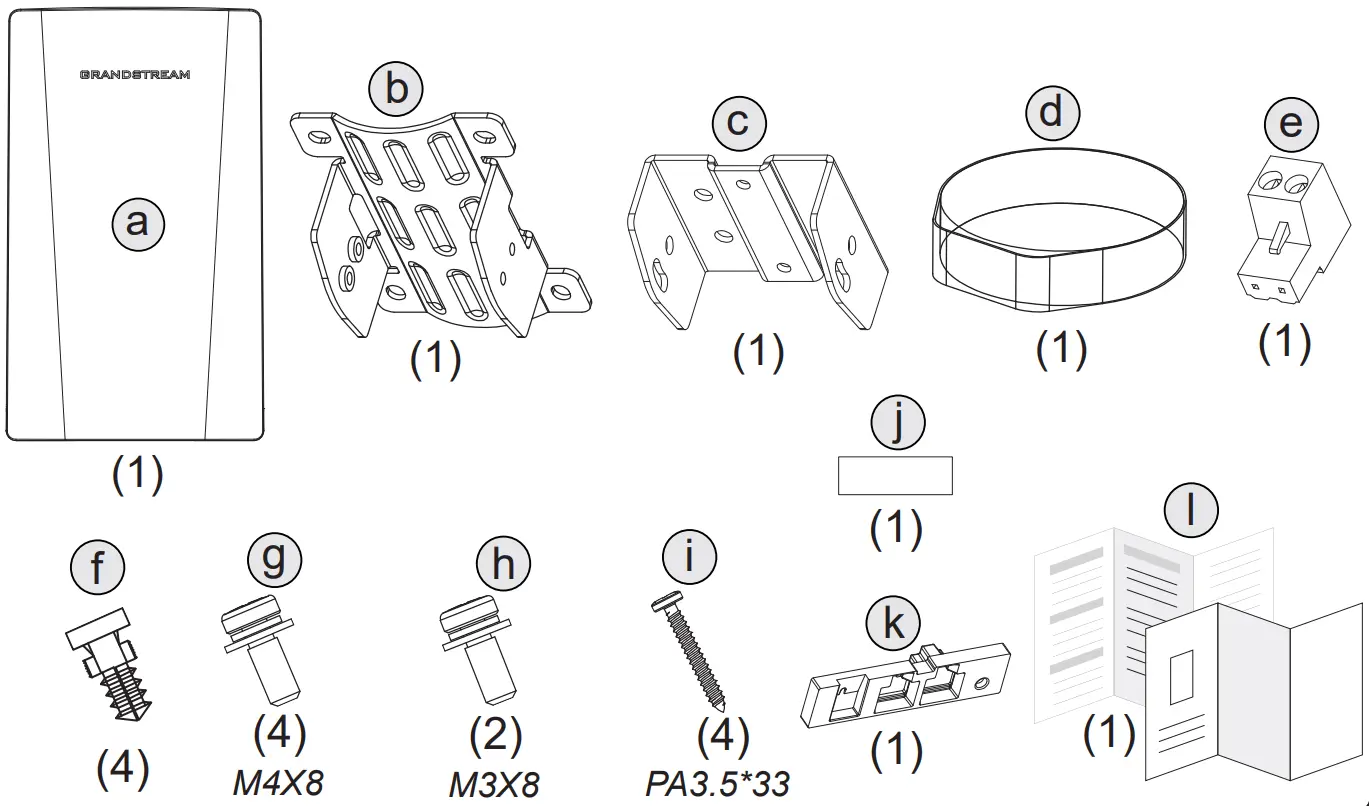
Letter | Qty | Item Description |
a | 1 | GWN7605CLR Device |
b | 1 | Wall/Pole Bracket |
c | 1 | Device Bracket |
d | 1 | Steel Strap |
e | 1 | Terminal Power Adapter (12-24V input) |
f | 4 | Expansion Bolts |
g | 4 | Screws (M4×8) |
h | 2 | Screws (M3×8) |
i | 4 | Screws (PA3.5×33) |
j | 1 | Adhesive Sticker |
k | 1 | Rubber Waterproof Accessory |
L | 1 | Quick Installation Leaflet |
Package Contents
Hardware Overview
The GWN7605CLR features:
- DC IN (12–24V) terminal block (optional power input)
- NET1 Port (PoE IN)
- NET2 Port
- RST button (factory reset)
- Grounding point (for outdoor grounding)
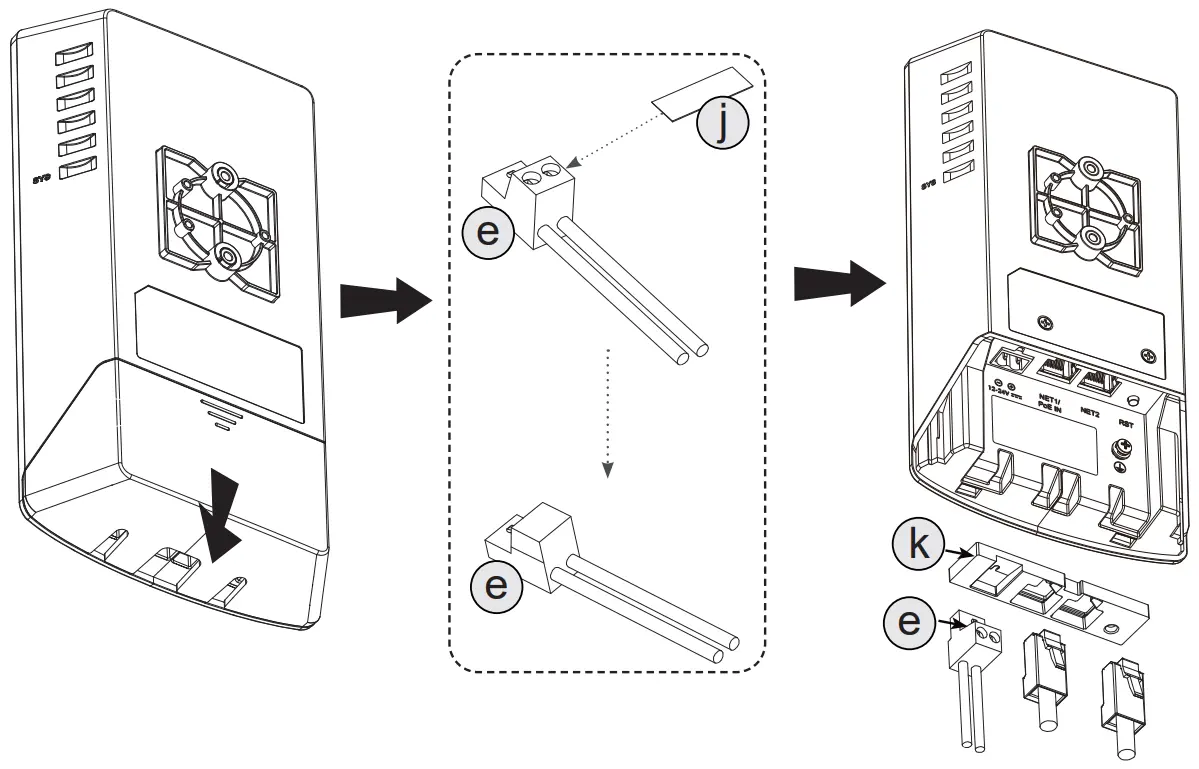
Port | Description |
12–24V (DC IN) | Terminal block input for 12–24V DC power. Use this option when PoE is not available. |
NET1 (PoE IN) | Gigabit Ethernet port (10/100/1000 Mbps) providing network connectivity and PoE power input. |
NET2 | Secondary Gigabit Ethernet port (10/100/1000 Mbps) for network connectivity. |
RST | Reset button/pinhole to restore factory settings (press and hold to reset). |
⏚ Grounding Point | Chassis grounding point for connecting to earth ground (recommended for outdoor installations to reduce surge/lightning risk). |
Ports
Hardware Installation
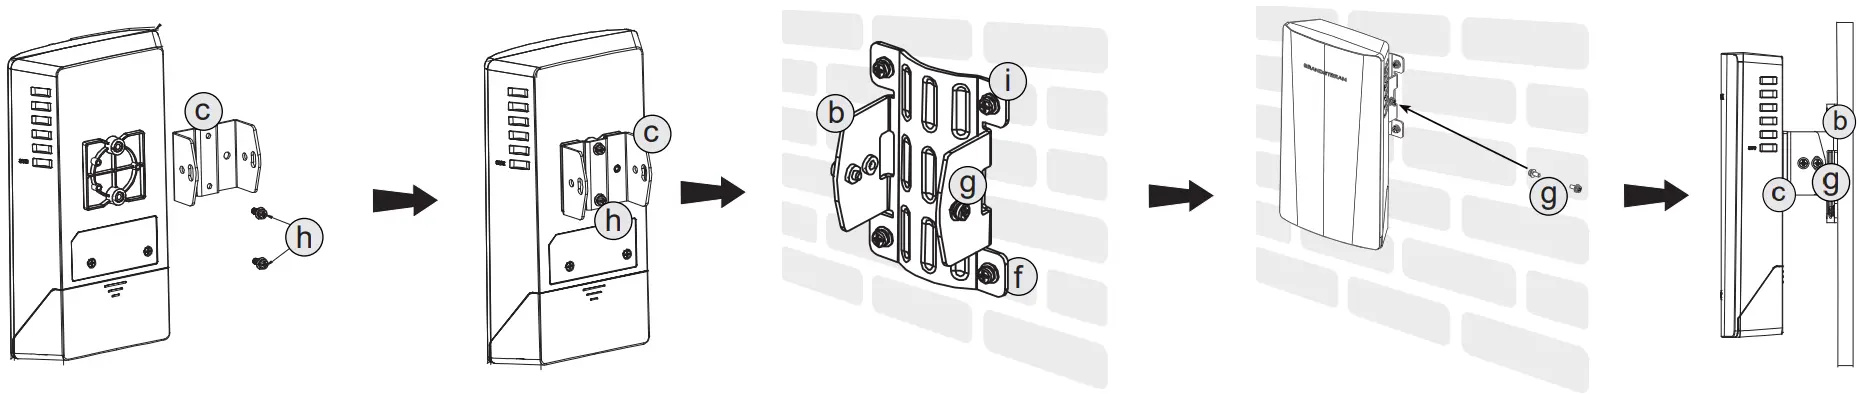
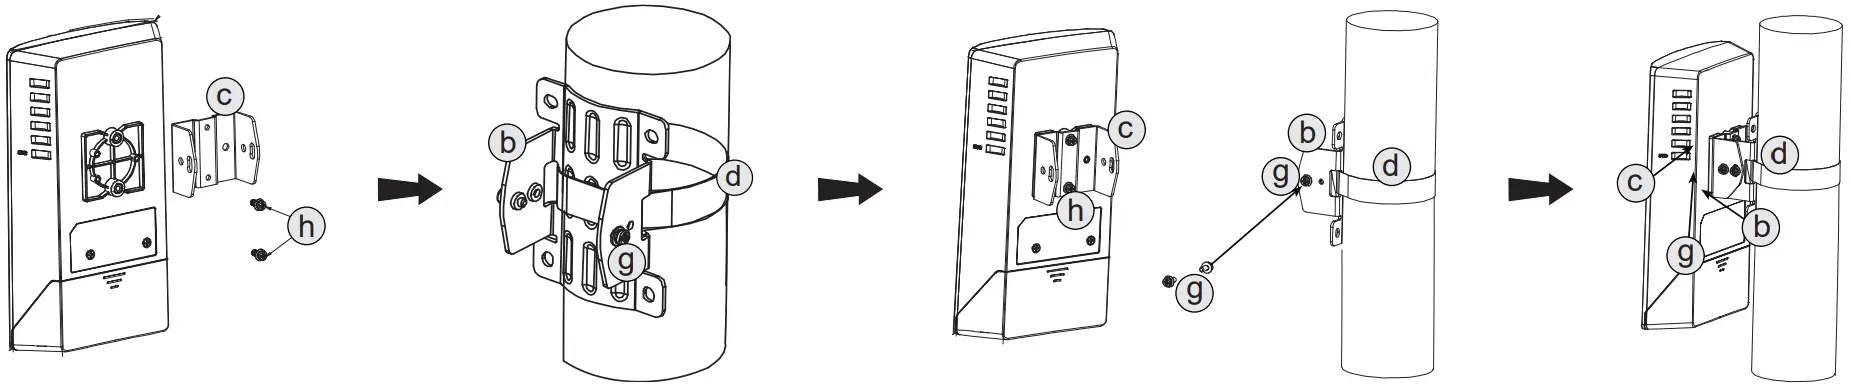
GWN7605CLR can be mounted on the wall or on a metal bar. Please refer to the following steps for the appropriate installation.
Wall Mount
- Attach the Device Bracket: Use the M3 screws to secure the device bracket to the back of the GWN7605CLR.
- Fix the Wall Bracket: Mount the wall/pole bracket to the wall using the expansion bolts and long screws.
- Hook & Secure the Device: Align the device bracket with the mounted wall bracket, hook it into place, and secure it using the screws for firm attachment.
- Tighten and Check: Ensure all screws are secure, and the device is properly fixed and facing the correct direction.
Pole Mount
- Attach the Device Bracket: Use the M3 screws to secure the device bracket to the back of the GWN7605CLR.
- Fix the Pole Bracket: Insert the steel strap through the pole bracket and wrap it around the pole. Tighten the strap until the bracket is snug and level.
- Hook & Secure the Device: Align the device bracket with the mounted pole bracket, hook it into place, and secure it with screws for a firm and stable attachment.
- Final Check: Confirm the device is tightly mounted, facing the correct direction, and all fasteners are secure.
Rubber Waterproof Plug Installation
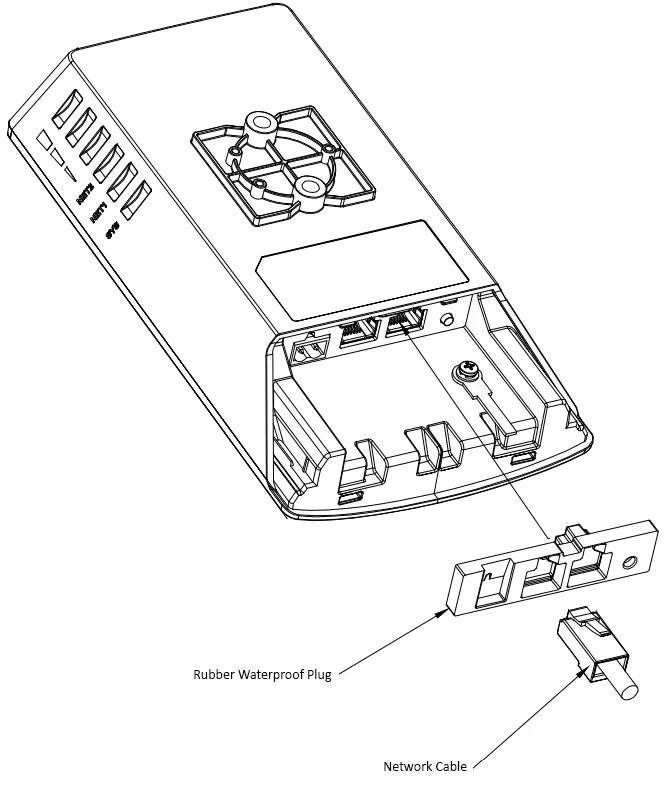
The GWN7605CLR includes a rubber waterproof plug used to seal unused ports and maintain IP66 protection for outdoor use. Depending on your power method and port usage (NET1, NET2, DC IN), the plug can be configured in two ways:
Case 1: Using only NET1 (PoE IN)
If you’re using only NET1 for both power and data (typical for most PtP deployments):
- You do not remove any rubber inserts.
- You insert the network cable (RJ45) directly through the main open port on the rubber plug.
- The other two plug sections (NET2 + DC IN) stay sealed.
Case 2: Using NET2 and/or 12-24V DC Input
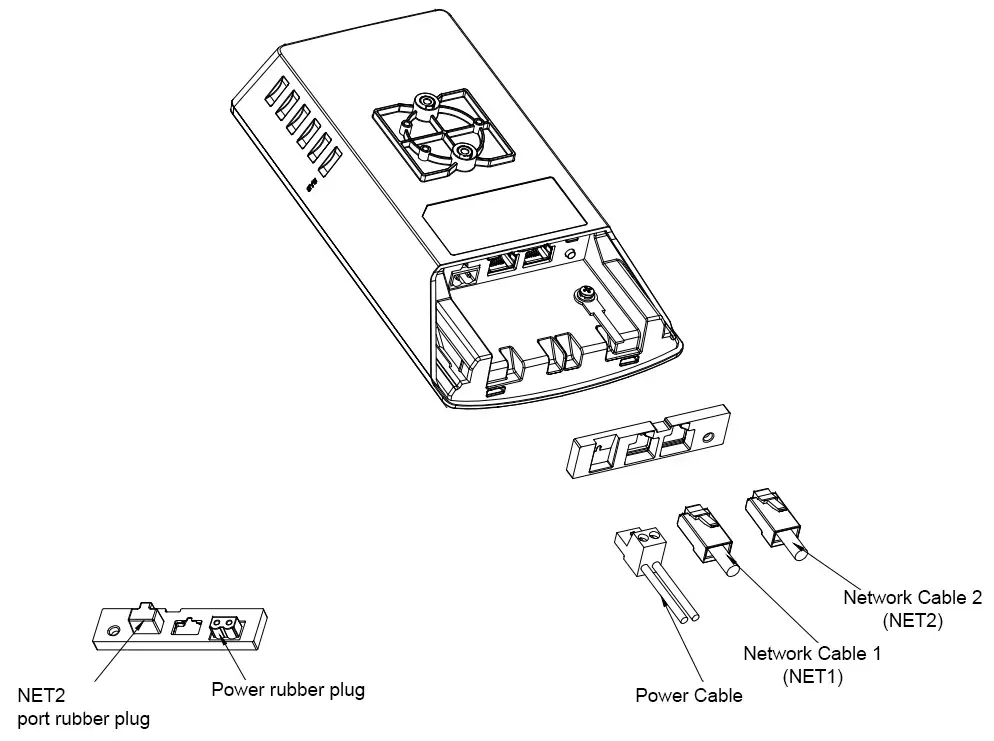
If you’re using NET2 (PoE OUT) to power another device (e.g., camera) and/or supplying power via the 12-24V terminal block:
- You need to remove the corresponding rubber seals from the backside of the plug:
- Cut the rubber plug with a blade for NET2 if you’re inserting a second Ethernet cable.
- Cut the rubber plug with a blade for DC IN if using a 12-24V terminal adapter.
- Insert the cables through the newly opened holes.
- Then fit the rubber plug into the main unit as usual.
Connect to GWN7605CLR Default Wi-Fi Network
GWN7605CLR can be used as a standalone access point out of the box, or after a factory reset with Wi-Fi enabled by default.
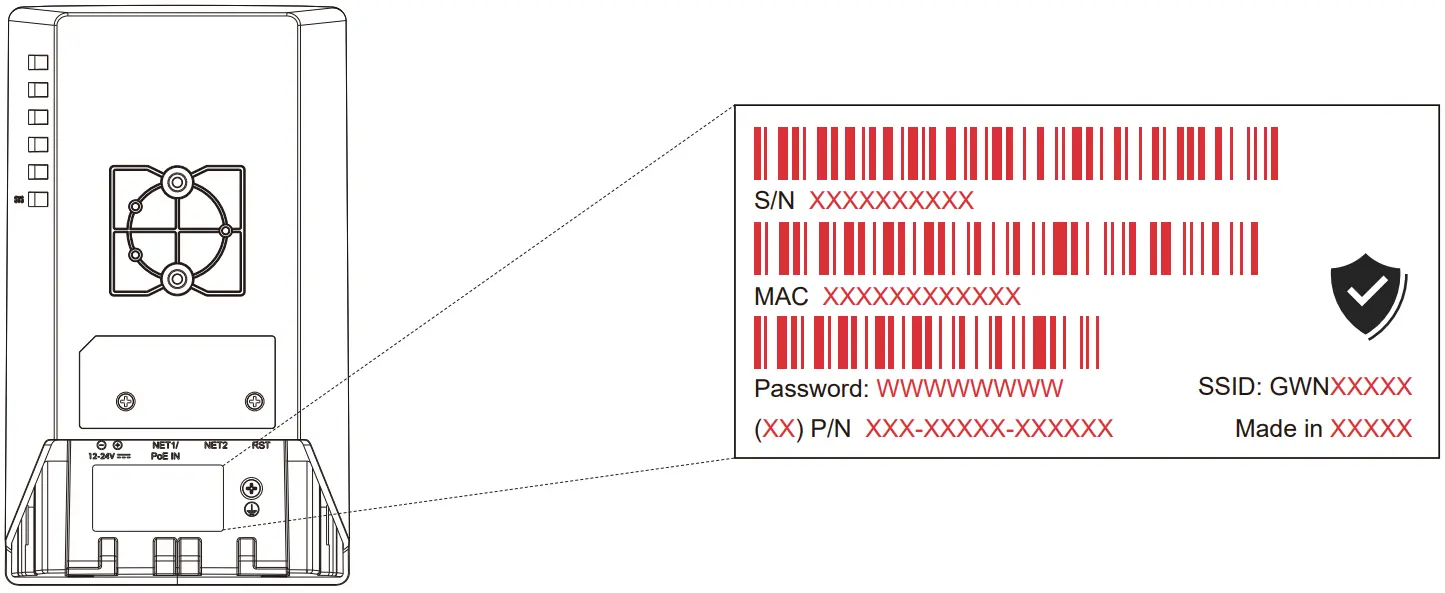
After powering the GWN7605CLR and connecting it to the network, GWN7605CLR will broadcast a default SSID based on its MAC address GWN[MAC’s last 6 digits], and a random password.
Accessing the Configuration Interface
A computer connected to the same network as the GWN7605CLR, or connected to its default Wi-Fi, can access the configuration interface using one of the following methods:
Method 1: Using the Device’s MAC Address
- Locate the MAC address on the sticker at the back of the device.
- From a computer connected to the same network as the GWN7605CLR, type in the following address using the GWN7605CLR’s MAC address on your browser https://gwn_<mac>.local
Method 2: Using the GWN Discovery Tool
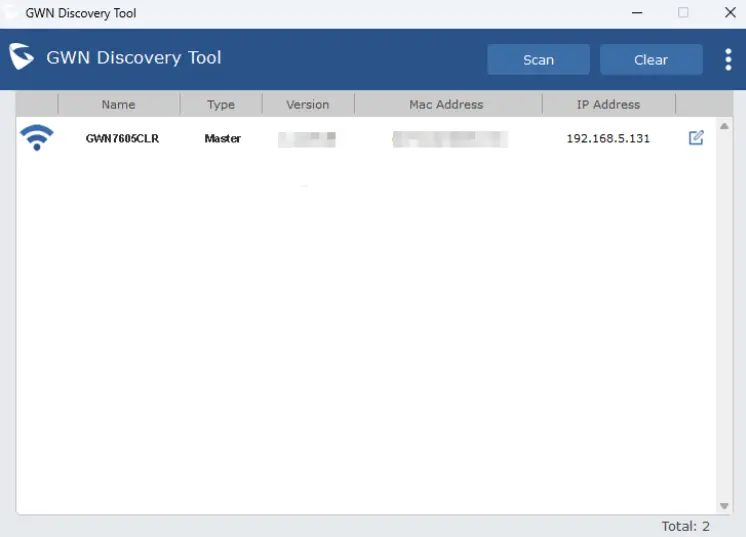
- Download and install the GWN Discovery Tool from the following link: https://www.grandstream.com/tools/GWNDiscoveryTool.zip
- Open the GWN Discovery Tool, and click on Scan.
- The tool will display all GWN devices on the network with their MAC and IP addresses.
- Click on Manage Device or copy the IP into your browser to access the Web UI.
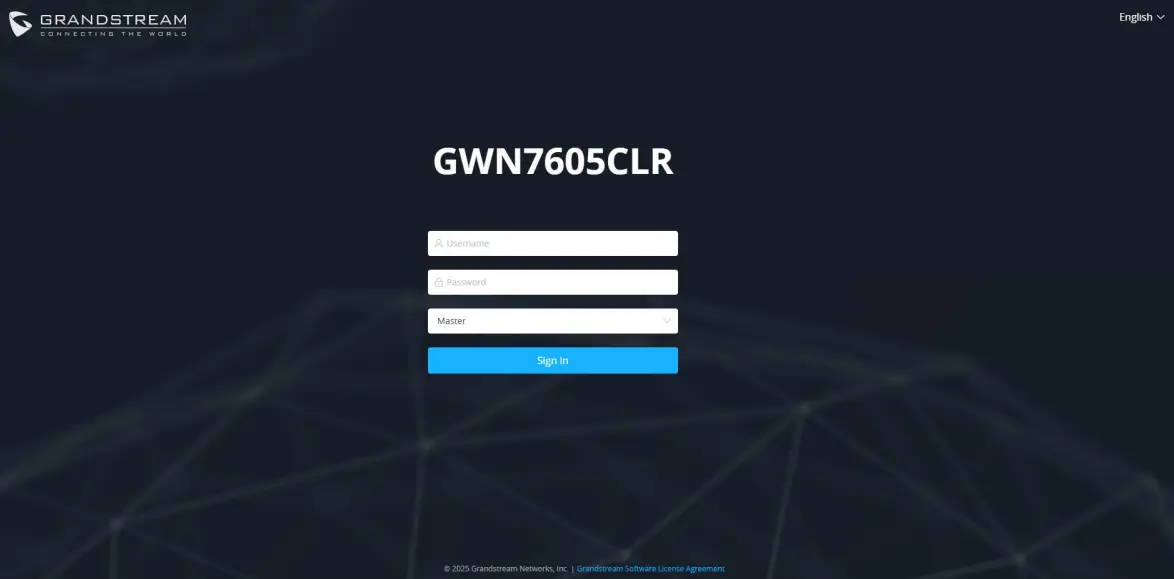
- Enter the username and password to log in. (The default administrator username is “admin” and the default random password can be found on the sticker on the GWN7605CLR).
Refer to online documents and FAQ for more detailed information:
https://www.grandstream.com/our-products

For Warranty and RMA information, please visit
www.grandstream.com/support/warranty