Thank you for purchasing Grandstream GRP260X Essential IP Phones.
The GRP Series of Essential IP Phones provides simple, easy-to-use devices with zero-touch provisioning for mass deployment and easy management. The four devices in the Essential series are designed to offer simple-to-use, affordable desktop IP Phones with a sleek design and next-generation features. Built for the needs of on-site and remote workers and designed for easy deployment by enterprises, service providers, and other high-volume markets, these essential IP phones offer an easy-to-use and easy-to-deploy voice endpoint.
Warning
The following hardware versions do not support firmware downgrade after upgrading to version 1.0.5.37:
GRP2601(P) hardware version 1.9A
GRP2602(P) hardware version 1.9A
GRP2604(P) hardware version 1.7A
GRP2603P / GRP2604P hardware version 1.5A
GRP2603P hardware version 1.5B
GRP2603 / GRP2604 hardware version 1.6B
PRODUCT OVERVIEW
Feature Highlights
The following table contains the major features of the GRP260X phones:
GRP2601
GRP2601P
GRP2601W
2 SIP account keys with dual-color LED
4 programmable context-sensitive soft keys.
10/100M network ports.
Integrated PoE (for GRP2601P only).
5-way conference.
Electronic Hook Switch (EHS) support for Plantronics & Jabra & Sennheiser.
Wi-Fi support (GRP2601W only).
GRP2602
GRP2602P
GRP2602W
GRP2602G
2 SIP account keys with dual-color LED
4 programmable context-sensitive soft keys.
10/100M network ports. (1000M for GRP2602G)
Integrated PoE (for GRP2602P/GRP2602G only).
5-way conference.
Electronic Hook Switch (EHS) support for Plantronics & Jabra & Sennheiser.
Wi-Fi support (GRP2602W only).
GRP2603
GRP2603P
3 SIP account keys with dual-color LED.
4 XML programmable context sensitive soft keys
132 x 64 backlit graphical LCD display
10/100/1000 Mbps Ethernet ports.
Integrated PoE (GRP2603P only).
5-way conference.
Electronic Hook Switch (EHS) support for Plantronics & Jabra & Sennheiser.
GRP2604
GRP2604P
3 SIP account keys with dual-color LED.
4 XML programmable context sensitive soft keys
132 x 64 backlit graphical LCD display
10/100/1000 Mbps Ethernet ports.
Integrated PoE (GRP2604P only).
5-way conference.
Electronic Hook Switch (EHS) support for Plantronics & Jabra & Sennheiser.
GRP260x Features at a glance
Technical Specifications
The following table resumes all the technical specifications including the protocols/standards supported, voice codecs, telephony features, languages, and upgrade/provisioning settings for the GRP260X series.
GRP2601W, Single frequency, 2.4 GHz, 802.11 b/g/n/ax (2.4G only)
Feature Keys
4 XML programmable context sensitive soft keys, 5 (navigation, menu) keys. 8 dedicated function keys for: MESSAGE (with LED indicator), TRANSFER, HEADSET, MUTE, SEND/REDIAL, SPEAKERPHONE, VOL+, VOL
Voice Codec
Support for G.729A/B, G.711μ/a-law, G.726, G.722(wide-band), G.723.1 ,iLBC, Opus, in- band and out-of-band DTMF(in audio, RFC2833, SIP INFO), VAD, AEC, CNG, PLC, AGC, AJB
Auxiliary Ports
RJ9 headset jack (allowing EHS with Plantronics & Jabra & Sennheiser headsets)
Telephony Features
Hold, transfer, forward, 5-way conference, call park, call pickup, downloadable phonebook (XML, LDAP, up to 2000 items), call waiting, call log (up to 800 records), off-hook auto dial, auto answer, click-to-dial, flexible dial plan, hot-desking, personalized music ringtones and music on hold, server redundancy and fail-over
User and administrator level passwords, MD5 and MD5-sess based authentication, 256-bit AES encrypted configuration file, SRTP, TLS, 802.1x media access control, secure boot.
Multi-language
LCD Language: English 简体中文 (Simplified Chinese) العربية (Arabic) Català (Catalan) Čeština (Czech) Deutsch (German) Ελληνικά (Greek) Español (Spanish) Français (French) עברית (Hebrew) Hrvatski (Croatian) Magyar (Hungarian) Italiano (Italian) 日本語 (Japanese) 한국어 (Korean) Latviešu valoda (Latvian) Nederlands (Dutch) Polski (Polish) Português (Portuguese) Русский (Russian) Svenska (Swedish) Slovenščina (Slovenian) Slovenčina (Slovak) Türkçe (Turkish) Українська (Ukrainian) 正體中文 (Traditional Chinese) WebUI Language: English 简体中文 (Simplified Chinese) العربية (Arabic) Čeština (Czech) Deutsch (German) Español (Spanish) Français (French) עברית (Hebrew) Hrvatski (Croatian) Magyar (Hungarian) Italiano (Italian) 日本語 (Japanese) 한국어 (Korean) Nederlands (Dutch) Polski (Polish) Português (Portuguese) Русский (Russian) Slovenščina (Slovenian) Türkçe (Turkish) 繁體中文 (Traditional Chinese)
Upgrade/Provisioning
Firmware upgrade via FTP/TFTP / HTTP / HTTPS, mass provisioning using GDMS/TR-069 or AES encrypted XML configuration file
Power & Green Energy Efficiency
Universal Power Supply Input 100-240VAC 50-60Hz; Output +5VDC, 600mA;
PoE: IEEE802.3af Class 1, 3.84W; IEEE802.3az (EEE) (GRP2601P Only)
Physical
Dimension: 208mm (L) x 180mm (W) x 63.4mm (H) (with handset)
Unit weight:650g; Package weight:810g (860g for GRP2601)
Temperature and Humidity
Operation: 0°C to 40°C
Storage: -10°C to 60°C
Humidity: 10% to 90% Non-condensing
Package Content
GRP2601/2601P phone, handset with cord, base stand, universal power supply (GRP2601 only), network cable, Quick Installation Guide
Compliance
FCC: Part 15 Class B; FCC Part 68 HAC;
CE: EN 55032; EN 55035; EN 61000-3-2; EN 61000-3-3; EN 62368-1;
2 SIP account keys with dual-color LED, 4 XML programmable context sensitive soft keys, 5 (navigation, menu) keys. 8 dedicated function keys for: MESSAGE (with LED indicator), TRANSFER, HEADSET, MUTE, SEND/REDIAL, SPEAKERPHONE, VOL+, VOL-
Voice Codec
Support for G7.29A/B, G.711µ/a-law, G.726, G.722(wide-band), G723, iLBC, OPUS, in-band, and out-of-band DTMF(in audio, RFC2833, SIP INFO), VAD, AEC, CNG, PLC, AGC
Auxiliary Ports
RJ9 headset jack (allowing EHS with Plantronics & Jabra &Sennheiser headsets)
Telephony Features
Hold, transfer, forward, 5-way conference, call park, call pickup, shared-call-appearance (SCA)/bridged-line-appearance (BLA), downloadable phonebook (XML, LDAP, up to 2000 items), call waiting, call log (up to 800 records), off-hook auto dial, auto answer, click-to-dial, flexible dial plan, hot-desking, personalized music ringtones and music on hold, server redundancy and fail-over
HD audio
Yes, HD handset and speakerphone with support for wideband audio
User and administrator level passwords, MD5 and MD5-sess based authentication, 256-bit AES encrypted configuration file, SRTP, TLS, 802.1x media access control, secure boot
Multi-language
LCD Language: English 简体中文 (Simplified Chinese) العربية (Arabic) Català (Catalan) Čeština (Czech) Deutsch (German) Ελληνικά (Greek) Español (Spanish) Français (French) עברית (Hebrew) Hrvatski (Croatian) Magyar (Hungarian) Italiano (Italian) 日本語 (Japanese) 한국어 (Korean) Latviešu valoda (Latvian) Nederlands (Dutch) Polski (Polish) Português (Portuguese) Русский (Russian) Svenska (Swedish) Slovenščina (Slovenian) Slovenčina (Slovak) Türkçe (Turkish) Українська (Ukrainian) 正體中文 (Traditional Chinese) WebUI Language: English 简体中文 (Simplified Chinese) العربية (Arabic) Čeština (Czech) Deutsch (German) Español (Spanish) Français (French) עברית (Hebrew) Hrvatski (Croatian) Magyar (Hungarian) Italiano (Italian) 日本語 (Japanese) 한국어 (Korean) Nederlands (Dutch) Polski (Polish) Português (Portuguese) Русский (Russian) Slovenščina (Slovenian) Türkçe (Turkish) 繁體中文 (Traditional Chinese)
Upgrade/Provisioning
Firmware upgrade via FTP/TFTP / HTTP / HTTPS, mass provisioning using GDMS/TR-069 or AES encrypted XML configuration file
Power & Green Energy Efficiency
Universal Power Supply Input 100-240VAC 50-60Hz; Output +5VDC, 600mA;
PoE: IEEE802.3af Class 1, 3.84W; IEEE802.3az (EEE) (GRP2602P Only)
Physical
Dimension: 208mm (L) x 180mm (W) x 63.4mm (H) (with handset)
Unit weight: 670g; Package weight:830g (880g for GRP2602)
Temperature and Humidity
Operation: 0°C to 40°C Storage: -10°C to 60°C Humidity: 10% to 90% Non-condensing
Package Content
GRP2602 phone, handset with cord, base stand, universal power supply (GRP2602/GRP2602W only), network cable, Quick Installation Guide
Compliance
FCC: Part 15 Class B; FCC Part 68 HAC;
CE: EN 55032; EN 55035; EN 61000-3-2; EN 61000-3-3; EN 62368-1;
3 SIP account keys with dual-color LED, 4 XML programmable context sensitive soft keys, 5 (navigation, menu) keys. 9 dedicated function keys for: MESSAGE(with LED indicator), TRANSFER, HOLD, HEADSET, MUTE, SEND/REDIAL, SPEAKERPHONE, VOL+, VOL-
Voice Codec
Support for G7.29A/B, G.711µ/a-law, G.726, G.722(wide-band),G723,iLBC, OPUS, in-band, and out-of-band DTMF(in audio, RFC2833, SIP INFO), VAD, AEC, CNG, PLC, AGC
Auxiliary Ports
RJ9 headset jack (allowing EHS with Plantronics & Jabra &Sennheiser headsets)
Telephony Features
Hold, transfer, forward, 5-way conference, call park, call pickup, shared-call-appearance(SCA)/bridged-line-appearance(BLA), downloadable phonebook (XML, LDAP, up to 2000 items), call waiting, call log (up to 800 records), off-hook auto dial, auto answer, click-to-dial, flexible dial plan, hot-desking, personalized music ringtones and music on hold, server redundancy and fail-over
HD audio
Yes, HD handset and speakerphone with support for wideband audio
User and administrator level passwords, MD5 and MD5-sess based authentication, 256-bit AES encrypted configuration file, SRTP, TLS, 802.1x media access control, secure boot
Multi-language
LCD Language: English 简体中文 (Simplified Chinese) العربية (Arabic) Català (Catalan) Čeština (Czech) Deutsch (German) Ελληνικά (Greek) Español (Spanish) Français (French) עברית (Hebrew) Hrvatski (Croatian) Magyar (Hungarian) Italiano (Italian) 日本語 (Japanese) 한국어 (Korean) Latviešu valoda (Latvian) Nederlands (Dutch) Polski (Polish) Português (Portuguese) Русский (Russian) Svenska (Swedish) Slovenščina (Slovenian) Slovenčina (Slovak) Türkçe (Turkish) Українська (Ukrainian) 正體中文 (Traditional Chinese) WebUI Language: English 简体中文 (Simplified Chinese) العربية (Arabic) Čeština (Czech) Deutsch (German) Español (Spanish) Français (French) עברית (Hebrew) Hrvatski (Croatian) Magyar (Hungarian) Italiano (Italian) 日本語 (Japanese) 한국어 (Korean) Nederlands (Dutch) Polski (Polish) Português (Portuguese) Русский (Russian) Slovenščina (Slovenian) Türkçe (Turkish) 繁體中文 (Traditional Chinese)
Upgrade/Provisioning
Firmware upgrade via FTP/TFTP / HTTP / HTTPS, mass provisioning using GDMS/TR-069 or AES encrypted XML configuration file
Power & Green Energy Efficiency
Universal Power Supply Input 100-240VAC 50-60Hz; Output +5VDC, 600mA;PoE: IEEE802.3af Class 1, 3.84W; IEEE802.3az (EEE) (GRP2603P Only)
Physical
Dimension: 214mm (L) x 206mm (W) x 68mm (H) (with handset)
Unit weight: 780g; Package weight: 1090g for GRP2603P &1140g for GRP2603
Temperature and Humidity
Operation: 0°C to 40°C Storage: -10°C to 60°C Humidity: 10% to 90% Non-condensing
Package Content
GRP2603 phone, handset with cord, base stand, universal power supply (GRP2603 only), network cable, Quick Installation Guide
Compliance
FCC: Part 15 Class B; FCC Part 68 HAC;
CE: EN 55032; EN 55035; EN 61000-3-2; EN 61000-3-3; EN 62368-1;
3 SIP account keys with dual-color LED, 4 XML programmable context sensitive soft keys, 5 (navigation, menu) keys. 9 dedicated function keys for: MESSAGE(with LED indicator), TRANSFER, HOLD, HEADSET, MUTE, SEND/REDIAL, SPEAKERPHONE, VOL+, VOL-
Voice Codec
Support for G7.29A/B, G.711µ/a-law, G.726, G.722(wide-band),G723,iLBC, OPUS, in-band, and out-of-band DTMF(in audio, RFC2833, SIP INFO), VAD, AEC, CNG, PLC, AGC
Auxiliary Ports
RJ9 headset jack (allowing EHS with Plantronics & Jabra & Sennheiser headsets)
Telephony Features
Hold, transfer, forward, 5-way conference, call park, call pickup, shared-call-appearance(SCA)/bridged-line-appearance(BLA), downloadable phonebook (XML, LDAP, up to 2000 items), call waiting, call log (up to 800 records), off-hook auto dial, auto answer, click-to-dial, flexible dial plan, hot-desking, personalized music ringtones and music on hold, server redundancy and fail-over
HD audio
Yes, HD handset and speakerphone with support for wideband audio
User and administrator level passwords, MD5 and MD5-sess based authentication, 256-bit AES encrypted configuration file, SRTP, TLS, 802.1x media access control, secure boot
Multi-language
LCD Language: English 简体中文 (Simplified Chinese) العربية (Arabic) Català (Catalan) Čeština (Czech) Deutsch (German) Ελληνικά (Greek) Español (Spanish) Français (French) עברית (Hebrew) Hrvatski (Croatian) Magyar (Hungarian) Italiano (Italian) 日本語 (Japanese) 한국어 (Korean) Latviešu valoda (Latvian) Nederlands (Dutch) Polski (Polish) Português (Portuguese) Русский (Russian) Svenska (Swedish) Slovenščina (Slovenian) Slovenčina (Slovak) Türkçe (Turkish) Українська (Ukrainian) 正體中文 (Traditional Chinese) WebUI Language: English 简体中文 (Simplified Chinese) العربية (Arabic) Čeština (Czech) Deutsch (German) Español (Spanish) Français (French) עברית (Hebrew) Hrvatski (Croatian) Magyar (Hungarian) Italiano (Italian) 日本語 (Japanese) 한국어 (Korean) Nederlands (Dutch) Polski (Polish) Português (Portuguese) Русский (Russian) Slovenščina (Slovenian) Türkçe (Turkish) 繁體中文 (Traditional Chinese)
Upgrade/Provisioning
Firmware upgrade via FTP/TFTP / HTTP / HTTPS, mass provisioning using GDMS/TR-069 or AES encrypted XML configuration file
Power & Green Energy Efficiency
Universal Power Supply Input 100-240VAC 50-60Hz; Output +5VDC, 600mA;PoE: IEEE802.3af Class 2, 3.84W-6.49W; IEEE802.3az (EEE) (GRP2604P Only)
Physical
Dimension: 208mm (L) x 180mm (W) x 63.4mm (H) (with handset)
Unit weight: 670g; Package weight:830g (880g for GRP2602)
Temperature and Humidity
Operation: 0°C to 40°C Storage: -10°C to 60°C Humidity: 10% to 90% Non-condensing
Package Content
GRP2604 phone, handset with cord, base stand, universal power supply (GRP2604 only), network cable, Quick Installation Guide
Compliance
FCC: Part 15 Class B; FCC Part 68 HAC;
CE: EN 55032; EN 55035; EN 61000-3-2; EN 61000-3-3; EN 62368-1;
RCM: AS/NZS CISPR32; AS/NZS 62368.1; AS/CA S004;
IC: ICES-003; CS-03;
GRP2604/GRP2604P Technical Specifications
GETTING STARTED
This chapter provides basic installation instructions including the list of the packaging contents and information for obtaining the best performance with the GRP260X phone.
Equipment Packaging
GRP260X
1 x GRP260X Main Case.
1 x Handset.
1 x Phone Stand.
1 x Ethernet Cable.
1 x Power Adapter (Except for GRP260xP).
1 x Phone cord.
1 x Quick Installation Guide.
GRP260X Package Content
Note
Check the package before installation. If you find anything missing, contact your system administrator.
GRP260X Phone Setup
The GRP260X phones can be installed on the desktop using the phone stand or attached to the wall using the slots for wall mounting.
Phone Stand and Mounting Slots on the GRP260X
Using the Phone Stand
For installing the phone on the table with the phone stand, attach the phone stand to the bottom of the phone where there is a slot for the phone stand. (Upper half, bottom part).
Using the Slots for Wall Mounting
1. Attach the wall mount spacers to the slot for wall mount spacers on the back of the phone.
2. Attach the phone to the wall via the wall mount hole.
3. Pull out the tab from the handset cradle (See figure below).
4. Rotate the tab and plug it back into the slot with the extension up to hold the handset while the phone is mounted on the wall (see figure below).
Tab on the Handset Cradle
Connecting the GRP260X
To set up the GRP260X, follow the steps below:
1. Connect the handset and main phone case with the phone cord.
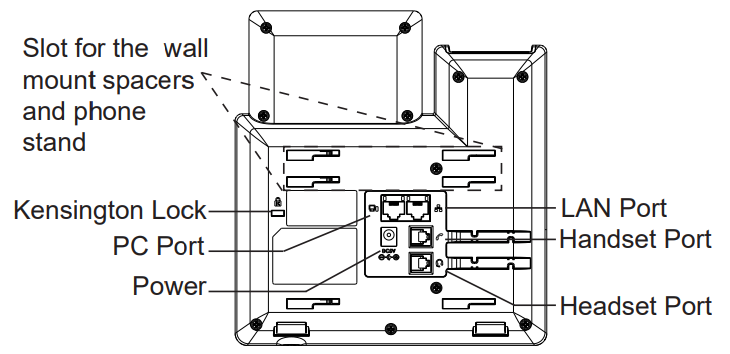
2. Connect the LAN port of the phone to the RJ-45 socket of a hub/switch or a router (LAN side of the router) using the Ethernet cable.
3. Connect the 5V DC output plug to the power jack on the phone; plug the power adapter into an electrical outlet. If a PoE switch is used in step 3, this step could be skipped (For GRP260xP/G).
4. The LCD will display the Grandstream logo. Before continuing, please wait for the date/time display to show up.
5. Using the phone-embedded web server or keypad configuration menu, you can further configure the phone using either a static IP or DHCP.
Using Wi-Fi (GRP2602W only):
– On the LCD menu, navigate to “Settings → Wi-Fi settings” and enable Wi-Fi.
– Select “Wi-Fi Network” and GRP2602W will automatically start scanning within the range.
– A list of Wi-Fi networks will be displayed. Select the desired network, and if required, enter the correct password to connect.
– Users can add and connect to a hidden network by accessing “Wi-Fi” Network” and then pressing on Add softkey . Then enter the Network’s information.
Notes:
When the GPR2602W is not connected to any network (including Ethernet and Wi-Fi), a prompt interface will pop up to notify users about it. Users can quickly enter the “Wi-Fi Network” page by pressing on the Wi-Fi softkey.
For easy deployment, The GRP2602W is preconfigured out of the box to connect to a default SSID named wp_master with a password (WPA/WPA2 PSK) equal to wp!987@dmin, users can adapt these settings from the web UI as well to make it easier for deployment on customer site.
The QR code of SSID can be displayed to share with cellphones and other devices.
GRP260X Back Side View
Configuration via Keypad
To configure the LCD menu using the phone’s keypad, follow the instructions below:
Enter MENU options. When the phone is idle, press the round MENU button or Menu Softkey to enter the configuration menu.
Navigate to the menu options. Press the arrow keys UP/DOWN keys to navigate in the menu options.
Enter/Confirm selection. Press the round MENU to enter the selected option.
Exit. Press Return Softkey to exit to the previous menu.
Return to the Home page.
The MENU options are listed in the following table.
Status
Displays account status, network status, software version number and Hardware:
Network status: Press to enter the sub menu for IP setting information (DHCP/Static IP/PPPoE), IPv4 address, IPv6 address, MAC address, Subnet Mask, Gateway, DNS and NTP servers.
System Status: Press to enter the sub menu for Hardware Information, Software version and IP Geographic Information.
Settings
Settings sub menu contains the following options:
– Account Settings: Enable/Disable SIP account, Configures Account Name, SIP server’s address, SIP User ID, SIP Auth ID, SIP Password, Outbound Proxy, and Voice Mail Access Number.
– Call Settings: Enable/Disable DND, Enable Disable Auto Answer for SIP account, Enable/Disable Call Forward (Forward All/Busy/No Answer).
– Basic Settings:
Sounds: Configures account ringtone and adjusts volume settings by pressing left/right arrow key.
Appearance: Configures the idle and active LCD brightness.
Date and Time: Adjusts Time and Date displaying format.
Time Zone: Choose your Time Zone from the list by scrolling with UP/DOWN keys.
Language: Selects the language to be displayed on the phone’s LCD. Users could select Automatic for local language based on IP location if available. By default, it is Auto.
Keypad Lock: Enables/Disables Keypad lock. Users can choose the Keypad Lock type (All Keys/Functional keys) and set up the lock password. If users enabled Keypad lock without configuring a password; They can unlock the phone by pressing on the unlock softkey.
Headset Type: Choose the headset type of the headset connect to the phone. Users could choose Normal, Plantronics EHS, Jabra EHS,VBeT EHS, Sennheiser EHS.
Softkey bar style: Chooses the corresponding style to show icons , you can choose from four different styles.
Input Method: Chooses to set the input method to be one of the following options: 123, abc, ABC, Ab2, and Q9 for both the contact input method and LDAP input method, you can define the input language too.
Key Customization: In this option you can set the hotkey settings to be configured for short press setting, long press setting, or reset the hotkey settings, you can also customize the VPKs by choosing the mode of each VPK to be set to Intercom, conference , call park , speed dial, Transfer…
– Advanced Settings:
Upgrade: Check for upgrade by contacting the firmware upgrade server.
Sys Log: Configures Syslog level, Transport protocol and Syslog Server’s address.
Security: Enables disables Web and SSH access.
Alternative Firmware: Press Switch/Convert softkey to switch between the dual firmware versions loaded to the phone. The phone will reboot with the chosen version.
Language Download: Gives you the option to download the chosen language files or restore them from previous firmware versions, you can also set the update to be either manual or automatic , it manual by default.
– Ethernet Settings:
Internet Protocol: Selects Prefer IPv4 / Prefer IPv6 / IPv4 only or IPv6 only. The default setting is “IPv4 only”.
IPv4 Settings: Selects IP mode (DHCP/Static IP/PPPoE); Configures PPPoE account ID and password; Configures static IP address, Netmask, Gateway, Preferred DNS server
IPv6 Settings: Selects IP mode (DHCP/Static IP); Configures static IP address, IPv6 Prefix (64 bits), IPv6 Preferred DNS server.
User could configure phonebooks/groups options here, download phonebook XML to the phone and search and dial from the local phonebook and search and dial from LDAP phonebook.
Factory Functions
Factory Functions sub menu includes the following options:
Audio Loopback: Speak to the phone using speaker/handset/headset. If you can hear your voice, your audio is working fine. Press Return Softkey to exit audio loopback mode.
Keypad/Led Diagnosis: All LEDs will light up Press all the available keys on the phone. The LCD will display the name for the keys to be pressed to finish the keyboard diagnostic mode. Press Hook button to exit.
Certification Verification: Verify the certificate loaded on the phone.
UCM Detect
Configures the IP address and port of the UCM on which the IP phone can be registered.
Factory reset
Performs a Factory reset on the phone.
Reboot
Reboots the phone.
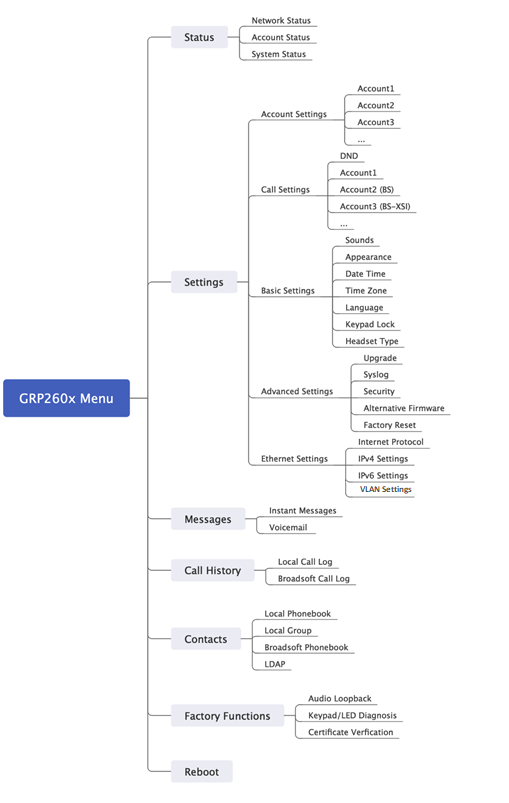
Configuration Menu
The following picture shows the keypad MENU configuration flow:
GRP260x LCD settings
Note
Users can also leverage the numeric keys and assign them different functions by pressing the key for 3 seconds and selecting the Mode and Value. The supported modes are: Speed Dial, Speed Dial via Active Account, Dial DTMF, Voicemail, Call Return, LDAP Search, Call History, INFO, Messages, DND, Redial, Open Door, Provision, and HTTP Command.
Configuration via Web Browser
The GRP260X embedded Web server responds to HTTP/HTTPS GET/POST requests. Embedded HTML pages allow a user to configure the IP phone through a Web browser such as Google Chrome, Mozilla Firefox, and Microsoft’s IE. To access the Web GUI:
Connect the computer to the same network as the phone.
Make sure the phone is turned on and shows its IP address. You may check the IP address by pressing the Up-arrow button when the phone is in an idle state.
Open a Web browser on your computer.
Enter the phone’s IP address in the address bar of the browser.
Enter the administrator’s login and password to access the Web Configuration Menu.
Notes
The computer must be connected to the same sub-network as the phone. This can be easily done by connecting the computer to the same hub or switch as the phone is connected. In the absence of a hub/switch (or free ports on the hub/switch), please connect the computer directly to the PC port on the back of the phone.
If the phone is properly connected to a working Internet connection, the IP address of the phone will display in MENU🡪Status🡪Network Status. This address has the format: xxx.xxx.xxx.xxx, where xxx stands for a number from 0-255. Users will need this number to access the Web GUI. For example, if the phone has an IP address of 192.168.40.154, please enter “http://192.168.40.154” in the address bar of the browser.
There are two default passwords for the login page:
User Level
User
Password
Web Pages Allowed
End User Level
user
123 or unit label password
Only Status and Basic Settings
Administrator Level
admin
admin or unit label password
Browse all pages
When changing any settings, always SUBMIT them by pressing the “Save” or “Save and Apply” button at the bottom of the page. If the change is saved only but not applied, after making all the changes, click on the “APPLY” button on the top of the page to submit. After submitting the changes in all the Web GUI pages, reboot the phone to have the changes take effect if necessary (Most of the options do not require a reboot).
Saving Configuration Changes
After users make changes to the configuration, pressing the “Save” button will save but not apply the changes until the “Apply” button on the top of the web GUI page is clicked. Or users could directly press the “Save and Apply” button.
Rebooting from Remote Locations
Press the “Reboot” button on the top right corner of the web GUI page to reboot the phone remotely. The web browser will then display a reboot message. Wait for about 1 minute to log in again.
ADVANCED FEATURES
When Special Feature is set to Zoom under Accounts → Accounts → Advanced Settings → Advanced Features, the phone supports a variety of Zoom Phone features that enhance call handling, collaboration, and user flexibility. These features enable advanced call management capabilities such as shared lines, call monitoring, call parking, and hot desking, allowing organizations to streamline communications and improve productivity. The following sections provide an overview of the Zoom Phone features supported on Zoom-enabled phones.
SLA/SLG on Zoom Phones
Zoom Phones support SLA (Shared Line Appearance) and SLG (Shared Line Group) features, enabling users and administrators to share calling responsibilities, phone numbers, and voicemail access across multiple extensions and devices.
Shared Line Appearance (also known as Call Delegation) provides an easy way for phone users to assign others to handle calls on their behalf. For example, an executive can assign calling privileges to an assistant, allowing the assistant to make and receive calls on the executive’s behalf.
Shared Line Group allows Zoom Phone administrators to share a phone number and extension with a group of phone users or common area phones. All members of the shared line group have access to the group’s direct phone number and voicemail. Administrators can also apply business, closed, and holiday hours, as well as configure call routing rules for the group.
Zoom Phones support BMWT (Barge-In/Listen/Whisper/Takeover), a call monitoring and intervention feature that allows authorized users to supervise active calls and, when necessary, participate in or take control of them. Additionally, authorized users can monitor or intervene in active calls through configured softkeys.
In addition, Privacy Mode can be enabled to prevent unauthorized monitoring or intervention from other members in the call group while the call is in progress.
The following BMWT options are supported:
Barge-in: Join an active call as an additional participant.
Listen: Listen to an active call without any parties being aware.
Whisper: Speak privately to the monitored extension without other parties being aware.
Takeover: Replace the monitored extension and take full control of the active call.
Zoom Phones support Call Park, allowing users to place calls on hold and retrieve them from another phone or Zoom client using a retrieval code.
When a call is parked, Zoom Phone generates a retrieval code that can be used by another phone user to resume the call. Administrators can configure routing rules for unanswered parked calls. Public call park locations are accessible to all users, while private call park locations can be restricted based on administrator-defined permissions.
Zoom Phones support Hot Desking, allowing users to temporarily sign in to a provisioned desk phone using their extension number and PIN.
This feature enables users to access their phone number, extension, and voicemail from different desk phones without requiring a dedicated device. It is particularly useful in shared workspaces, rotating shifts, multi-office deployments, and other environments where users frequently change work locations.
Use case examples:
Out-of-office or traveling employees: Users can enable Hot Desking on their desk phone, allowing other users to temporarily sign in and use the device.
Shared office or co-working space: Users can share the same phone hardware while retaining access to their own extension, phone number, and voicemail.
Traveling sales or field teams: Users can sign in to any Hot Desk phone at different office locations while maintaining a single phone number and extension.
24/7 call centers: Shift workers can share the same desk phone while keeping separate extensions, phone numbers, and voicemail boxes.
This section describes the options in the phone’s Web GUI. As mentioned, you can log in as an administrator or an end-user.
Status: Displays the Account status, Network status, and System Info of the phone.
Account: To configure the SIP account.
Phone Settings: To configure phone general settings, Call Settings, Ringtone, and Multicast Paging.
Network Settings: To configure network settings.
Programmable keys: Configures idle and call screen softkeys And the Multi-purpose keys settings for the GRP2604 only.
System Settings: Configures Time and Language settings, Security Settings, Preferences, TR-069.
Maintenance: To configure upgrading and provisioning, System Diagnostics, Outbound Notifications, and Voice monitoring.
Application: Configures Web Service settings, Contacts, LDAP, and Call History.
External Service: Configures GDS Settings, Call Center, BroadSoft XSI.
Status Page Definitions
Status 🡪 Account Status
Account
Account index.
For GRP2601/GRP2601P: 2 SIP accounts
For GRP2602/GRP2602P/GRP2602W: 4 SIP accounts
For GRP2603/GRP2603P: 6 SIP accounts
For GRP2604/GRP2604P: 6 SIP accounts
SIP User ID
Displays the configured SIP User ID for the account.
SIP Server
Displays the configured SIP Server address, URL or IP address, and port of the SIP server.
SIP Registration
Displays SIP registration status for the SIP account.
Status 🡪 Network Status
MAC Address
Global unique ID of device, in HEX format. The MAC address will be used for provisioning and can be found on the label coming with original box and on the label located on the back of the device.
IP Setting
The configured address type: DHCP, Static IP or PPPoE.
IPv4 Address
The IPv4 address obtained on the phone.
IPv6 Address
The IPv6 address obtained on the phone.
OpenVPN® IP
The OpenVPN® IP obtained on the phone.
Subnet Mask
The subnet mask obtained on the phone.
Gateway
The gateway address obtained on the phone.
DNS Server 1
The DNS server address 1 obtained on the phone.
DNS Server 2
The DNS server address 2 obtained on the phone.
PPPoE Link Up
PPPoE connection status.
NAT Type
The type of NAT connection used by the phone.
NAT Traversal
Display the status of NAT connection for each account on the phone.
Status 🡪 System Info
Product Model
Product model of the phone.
Part Number
Product part number.
Serial Number
Displays the serial number of the unit.
Certificate Type
This indicates the encryption protocol and hashing protocol used in the certificates.
Security Version
This indicates the version of the security software.
Software Version
Boot: boot version number.
Core: core version number.
Base: base version number.
Prog: program version number. This is the main firmware release number, which is always used for identifying the software system of the phone.
Locale: locale version number.
IP Geographic Information
Language: displaying language.
Recommend Time Zone: represent the time zone detected by IP address
System Up Time
System up time since the last reboot.
System Time
Current system time on the phone system.
System Time-Zone
Displays the time zone that is configured by user
Service Status
GUI, Phone and CPE service status.
System Information
Download system information
User Space
Shows the percentage of the user space used and the status of the Database
Core Dump
Shows the status of the core dump and the core dump files generated if any. It also gives the ability to generate GUI/Phone core dump files manually.
Special Feature
OpenVPN® Support: displaying if the phone supports OpenVPN®.
Account Page Definitions
Accounts → Account x → General Settings
Account Register
Account Active
Indicates whether the account is active.
The default setting is “No”.
Account Name
The name associated with each account to be displayed on the LCD. (e.g., MyCompany)
SIP Server
The URL or IP address, and port of the SIP server. This is provided by your VoIP service provider (e.g., sip.mycompany.com, or IP address)
Secondary SIP Server
The URL or IP address, and port of the SIP server. This will be used when the primary SIP server fails
Tertiary SIP Server
The URL or IP address, and port of the SIP server. This will be used when the primary and secondary SIP server fail.
SIP User ID
User account information, provided by your VoIP service provider.
SIP Authentication ID
SIP service subscriber’s Authenticate ID used for authentication. It can be identical to or different from the SIP User ID.
SIP Authentication Password
The account password required for the phone to authenticate with the SIP server before the account can be registered.
After it is saved, this will appear as hidden for security purpose.
Name
The SIP server subscriber’s name (optional) that will be used for Caller ID display (e.g., John Doe).
TEL URI
If the phone has an assigned PSTN telephone number, this field should be set to “user=phone”. A “user=phone” parameter will be attached to the Request-URI and “To” header in the SIP request to indicate the E.164 number. If set to “Enable”, “tel:” will be used instead of “sip:” in the SIP request.
Voicemail Access Number
Allows users to access voice messages by pressing the MESSAGE button on the phone. This value is usually the VM portal access number.
Monitored Voicemail Access Number
Configures the access code (e.g. *98) required to dial into the voicemail box of a monitored extension. When a Voicemail VPK/MPK is configured with a target extension, the device will use this access code followed by the target extension number (e.g. *981001) to access the monitored extension’s voicemail.
BLF Server
Configures the BLF server (optional) used for SUBSCRIBE requests.
Account Display
When set to “Username”, the LCD will display the Username if it is not empty and when set to “User ID”, the LCD will display the User ID if it is not empty.
UCM User Password
Input UCM user login password to connect UCM user settings.
Network Settings
DNS Mode
This parameter controls how the Search Appliance looks up IP addresses for hostnames. If “Use Configured IP” is selected, please fill in Primary IP, Backup IP 1 and Backup IP 2.
A Record
SRV
NAPTR/SRV
Use Configured IP
Max Number Of Sip Request Retries
Sets the maximum number of retries for the device to send requests to the server. In DNS SRV configuration, if the destination address does not respond, all request messages are resent to the same address according to the configured retry times. Valid range: 1-10.
DNS SRV Failover Mode
Configures the preferred IP mode for DNS SRV.
Default
If the option is set with “default”, it will again try to send register messages to one IP at a time, and the process repeats.
Use current server until DNS TTL
If the option is set with “Use current server until DNS TTL”, it will send register messages to the previously registered IP first. If no response, it will try to send one at a time for each IP. This behavior lasts if DNS TTL (time-to-live) is up.
Use current server until no responses
If the option is set with “Use current server until no responses”, it will send registered messages to the previously registered IP first, but this behavior will persist until the registered server does not respond.
Use current server until failback timer expires
If “Use current server until failback timer expires” is selected, the device will send all SIP messages to the current failover SIP server or Outbound Proxy until the failback timer expires.
Failback Expiration (m)
Specifies the duration (in minutes) since failover to the current SIP server or Outbound Proxy before making failback attempts to the primary SIP server or Outbound Proxy.
Register Before DNS SRV Failover
Configures whether to send REGISTER requests to the failover SIP server or Outbound Proxy before sending INVITE requests in the event of a DNS SRV failover.
Primary IP
Configures the primary IP address where the phone sends DNS query to when “Use Configured IP” is selected for DNS mode.
Backup IP 1
Configures the backup IP 1 address where the phone sends DNS query to when “Use Configured IP” is selected for DNS mode.
Backup IP 2
Configures the backup IP 2 address where the phone sends DNS query to when “Use Configured IP” is selected for DNS mode.
NAT Traversal
Configures whether NAT traversal mechanism is activated. Please refer to user manual for more details.
If set to “STUN” and STUN server is configured, the phone will route according to the STUN server. If NAT type is Full Cone, Restricted Cone or Port-Restricted Cone, the phone will try to use public IP addresses and port number in all the SIP&SDP messages.
The phone will send empty SDP packet to the SIP server periodically to keep the NAT port open if it is configured to be “Keep-alive”. Configure this to be “No” if an outbound proxy is used. “STUN” cannot be used if the detected NAT is symmetric NAT. Set this to “VPN” if OpenVPN is used.
Media NAT Traversal
Select the method of NAT traversal for media packets.
No: NAT media traversal will not be used.
Auto: The NAT media traversal method will follow the “NAT traversal (STUN) logic.
STUN: When set to STUN, the IP phone will use the STUN protocol to discover the public IP address and the port using a remote STUN server.
TURN: The data stream will be forwarded using the TURN relay.
ICE: When this option is chosen, the IP phone will collect local IP addresses, STUN-reflected addresses and TURN relay addresses to dynamically select the optimal connection path.
The default setting is “Auto”.
Candidate Type
Note: This option appears when “ICE” is selected in the parameter Media NAT Traversal.
Configure the ICE candidate type.
All: All address types will be selected.
Relay Candidates Only: The candidate addresses will be obtained through a TURN server, which will act as a relay for the media stream.
STUN/TURN Server
Fill in the STUN/TURN server related configurations.
Note: This option appears when either ICE, STUN or TURN are selected in Media NAT Traversal parameter.
Support rport (RFC3581)
Configures to use symmetric response routing. If it is used, the “rport” field will be added to the Via header field in the SIP Request, and the information will be extracted from the SIP 200OK Response for SIP Register to rewrite the SIP Contact information and apply it in subsequent SIP Requests.
Proxy-Require
A SIP Extension to notify the SIP server that the phone is behind a NAT/Firewall.
Use SBC
Configures whether a SBC server is used. Note: If enabled, make sure an outbound proxy is set up.
Accounts → Account x → SIP Settings
Basic Settings
SIP Registration
Selects whether the phone will send SIP Register messages to the proxy/server. The default setting is “Enabled”.
UNREGISTER on Reboot
If set to “No”, the phone will not unregister the SIP user’s registration information before new registration.
If set to “All”, the SIP Contact header will use “*” to clear all SIP user’s registration information.
If set to “Instance”, the phone only needs to clear the current SIP user’s info.
REGISTER Expiration
Specifies the frequency (in minutes) in which the phone refreshes its registration with the specified registrar.
The maximum value is 64800 minutes (about 45 days). The default value is 60 minutes.
SUBSCRIBE Expiration
Specifies the frequency (in minutes) in which the phone refreshes its subscription with the specified registrar.
The maximum value is 64800 minutes (about 45 days). The default value is 60 minutes.
Re-Register before Expiration
Specifies the time frequency (in seconds) that the phone sends re-registration request before the Register Expiration. The default value is 0.
Registration Retry Wait Time
Specifies the interval to retry registration if the process is failed. The valid range is 1 to 3600. The default value is 20 seconds.
Registration Retry Wait Time(s) upon 403 Forbidden
Specifies the interval to retry registration if the process is failed due to 403 Forbidden. Valid range is 0 to 3600 in second. 0 second means stop retry registration.
Note: The default value is 1200 seconds
Add Auth Header on Initial REGISTER
If enabled, the phone will add Authorization header in initial REGISTER request.
Default is “Disabled”.
Add Auth Header on RE-REGISTER
If enabled, the phone will add Authorization header in RE-REGISTER request.
Note: This option is enabled by default.
Enable OPTIONS Keep Alive
Configures whether to enable SIP OPTIONS to track account registration status. If enabled, the phone will send periodic OPTIONS messages to server to track the connection status with the server.
Default is “Disabled”.
OPTIONS Keep Alive Interval
Configures the time interval the phone sends OPTIONS message to the server. If set to 30 seconds, it means the phone will send an OPTIONS message to the server every 30 seconds.
OPTIONS Keep Alive Max Lost
Configures the maximum number of times the phone will try to send OPTIONS message consistently to server without receiving a response. If set to “3”, the phone will send OPTIONS message 3 times. If no response from the server, the phone will re-register.
SUBSCRIBE for MWI
When set to “Yes”, a SUBSCRIBE for Message Waiting Indication will be sent periodically.
The default setting is “No”.
SUBSCRIBE for Registration
When set to “Yes”, a SUBSCRIBE for Registration will be sent out periodically.
The default setting is “No”.
Use Privacy Header
Configures whether the “Privacy Header” is present in the SIP INVITE message.
Default: the phone will add “Privacy Header” when special feature is not “Huawei IMS”.
Yes: the phone will always add “Privacy Header”.
No: the phone will not add “Privacy Header”.
The default setting is “default”.
Use P-Preferred- Identity Header
Configures whether the “P-Preferred-Identity Header” is present in the SIP INVITE message.
Default: the phone will add “P-Preferred-Identity header” when special feature is not “Huawei IMS”.
Yes: the phone will always add “P-Preferred-Identity header”.
No: the phone will not add “P-Preferred-Identity header”.
Use X-Grandstream-PBX Header
Configures to use X-Grandstream-PBX header in SIP request.
Default setting is “Yes”.
Use P-Access-Network-Info Header
Configures to use P-Access-Network-Info header in SIP request.
Default setting is “Yes”.
Use P-Emergency-Info Header
Configures to use P-Emergency-Info header in SIP request.
Default setting is “Yes”.
Use P-Asserted-Identity Header
Configure whether the “P-Asserted-Identity Header” is present in the SIP REGISTER message.
Use P-Early-Media Header
Configure if the “P-Early-Media Header” support is enabled.
Use Zoom E911 X-switch-info SIP Header
Configure whether the “Zoom E911 X-switch-info SIP Header” is present in the SIP REGISTER message.
Use MAC Header
If Register Only, all outgoing SIP message will include the MAC header.
If Yes to all SIP, all outgoing SIP messages will include the MAC header.
If No, the phone’s MAC header will not be included in any outgoing SIP messages.
The default setting is “No”.
Add MAC in User-Agent
If Yes except REGISTER, all outgoing SIP messages will include the phone’s MAC address in the User-Agent header, except for REGISTER and UNREGISTER.
If Yes to All SIP, all outgoing SIP messages will include the phone’s MAC address in the User-Agent header.
If No, the phone’s MAC address will not be included in the User-Agent header in any outgoing SIP messages.
The default setting is “No”.
SIP Transport
Selects the network protocol used for the SIP transport.
The default setting is “UDP”.
Enable TCP Keep-alive
Configures whether to enable TCP Keep-alive for the TCP connection between the terminal and the SIP server.
SIP Listening Mode
Configures whether or not to listen to multiple SIP protocols.
If set to “Dual“, phone will listen to TCP when UDP is selected.
If set to “Dual (Secured)“, phone will listen to TLS/TCP when UDP is selected. If “TCP” or “TLS/TCP” is selected, UDP will be listened too.
If set to “Dual (BLF Enforced)“, phone will try to enforce BLF subscriptions to use TCP protocol by adding ‘transport=tcp’ to the Contact header.
The default setting is “Transport Only”.
Local SIP Port
Configures the local SIP port used to listen and transmit.
SIP URI Scheme when using TLS
Specifies if “sip” or “sips” will be used when TLS/TCP is selected for SIP Transport. The default setting is “sips”.
Use Actual Ephemeral Port in Contact with TCP/TLS
Configures whether the actual ephemeral port in contact with TCP/TLS will be used when TLS/TCP is selected for SIP Transport.
The default setting is “No”.
Support SIP Instance ID
Configures whether SIP Instance ID is supported or not.
The default setting is “Yes”.
SIP T1 Timeout
SIP T1 Timeout is an estimate of the round-trip time of transactions between a client and server. If no response is received the timeout is increased and request re-transmit retries would continue until a maximum amount of time define by T2. The default setting is 0.5 seconds.
SIP T2 Timeout
SIP T2 Timeout is the maximum retransmit time of any SIP request messages (excluding the INVITE message). The re-transmitting and doubling of T1 continues until it reaches the T2 value. Default is 4 seconds.
Outbound Proxy Mode
Configures whether to put the Outbound Proxy in the Route header, or if SIP messages should always be sent to Outbound Proxy.
In route
Not in route
Always send to
Default is “in route”.
Enable 100rel
When enabled, the 100rel tag is appended to the value of the Supported header of the initial signaling messages.
The default setting is “No”.
Use Route Set in Notify (Follow RFC 6665)
Configures whether to use route set in NOTIFY (follow RFC 6665).
If enabled, the Request URI of the refresh subscription will use the URI in the received NOTIFY Contact (RFC 6665).
If disabled, the URI in the previously subscribed 200 OK Contact will be used.
Session Timer
Enable Session Timer
Configures whether to enable session timer function. It enables SIP sessions to be periodically “refreshed” via a SIP request (UPDATE, or re-INVITE). If there is no refresh via an UPDATE or re-INVITE message, the session will be terminated once the session interval expires. If set to “Yes”, the phone will use the related parameters when sending session timer according to “Session Expiration”. If set to “No”, session timer will be disabled.
The default setting is “No”.
Session Expiration
Session Expiration is the time (in seconds) where the session is considered timed out, provided no successful session refresh transaction occurs beforehand.
The default setting is 180. The valid range is from 90 to 64800.
Min-SE
The minimum session expiration (in seconds). The default value is 90 seconds. The valid range is from 90 to 64800.
Caller Request Timer
If set to “Yes” and the remote party supports session timers, the phone will use a session timer when it makes outbound calls.
The default setting is “No”.
Callee Request Timer
If set to “Yes” and the remote party supports session timers, the phone will use a session timer when it receives inbound calls.
The default setting is “No”.
Force Timer
If set to “Yes”, the phone will use the Session Timer even if the remote party does not support this feature. Otherwise, Session Timer is enabled only when the remote party supports it.
The default setting is “No”.
UAC Specify Refresher
As a caller, select UAC to use the phone as the refresher, or select UAS to use the callee or proxy server as the refresher. When set to “Omit”, the refresh object is not specified.
The default setting is “UAC”.
UAS Specify Refresher
As a callee, select UAC to use caller or proxy server as the refresher, or select UAS to use the phone as the refresher.
The default setting is “UAC”.
Force INVITE
Select “Yes” to force using the INVITE method to refresh the session timer.
The default setting is “No”.
Accounts → Account x → Codec Settings
Audio
Preferred Vocoder
(Choice 1 – 8)
Multiple vocoder types are supported on the phone, the vocoders in the list is a higher preference. Users can configure vocoders in a preference list that is included with the same preference order in SDP message. The vocoders supported are:
OPUS
PCMU
PCMA
G.723.1
G.722 (wide band)
G.729A/B
iLBC
G.726-32
G.726-16
G.726-24
G.726-40
Codec Negotiation Priority
Configures the phone to use which codec sequence to negotiate as the callee. When set to “Caller”, the phone negotiates by SDP codec sequence from received SIP Invite. When set to “Callee”, the phone negotiates by audio codec sequence on the phone. The default setting is “Callee”.
Use First Matching Vocoder in 200OK SDP
When set to “Yes”, the device will use the first matching vocoder in the received 200OK SDP as the codec. The default setting is “No”.
iLBC Frame Size
Selects iLBC packet frame size. Users can choose from 20ms and 30ms. The default setting is “30ms”.
iLBC Payload Type
Specifies iLBC payload type. Valid range is 96 to 127. Cannot be the same as Opus or DTMF payload type. Valid range is 96 to 127. The default setting is “97”.
G.726-32 Packing Mode
Selects “ITU” or “IETF” for G.726-32 packing mode.
The default setting is “ITU”.
G.726-32 Dynamic Payload Type
Specifies G.726-32 payload type. Valid range is 96 to 127. Default is 127.
Opus Payload Type
Specifies Opus payload type. Valid range is 96 to 127. It cannot be the same as iLBC or DTMF Payload Type. Default value is 123.
Send DTMF
Specifies the mechanism to transmit DTMF digits. There are 3 supported modes:
In audio: DTMF is combined in the audio signal (not very reliable with low-bit-rate codecs).
RFC2833 sends DTMF with RTP packet. Users can check the RTP packet to see the DTMFs sent as well as the number pressed.
SIP INFO uses SIP INFO to carry DTMF.
Default setting is “RFC2833”.
DTMF Payload Type
Configures the payload type for DTMF using RFC2833. Cannot be the same as iLBC or OPUS payload type.
Inbound DTMF Volume
Sets the volume size when using in-audio DTMF transmission mode. The higher the parameter value, the higher the volume value. the valid range is 0-32. The default value is 18.
Enable Audio RED with FEC
If set to “Yes”, FEC will be enabled for audio call.
Audio FEC Payload Type
Configures audio FEC payload type. The valid range is from 96 to 126.
The default value is 121.
Audio RED Payload Type
Configures audio RED payload type. The valid range is from 96 to 126.
The default value is 124.
Silence Suppression
If set to “Yes”, when silence is detected, a small quantity of VAD packets (instead of audio packets) will be sent during the period of no talking. For codec G.723 and G.729 only.
Default setting is “No”.
Jitter Buffer Type
Selects either Fixed or Adaptive for jitter buffer type, based on network conditions. The default setting is “Adaptive”.
Jitter Buffer Length
Selects jitter buffer length from 100ms to 800ms, based on network conditions. The default setting is “300ms”.
Voice Frames Per TX
Configures the number of voice frames transmitted per packet. It is recommended that the IS limit value of Ethernet packet is 1500 bytes or 120 kbps. When configuring this, it should be noted that the “ptime” value for the SDP will change with different configurations here. This value is related to the codec used in the codec table or negotiate the payload type during the actual call. For example, if set to 2 and the first code is G.729, G.711 or G.726, the “ptime” value in the SDP datagram of the INVITE request is 20 ms. If the “Voice Frame/TX” setting exceeds the maximum allowed value, the phone will use and save the maximum allowed value for the selected first codec. It is recommended to use the default setting provided, and incorrect setting may affect voice quality.
The default setting is 2.
G.723 Rate
Selects encoding rate for G723 codec.
RTP Settings
SRTP Mode
Enable SRTP mode based on your selection from the drop-down menu.
No
Enabled but Not forced
Enabled and Forced
Optional
The default setting is “No”.
SRTP Key Length
Allows users to specify the length of the SRTP calls. Available options are:
AES 128&256 bit
AES 128 bit
AES 256 bit
Default setting is AES 128&256 bit
Crypto Life Time
Enable or disable the crypto lifetime when using SRTP. If users set to disable this option, phone does not add the crypto lifetime to SRTP header. The default setting is “Yes”.
RTCP Mode
Configure RTCP port negotiation rules.
Default: Use the traditional RTCP port, which is “RTP port+1”.
Negotiate RTCP Port: Use attribute RTCP to negotiate.
RTCP Mux: The caller actively negotiates the RTCP port and indicates RTCP Mux at the same time.
RTCP Mux Only: The caller forces RTCP Mux, generated by the local media port only apply for RTP port.
RTCP Keep-Alive Method
Configures the RTCP channel keep-alive packet type.
Receiver Report: The RTCP channel will sends “receiver report+source description+RTCP extension” as keep-alive data.
Sender Report: The RTCP channel will sends “Sender report+source description+ RTCP extension” as keep-alive data.
RTP Keep-Alive Method
Configures the RTP channel keep-alive packet type.
No: No data will be sent
RTP Version 1: The wrong version infor “1” will be carried when sending RTP data packets.
RTP Packet with Silent Payload: If set to “RTP Packet with Silent Payload”, the silent payload will be carried when sending RTP format packets.
VQ RTCP-XR Collector Address Selection
Configures the method for VQ RTCP-XR collector address selection. There are two supported methods:
Manual: use the manually configured collector address with server/port in order to process XR reports.
Auto: VQ collector address and port are not required to be filled in order to send XR reports. If the collector address is manually filled in, the same address will be used. If not filled in, the same server/port that is used for SIP registration will be used to process XR reports.
The default setting for this parameter is “Manual”.
VQ RTCP-XR Collector Name
Configure the host name of the central report collector that accepts voice quality reports contained in SIP PUBLISH messages.
VQ RTCP-XR Collector Address
Configure the IP address of the central report collector that accepts voice quality reports contained in SIP PUBLISH messages.
VQ RTCP-XR Collector Port
Configure the port of the central report collector that accepts voice quality reports contained in SIP PUBLISH messages.
Symmetric RTP
Configures whether Symmetric RTP is used or not. Symmetric RTP means that the UA uses the same socket/port for sending and receiving the RTP stream. The default setting is “No”.
RTP Timeout (s)
Configures the RTP timeout of the phone. If the phone does not receive the RTP packet within the specified RTP time, the call will be automatically disconnected. The default range is 0 and 6-600. If set to 0, the phone will not hang up the call automatically.
Accounts → Account x → Call Settings
General
Key as Send
Allows users to configure either the “*” or “#” keys as the “Send” key. Please make sure the dial plan is properly configured to allow dialing * and # out. The default setting is “Pound (#)”.
No Key Entry Timeout
Configures the timeout (in seconds) for no key entry. If no key is pressed after the timeout, the collected digits will be sent out. The default value is 4 seconds. The valid range is from 1 to 15.
Send Anonymous
If set to “Yes”, the “From” header in outgoing INVITE messages will be set to anonymous. Default is “No”.
Anonymous Call Rejection
If set to “Yes”, anonymous calls will be rejected.
The default setting is “No”.
Enable Call Waiting
Configures the call waiting function for this account. If set to “Default”, it will be configured according to global call waiting function. Default value is “Default”.
RFC2543 Hold
Allows users to toggle between RFC2543 hold and RFC3261 hold. RFC2543 hold (0.0.0.0) allows user to disable the hold music sent to the other side. RFC3261 (a line) will play the hold music to the other side. The default setting is “No”.
Ring Timeout
Configures the timeout (in seconds) for the phone to ring when an incoming call is not answered. Valid range is 30 to 3600. The default setting is 60.
Call Log
Configures Call Log setting on the phone.
Log All Calls
Log incoming/Outgoing Only (missed calls NOT recorded)
Disable Call Log
The default setting is “Log All Calls”.
Auto Answer
Auto Answer
If set to “Yes”, the phone will automatically turn on the speaker phone to answer incoming calls after a short reminding beep. Default setting is “No”.
Auto Answer Numbers
Allows the user to configure specific numbers to auto answer. If not set, all numbers will be auto answered If auto answer is enabled. Up to 10 numbers can be configured.
Intercom
Play warning tone for Auto Answer Intercom
If enabled, phone will play warning tone when auto answering Intercom.
Custom Alert-Info for Auto Answer
Used exclusively to match the contents of the Alert-Info header for auto answer. The default auto answer headers will not be matched if this is defined.
Allow Auto Answer by Call-Info/Alert-Info
If set to “Yes”, the phone will automatically turn on the speaker phone to answer incoming calls after a short reminding beep, based on the SIP Call-Info/Alert-Info header sent from the server/proxy.
Default is “Yes”.
Allow Barging by Call-Info/Alert-Info
When enabled, the phone will automatically put the current call on hold and answer the incoming call based on the SIP Call-Info/Alert-Info header sent from the server/proxy. However, if the current call was answered based on the SIP Call-Info/Alert-Info header, then all other incoming calls with SIP Call-Info/Alert-Info headers will be rejected automatically. Default setting is “No”.
Mute on Intercom Answer
If enabled, the phone will mute the mirophone after answer an intercom call via Call-Info/Alert-Info.
Record
Record Key Default Fuction
Configures whether to turn the recording function on or off when the “Record” key is pressed for the first time in a call using this account. For example, the SIP server can be configured with automatic call recording. In this case, Record key default function should be configured as “Record off”.
Call Recording On
Configures the DTMF sequence sent when pressing the Record key during a call on this account. Toggles between this value and the off code if possible; otherwise always sends this code.
Call Recording Off
Configures the DTMF sequence sent when pressing the Recording key during a call on this account when turning recording off.
Transfer
Transfer on Conference Hangup
Configures whether the call is transferred to the other party if the conference initiator hangs up.
The default setting is “No”.
Transfer to VM feature code
During a call, press the transfer to voicemail softkey or voicemail hard button, enter the extension number, and then transfer the call to the extension voicemail by entering the transfer to VM feature code defined. At this point, the code will be used as an extension prefix and called into the SIP server to complete the transfer to voicemail event.
Enable Recovery on Blind Transfer
Enable recovery to the call to the transferee on failing blind transfer to the target. The default setting is “Yes”.
Notes:
This feature only applies to blind transfer.
This feature depends on how server handles transfer. If there is any NOTIFY from server, this feature will not take effect. If server responds 4xx, phone should try to recover regardless of this option.
During blind transfer, after transferor received 200/202 for REFER, but there is no NOTIFY from server after 7 seconds, transferor will decide to recover the call with transferee or not depending on the options. This is the only case that this option will be applied.
Blind Transfer Wait Timeout
Configures the timeout (in seconds) when waiting for sipfrag response in blind transfer. Valid range is 30 to 300. Default setting is “30”.
Refer-To Use Target Contact
If set to “Yes”, the “Refer-To” header uses the transferred target’s Contact header information for attended transfer.
Call Forward
Enable Forward All
If set to “Yes”, all calls will be forwarded to the number specified below. Disabled by Default
All To
Specifies the number to be forwarded to when enabled Forward all.
Enable Busy Forward
If set to “Yes”, the call will be forwarded to the number specified below on busy. Disabled by Default
Busy To
Specifies the number to be forwarded to for Call Forward On Busy.
Enable No Answer Forward
If set to “Yes”, call will be forwarded to the number specified below on no answer. Disabled by Default
No Answer To
Specifies the number to be forwarded to for Call Forward On No Answer.
No Answer Timeout (s)
Defines the timeout (in seconds) before the call is forwarded on no answer.
Enable Override Forward
If enabled, the local call forward is disabled when an incoming call comes in from the configured override forward number. Disabled by Default
Override Forward Numbers
Configures the number to override the local forward function. The Max number is 10.
Dial Plan
Dial Plan Prefix
Configures a prefix added to all numbers when making outbound calls.
Bypass Dial Plan
Bypass the dial plan when dialing from one of the available items:
Contacts
Call History Incoming Call
Call History Outgoing Call
Dialing Page
MPK
API
Dial Plan
Configures the dial plan rule. For syntax and examples, please refer to user manual for more details.
test : only string “test” will pass the dial plan check
^ – exclude
[3-5] – any digit of 3, 4, or 5
[147] – any digit of 1, 4, or 7
<2=011> – replace digit 2 with 011 when dialing
| – the OR operand
x – uses the x character literally and escapes its representation
Example 1: {[369]11 | 1617xxxxxxx}
Allow 311, 611, and 911 or any 11 digit numbers with leading digits 1617;
Example 2: {^1900x+ | <=1617>xxxxxxx}
Block any number of leading digits 1900 or add prefix 1617 for any dialed 7 digit numbers;
Example 3: {1xxx[2-9]xxxxxx | <2=011>x+}
Allows any number with leading digit 1 followed by a 3-digit number, followed by any number between 2 and 9, followed by any 7-digit number OR Allows any length of numbers with leading digit 2, replacing the 2 with 011 when dialed.
Example 4: [x-X*]+
Allows any number starting with any digit from “0-9” followed by a hyphen “-” and any character from “0-9, a-z, A-Z” then an asterisk “*”.
Example of a simple dial plan used in a Home/Office in the US: { ^1900x. | <=1617>[2-9]xxxxxx | 1[2-9]xx[2-9]xxxxxx | 011[2-9]x. | [3469]11 }
Explanation of example rule (reading from left to right):
^1900x. – prevents dialing any number started with 1900;
<=1617>[2-9]xxxxxx – allows dialing to local area code (617) numbers by dialing7 numbers and 1617 area code will be added automatically;
1[2-9]xx[2-9]xxxxxx |- allows dialing to any US/Canada Number with 11 digits length;
011[2-9]x – allows international calls starting with 011;
[3469]11 – allows dialing special and emergency numbers 311, 411, 611 and 911.
Note: In some cases, where the user wishes to dial strings such as *123 to activate voice mail or other applications provided by their service provider, the * should be predefined inside the dial plan feature. An example dial plan will be: { *x+ } which allows the user to dial * followed by any length of numbers.
Max length of dial plan is up to 1024 characters.
Call Display
Caller ID Display
When set to “Auto”, the phone will look for the caller ID in the order of P-Asserted Identity Header, Remote-Party-ID Header and From Header in the incoming SIP INVITE. When set to “Disabled”, all incoming calls are displayed with “Unavailable”.
Callee ID Display
When set to “Auto”, the phone will update the callee ID in the order of P-Asserted Identity Header, Remote-Party-ID Header and To Header in the 180 Ringing. When set to “Disabled”, callee id will be displayed as “Unavailable”. When set to “To Header”, caller id will not be updated and displayed as To Header.
Ringtone
Ringback Tone at No Early Media
Play ringback tone when there is no receiving early media RTP packets. Disabled by Default
Account RingTone
Allows users to configure the ringtone for the account. Users can choose from different ringtones from the dropdown menu.
Note: User can also choose silent ring tone or doorbell.
Ignore Alert-Info header
Configures to play default ringtone by ignoring Alert-Info header.
The default setting is “No”.
Enable Alert-Info Bellcore Mapping
This feature allows the IP phone to enable or disable the mapping of keywords in the Alert-Info header to predefined Bellcore ring tones.
When an Alert-Info header containing “Bellcore-dr%N” is received—where N is a value between 1 and 5—the corresponding Bellcore ring tone will be played if the option is enabled. If the option is disabled, a corresponding custom ring tone will be played instead.
When N is 0, a silent ringtone will be used. When N is 6, a corresponding custom ringtone will always be played, regardless of the option setting.
If N is outside the valid range (i.e., less than 0 or greater than 6), the default ring tone will be used.
Note: This option is enabled by default.
Match Incoming Caller ID
Specifies matching rules with number, pattern, or Alert Info text (up to 10 matching rules). When the incoming caller ID or Alert Info matches the rule, the phone will ring with selected distinctive ringtone. Matching rules:
Specific caller ID number. For example, 8321123.
A defined pattern with certain length using x and + to specify, where x could be any digit from 0 to 9. Samples:
xx+ : at least 2-digit number.
xx : only 2-digit number.
[345]xx: 3-digit number with the leading digit of 3, 4 or 5.
[6-9]xx: 3-digit number with the leading digit from 6 to 9.
Alert Info text
Users could configure the matching rule as certain text (e.g., priority) and select the custom ring tone mapped to it. The custom ring tone will be used if the phone receives SIP INVITE with Alert-Info header in the following format: Alert-Info: <http://127.0.0.1>; info=priority When the incoming caller ID or Alert Info matches one of the 10 rules, the phone will ring with the associated ringtone.
Note: Beginning with firmware version 1.0.3.98, a new feature was introduced that enables the use of a ringtone stream via a remote URL. The functionality of this feature works as follows: the following audio file named test.wav is uploaded onto an HTTP server and the remote URL is “http://192.168.5.165:8080/test.wav;info=ring3”, the IP phone then attempts to use the provided URL first to play the ringtone. If the URL is not functional for some reason, it will then use the info=ring3 parameter, as the default ringtone.
Accounts → Account x → Advanced Settings
Security Settings
Check Domain Certificates
Configures whether the domain certificates will be checked when TLS/TCP is used for SIP Transport. The default setting is “No”.
Trusted Domain Name List
Configure the list of trusted domain names, which supports filling in the SAN list used only for domain name verification in TLS to obtain certificates. If it matches any item in the trusted domain name list, the certificate is trusted. By default, the remote proxy domain name and SIP server domain name are trusted. This field allows numbers/letters/-/./*. It supports wildcard domain names, such as “*.mycompany.com“, and trusts any domains ending with “.mycompany.com“. Note: The trusted domain name list supports up to 10 domain names
Validate Certificate Chain
Validate certification chain when TCP/TLS is configured.
The default setting is “No”.
Validate Incoming SIP Messages
Specifies if the phone will check the incoming SIP messages Caller ID and CSeq headers. If the message does not include the headers, it will be rejected. The default setting is “No”.
Omit charset=UTF-8 in MESSAGE
Omit charset=UTF-8 in MESSAGE content-type
Allow Unsolicited REFER
Configures whether to dial the number carried by Refer-to header after receiving out-of-dialog SIP REFER request actively.
If set to “Disabled“, the phone will send error warning and stop dialing.
If set to “Enabled/Force Auth“, the phone will dial the number after sending authentication. If the authentication fails, it will stop dialing.
If set to “Enabled“, the phone will dial all numbers carried by SIP REFER.
Accept Incoming SIP from Proxy Only
When set to “Yes”, the SIP address of the Request URL in the incoming SIP message will be checked. If it does not match the SIP server address of the account, the call will be rejected. The default setting is “No”.
Check SIP User ID for Incoming INVITE
If set to “Yes”, SIP User ID will be checked in the Request URI of the incoming INVITE. If it does not match the phone’s SIP User ID, the call will be rejected. The default setting is “No”.
Allow SIP Reset
Allow SIP Notification message to perform factory reset.
The default setting is “No”.
Authenticate Incoming INVITE
If set to “Yes”, the phone will challenge the incoming INVITE for authentication with SIP 401 Unauthorized response.
The default setting is “No”.
MOH
On Hold Reminder Tone
Configures to play reminder tone when the call is on hold.
Music On Hold URI
Music On Hold URI to call when a call is on hold if server supports it.
Advanced Features
Special Feature
Different soft switch vendors have special requirements. Therefore, users may need select special features to meet these requirements. Users can choose from Standard, Nortel MCS, Broadsoft, CBCOM, RNK, Sylantro, Huawei IMS, Zoom, PhonePower, and UCM Call center depending on the server type. The default setting is “Standard”.
Feature Key Synchronization
This feature is used for Broadsoft call feature synchronization. When it is enabled, DND, Call Forward features and Call Center Agent status can be synchronized between Broadsoft server and phone. Default is “Disabled”.
Conference URI
Configures the conference URI when using Broadsoft N-way calling feature.
Reboot on check-sync event without “reboot=”
If option is enabled, the phone will do reboot when receiving SIP NOTIFY check-sync event without “reboot=” header. If the option is disabled, the phone will do provision and not reboot when receiving SIP NOTIFY check-sync event without “reboot=” header.
Note: This option is disabled by default.
BroadSoft Call Center
When Special Features is set to BroadSoft, enables Feature Key Synchronization regardless of web UI settings. Default is Disabled.
Hoteling Event
When Special Features is set to BroadSoft, enables the Hoteling Event feature. Disabled by default.
Call Center Status
When Special Features is set to BroadSoft, enables the Call Center Status feature. The phone sends a SUBSCRIBE request to the server to retrieve call center status. Disabled by default.
BroadSoft Executive Assistant
When Special Features is set to BroadSoft, enables the Executive Assistant feature. Disabled by default.
BroadSoft Call Park
When Special Features is set to BroadSoft, enables the BroadSoft Call Park feature. The phone sends a SUBSCRIBE request to the BroadSoft server to receive Call Park notifications. Disabled by default.
Enable Call Monitor Function
When Special Features is set to Zoom, enables the Call Monitor function. Enbaled by default.
Support Call Monitor Privacy Mode
When Special Features is set to Zoom, enables privacy mode for Call Monitor. This mode can be toggled on or off directly from the phone’s LCD. Enabled by default.
Barge-in Feature Code
When Special Features is set to Zoom, specifies the feature code used for barge-in (e.g., *123).
Listen Feature Code
When Special Features is set to Zoom, specifies the feature code used to silently monitor an active call.
Whisper Feature Code
When Special Features is set to Zoom, specifies the feature code used to whisper during a monitored call, allowing private guidance without being audible to the other call participants.
Takeover Feature Code
When Special Features is set to Zoom, specifies the feature code used to take over an active monitored call.
BLF (Busy Lamp Field) – GRP2604 only
Presence Eventlist URI
Configures Presence Eventlist URI to monitor the extensions on Multi-Purpose Keys.
Eventlist BLF URI
Configures Eventlist BLF URI to monitor the extensions on Multi-Purpose Keys
Auto provision Eventlist
Select the type of Eventlist to get automatically provisioned onto available MPKs. Whether its BLF Eventlist or Presence Eventilist.
BLF Call-pickup
Configures BLF Call-pickup method:
Auto:
The phone will do either Prefix or barge in code for BLF pickup depend on which on is set.
Force BLF Call-pickup by prefix:
The phone will ignore both BLF pickup method, now the monitored VPK will only dial the extension if pressed
Disabled
The phone will ignore both BLF pickup method, now the monitored VPK will only dial the extension if pressed
BLF Call-pickup Prefix
Configures the prefix prepended to the BLF extension when the phone picks up a call with BLF key. The default setting is **.
Call Pickup Barge-In Code
Configures feature access code of Call Pickup with Barge-in feature.
PUBLISH for Presence
Enables presence feature on the phone.
The default setting is “No”.
SCA
Line-Seize Timeout
Configures the interval (in seconds) when the line-seize is considered timed out when Shared Call Appearance feature is used. Valid range is 15 to 60.
Call Park
Call Park Feature Code
Configure the feature access code for parking current call to parking lot or another extension.
Call Park Retrieve Feature Code
Configure the feature access code for retrieving the parked call on accounts or BLF keys.
Accounts → Account x → Dial Plan
Name
Enter the name for the configured rules.
Rule
Enter the rule settings (number pattern, prefix to add …etc.).
Type
Choose the type of the rule:
Pattern: The phone will dial the number matching the entered pattern.
Block: The phone will block the number/pattern matching the rule.
Dial now: The phone will dial immediately the number once the DTMF matches the dial plan.
Prefix: Specify the “Replaced” field to replace by the “Used” field to dial.
Second tone: The phone plays the second dial tone when the entered “Trigger” digit is dialed.
Accounts → Account x → Hidden Number Plan
Hidden Number Feature
If set to “Yes”, incoming and outgoing number display will be handled according to hidden number plan.
Hidden Number Plan List
Currently, incoming and outgoing number display will be handled according to hidden number plan. Users are able to configure the hidden number rules, matching their syntax rules from top to bottom as follows:
Element Rules • x:any digit number from 0-9 • +:any length after x(>=1) • [-+…] or *:Escape symbol • ():The part that needs to be hidden, there can only be one hidden part in a rule
Enter the number to test the hidden rules of the current page. After confirming, please save and apply it.
Accounts → Account x → Feature Codes
Enable Local Call Features
Configures whether call features are handled locally on the phone using user feature codes or through feature codes provisioned by the server. This setting affects how features such as Do Not Disturb (DND) and Call Forwarding are executed.
Disabled: The provisioned feature codes from the server will be used. User-configured feature codes are used only if server-provisioned feature codes are not provided.
Enabled: The device performs Do Not Disturb, Call Forwarding, and other call features locally using its locally configured feature codes.
Call Forwarding & DND Only: The device performs only Do Not Disturb and Call Forwarding locally.
Enabled without Feature Codes: The device performs local call features, but does not support local feature codes.
Note: If the device is registered with Broadsoft account, it does not matter if local call features are enabled or disabled, once the Broadsoft account is set, special feature to Broadsoft and Feature Key Synchronization is enabled, the call feature will be handled by Broadsoft server, not by the phone.
Configures Call Forward No Answer feature code to activate no answer call forwarding.
Off
Configures Call Forward No Answer feature code to deactivate no answer call forwarding.
Target
The extension the call will be forwarded to.
Call Forward No Answer Timeout (s)
Defines the timeout (in seconds) before the call is forwarded on no answer. valid range is 1 to 120.
Accounts → Account Swap
Swap Account Settings
Allows users to swap the two accounts that they have configured. This will Increase the flexibility of account management.
Note: Make sure to press “Start” to complete the process.
Account settings definitions
Phone Settings Page Definitions
Phone Settings > General settings
Basic Settings
Local RTP Port
This parameter defines the local RTP port used to listen and transmit. It is the base RTP port for channel 0. When configured, channel 0 will use this port _value for RTP; channel 1 will use port_value+2 for RTP. Local RTP port ranges from 1024 to 65400 and must be even. Default value is 5004.
Local RTP Port Range
Gives users the ability to define the parameter of the local RTP port used to listen and transmit. This parameter defines the local RTP port from 48 to 10000. This range will be adjusted if local RTP port + local RTP port range is greater than 65486. Default setting is 200.
Use Random Port
When set to “Yes”, this parameter will force random generation of both the local SIP and RTP ports. This is usually necessary when multiple phones are behind the same full cone NAT. The default setting is “Yes”
Note: This parameter must be set to “No” for Direct IP Calling to work.
Keep-alive Interval
Specifies how often the phone sends a blank UDP packet to the SIP server to keep the “ping hole” on the NAT router to open. The default setting is 20 seconds. The valid range is from 10 to 160.
STUN Server
The IP address or Domain name of the STUN server. STUN resolution results are displayed in the STATUS page of the Web GUI.
Only non-symmetric NAT routers work with STUN.
Use NAT IP
The NAT IP address used in SIP/SDP messages. This field is blank at the default settings. It should ONLY be used if it is required by your ITSP.
Delay Registration
Configures specific time that the account will be registered after booting up.
Enable Outbound Notification
Configures whether to enable outbound notifications such as Action URL.
Clean User Data While Different Users Log In
When enabled, if the current login account is different with last one, Device under tesr will delete the contact and call history of the last account.
Public Mode
Enable Public Mode
Configures to turn on/off public mode for hot desking feature.
Public Mode Username Prefix
Configures the prefix of the username for public mode login.
Public Mode Username Suffix
Configures the suffix of the username for public mode login.
Allow Multiple Accounts
Configures remaining account with a SIP account and be able to make/receive calls on the configured account even if the user is not logged in to the public mode.
– If set to “No”, then after the user logs in to the public mode account on LCD, only the public mode account can be used on the phone even though there are other configured SIP accounts.
– If set to “Yes,” then after the user logs in to the public mode account on LCD, other configured SIP accounts on the phone can also be used. Note: Note: This option requires enabling public mode to take effect.
Enable Remote Synchronization
If enabled, the phone will automatically download the current account’s settings from the remote server and upload it to the server.
Server Type
Configures the Server type and protocol used to send requests to the Remote Synchronization Server.
This can be set to TFTP, FTP, HTTP
Server Path
Configures the server path for the Remote Synchronization feature.
FTP/HTTP Username
The username for FTP/HTTP server.
FTP/HTTP Password
The password for FTP/HTTP server.
Public Mode Timeout
Sets the public mode timeout (min), the time starts from the last idle state of the phone. The Valid Range is 10-1440min
The Default value is 10min
Phone Settings > Call Settings
General
Key Mode
Account Mode
In Calling State, each key displays the call status of the corresponding account. Click to switch to the first line under this account or select the account to initiate a new call.
Line Mode
In Calling State, each key controls a line, and the call line can be switched by pressing the key.
Preferred Default Account
Select the preferred default account for on-hook or off-hook dialing. When the selected account is unavailable, system will use the first available account to dial out.
Mute Key Functions While Idle
Select “Mute” key function while the phone is idle.
DND: Pressing the “Mute” key when the phone is idle will enable DND.
Idle Mute: Pressing the “Mute” key when the phone is idle will set the phone to be muted when answering incoming calls.
Disabled
Last Call Froward Always
If enabled, the number put into the ForwardAll feature will be stored the next time you use the ForwardAll softkey. Note: ForwardAll softkey currently only used for account 1.
Show SIP Error Response
Configures to enable SIP error response information displayed on LCD screen.
Do Not Escape ‘#’ as %23 in SIP URI
Replaces # by %23 for some special situations.
User-Agent Prefix
Configures the prefix in the User-Agent header.
Call-ID Domain Mode
Configure the Call-ID domain format.
Masked Info: The host IP address will be transformed according to the built-in rules, and the resulting value will be used in the Call-ID Domain. Masking the Call-ID domain reinforces the security by protecting the identity of the device in the network. See the screenshot below.
Plaintext Host IP Address: The Call-ID Domain will use the host IP address in plain text. See the screenshot below.
Note: The default setting is Masked Info.
Enable Hook Switch
When set to “No”, disable hook switch completely; When set to “Yes, except answering call”, hook switch cannot be used for answering call.
Enable Speaker Key
Sets whether to enable the speaker key.
When “Yes” is selected, the speaker key can be used to make calls, end calls, and switch channels;
when “No” is selected, the speaker key is completely disabled; when “For Switching Channels”is selected, the user cannot use the speaker key to hang up the call.
Voicemail Key Mode
Enables/disables the voicemail key.
Default: The voicemail key will function as intended, directing users to voicemails.
Disabled: Under this setting, the voicemail button will not function.
Contact Source Priority
Configure the priority if the ID source displayed on the phone when incming/outgoing calls. Select on ID source and click Up/Down arrow on the right to adjust the order. Note: If the “Caller ID Display” under the account is configured as “Disabled”, the caller number cannot be obtained, the phone will only display “Unavailable”.
Outgoing
Click-To-Dial Feature
Enables Click-To-Dial feature. If this feature is enabled, user could click the green dial button on left top corner of phone’s Web GUI, then choose the account and dial to the target number. The default setting is “Disabled”.
Users can utilize the Click2Dial browser extension for screen sharing during calls, enabling remote presentations, as well as use it for direct file sharing from their computers.
This options is disabled by default.
Enable Direct IP Call
Enables the Direct IP Call feature. This option is enabled by default but will be disabled after a factory reset.
Use Quick IP Call Mode
When set to “Yes”, users can dial an IP address under the same LAN/VPN segment by entering the last octet of the IP address.
This options is disabled by default.
Enable Paging Call Mode
Configures enable/disable paging call mode of the phone. If set to “Yes”, the feature of paging call will be enabled. Default is Yes.
Predictive Dialing Feature
Configures the predictive dialing feature on the call screen.
Predictive Dialing Source
Predictive dialing feature will sequentially search the number based on the selected sources.
Enable Local Dialing DTMF Tone in Speaker Mode
Configures whether to play local DTMF tone during dialing when using speaker, if enabled, you can set it play normal DTMF, or a single specific tone
Onhook Dial Barging
When the option is set to “Disabled”, onhook dialing won’t be interrupted by an incoming call.
Off-hook Auto Dial
Configures the digits to be dialed via the first account when the phone is off-hook.
Off-hook Auto Dial Delay
Configures the digits to be dialed via the first account when the phone is off-hook.
Off-hook/On-hook Timeout (s)
If configured, when the phone is in the off-hook or on-hook dialing state, it will go idle after the timeout (in seconds). Valid range is 10 to 60.
Enable Live Keypad
If enabled, phone will automatically dial out and turn on hands-free mode when keypad or softkey is pressed.
Live Keypad Expiration
Configures the expiration time for live keypad. Interval is between 2s and 15s. Default value is 5s.
Enable Auto Redial
Configures to redial automatically at a later time when the dialed number is currently busy.
Auto Redial Times
Configures the total times to redial if “Auto Redial” is enabled.
Auto Redial Interval
Configures the interval between each redial if “Auto Redial” is enabled.
Bypass Dial Plan Through Call History and Directories
Configures hether to check dial plan when dialing from call history and phonebook directories.
Enable Call Completion Service
If enabled, phone will automatically redial the previous failed call when the remote party becomes available.
Incoming
Enable Incoming Call Popup
If set to “Yes”, phone will pop up an incoming call window to notify the call.
Enable Missed Call Notification
If set to “Yes”, phone will show a prompt about the missed call information. Note: users can still initiate calls directly when a missed call notification is displayed.
Return Code When Refusing Incoming Call
Configures the return code that phone will send to the call when it refuses an incoming call.
Allow Incoming Call before Ringing
This allows incoming calls after dialed but before ringing. This can be used under custom user configuration based on need.
Enable Call Waiting
Disables the call waiting feature. The default setting is “Yes”.
Ring for Call Waiting
Configures the phone to ring instead of playing call waiting tone when handset or headset is used.
Auto Answer Delay
Configures the delay for automatically answering the incoming call. Valid range is 0 to 10 (seconds)
In Call
Enable In-call DTMF Display
When set to “No”, the DTMF digits entered during a call will not be displayed on LCD. Enabled by Default.
Enable Local In-call DTMF Tone in Speaker Mode
Allows users to enable/disable hearing DTMF tones locally through the device’s speaker during a call when in speaker mode.
Enable Sending DTMF via specific MPKs
Allows certain MPKs to send DTMF in-call. This option does not affect Dial DTMF. Disabled by Default
Show on Hold Duration
Shows the duration of holding a call on the LCD Enabled by Default.
Enable Auto Unmute
If the option is enabled, automatically unmute the phone when a user unholds the call or establishes a new call. Enabled by Default
In-call Dial Number on Pressing Transfer Key
Configures the number to be dialed as DTMF using TRANSFER button.
Enable Busy Tone on Remote Disconnect
Configures the phone to Play busy tone when call is disconnected remotely. Enabled by Default.
Enable Mute Key In Call
When set to “No”, the mute key will not work while on call. Enabled by Default.
Transfer
Enable Transfer
Enables Call Transfer feature
Hold Call Before Completing Transfer
When set to “No”, the phone will not hold the current call or the transfer target for an Attended Transfer.
Attended Transfer Mode
Static: If this option is selected, attended transfer can only be performed with established calls
Dynamic: If this option is selected, attended transfers can be performed with established calls or be initiated during the transfer process. This option does not affect the user’s ability to perform blind transfers.
Call Park
Enable Call Park Softkey
Enable call park service to use call park related softkeys.
Call Park Softkey Feature Code
Configure the feature access code for parking current call to parking lot or another extension.
Call Park Retrieve Softkey Feature Code
Configure the feature access code for retrieving the parked call on accounts or parking lot.
Group Call Park Softkey Feature Code
Configure the feature access code for parking current call to the group current user is in.
DND
Enable DND Feature
If enabled, the Do Not Disturb feature can be activated via MUTE key, MPK, or using the menu on LCD.
Return Code Upon DND
Configures the return code that phone will send when it has DND enabled.
Override DND
Configures to override the local DND function.
Off: The local DND function is normal.
Allow All: The local DND function is invalid.
Allow Only Contacts: When the local DND function is enabled, only local contacts and the configured override numbers can call in.
Allow Override Numbers: When the local DND is turned on, only the configured coverage numbers can call in.
The default setting is off.
Override DND Numbers
Configure the number to override the local DND function.
Conference
Enable Conference
Enables the conference feature
Hold Call Before Conferee
Configures whether to put the current call on hold while adding new members to a conference. If set to “Yes”, the current call will be put on hold when the host presses conference or add key to invite new members. When the invited member answers the call and agrees to attend the conference, the host needs to manually resume the conference with the new member added. If set to “No”, the current call will not be put on hold and the invited member will join the meeting automatically after answering the call.
BLF
Enable BLF Pickup Screen
Configures to show a softkey which leads to a monitor screen when a monitering BLF line is ringing.
Enable BLF Pickup Sound
Configures to play sound when a monitering BLF line is ringing.
Hide BLF Remote Status
Configures to hide the status information of the monitored line.
IM
Enable IM Popup
If enabled, the phone will show a pop up upon receiving an IM.
Instant Message Popup Timeout
Configures the number of seconds that the message will remain on screen.
Play Tone on Receiving IM
Configures to play a short tone when phone receives an IM during idle state
Record
Enable the Indicator in Recording
When the call is recorded, the recording indicator is displayed on the LCD. Enabled by default.
Phone settings > Ringtone
Ringtone
Call Progresses Tones:
System Ring Tone
Dial Tone
Second Dial Tone
Message Waiting
Ring Back Tone
Call-Waiting Tone
Call Waiting Tone Gain
Auto-Answer Tone Gain
Busy Tone
Reorder Tone
Configures ring or tone frequencies based on parameters from local telecom. The default value is North American standard. Frequencies should be configured with known values to avoid uncomfortable high pitch sounds.
Syntax: f1=val,f2=val[,c=on1/off1[-on2/off2[-on3/off3]]]; (Frequencies are in Hz and cadence on and off are in 10ms)
ON is the period of ringing (“On time” in ‘ms’) while OFF is the period of silence.
To set a continuous ring, OFF should be zero. Otherwise, it will ring ON ms and a pause of OFF ms and then repeat the pattern. Up to three cadences are supported.
Call Waiting tone gain can be set to either: Low, Medium, or High, it is set to Low by Default
Auto-Answer Tone Gain can be set to either: Low, Medium, or High, Set to Medium by Default
Provision
Total Number of Custom Ringtone Update
Configures the number of custom ringtones to update in the provisioning process.
Default Value is 6.
Phone settings > Multicast Paging
Multicast Paging Function
Enable or disable multicast paging
Allowed In DND Mode
Allow Multicast Paging when DND mode is enabled.
Default Setting is “No”.
Paging Barge
During active call, if incoming multicast page is higher priority (1 being the highest) than this value, the call will be held, and multicast page will be played. The default setting is “Disabled”.
Paging Priority Active
If enabled, during a multicast page if another multicast is received with higher priority (1 being the highest) that one will be played instead. The default setting is “Enabled”.
Multicast Channel Number
Multicast Channel Number (0-50). 0 for normal RTP packets, 1-50 for Polycom multicast format packets.
Multicast Paging Codec
The codec for sending multicast pages, there are 5 codecs could be used: G.731.1 PCMU, PCMA, G.726-32, G.729A/B, G.722 (wide band). Default setting is “PCMU”.
Multicast Sender ID
Outgoing caller ID that displays to your page group recipients (for multicast channel 1 – 50).
Multicast Call Timeout (s)
Set multicast based call timeout. When the multicast call exceeds the set time, it will automatically hang up and set to 0 without timeout. Default value is 0.
Multicast Tone
If enabled, there will be a prompt sound at the beginning and end of the receiver’s multicast intercom. The default setting is enabled.
Multicast Listening
Defines multicast listening addresses and labels. For example:
“Listening Address” should match the sender’s Value such as “237.11.10.11:6767”
“Label” could be the description you want to use.
For details, please check the “Multicast Paging User Guide” on our Website.
Phone settings definitions
Network Settings Page Definitions
Network Settings 🡪 Ethernet Settings
Internet Protocol
Selects “IPv4 Only”, “IPv6 Only”, “Both, prefer IPv4” or “Both, prefer IPv6”. The default setting is “IPv4 only”.
IPv4 Address
IPv4 Address
Allows users to configure the appropriate network settings on the phone to obtain IPv4 address. Users could select “DHCP”, “Static IP” or “PPPoE”. By default, it is set to “DHCP”.
Host name (Option 12)
Specifies the name of the client. This field is optional but may be required by Internet Service Providers.
Vendor Class ID (Option 60)
Used by clients and servers to exchange vendor class ID.
IPv4 Address
Enter the IP address when static IP is used.
Subnet Mask
Enter the Subnet Mask when static IP is used for IPv4.
Gateway
Enter the Default Gateway when static IP is used for IPv4.
PPPoE Account ID
Enter the PPPoE account ID.
PPPoE Password
Enter the PPPoE Password.
PPPoE Service Name
Enter the PPPoE Service Name.
DNS Server 1
Enter the DNS Server 1 when static IP is used for IPv4.
DNS Server 2
Enter the DNS Server 2 when static IP is used for IPv4.
Preferred DNS Server
Enters the Preferred DNS Server for IPv4.
IPv6 Address
IPv6 Address Type
Allows users to configure the appropriate network settings on the phone to obtain IPv6 address. Users could select “Auto-configured” or “Statically configured” for the IPv6 address type.
Static IPv6 Address
Enter the static IPv6 address when Full Static is used in “Statically configured” IPv6 address type.
IPv6 Prefix Length
Enter the IPv6 prefix length when Full Static is used in “Statically configured” IPv6 address type.
IPv6 Prefix(64 bits)
Enter the IPv6 Prefix (64 bits) when Prefix Static is used in “Statically configured” IPv6 address type.
DNS Server 1
Enter the DNS Server 1 for IPv6.
DNS Server 2
Enter the DNS Server 2 for IPv6.
Preferred DNS server
Enter the Preferred DNS Server for IPv6.
802.1X
802.1X mode
Allows the user to enable/disable 802.1X mode on the phone. The default value is disabled. To enable 802.1X mode, this field should be set to EAP-MD5, users may also choose EAP-TLS, or EAP-PEAPv0/MSCHAPv2.
802.1X Identity
Enter the Identity information for the 802.1x mode.
Note: Letters, digits and special characters including @ and – are accepted.
MD5 Password
Enter the MD5 Password for the 802.1X mode.
Note: Letters, digits and special characters including @ and – are accepted.
802.1X CA Certificate
Uploads / deletes the 802.1X CA certificate to the phone; or delete existed 802.1X CA certificate from the phone.
802.1X Client Certificate
Uploads / deletes the 802.1X CA certificate to the phone; or delete existed 802.1X CA certificate from the phone.
Enables / Disables the Wi-Fi on the phone. Three options are available:
Enable: Enables Wi-Fi to connect to Wi-Fi network.
Disable: Disables Wi-Fi. User has ability to enable Wi-Fi from LCD Menu.
Disable & Hide Menu from LCD: Disables Wi-Fi and hides “Wi-Fi Settings” menu from phone LCD.
Wi-Fi Band
Set the type of Wi-Fi Band whether its 2G or 5G or 5G&2G.
Country Code
Configures Wi-Fi country code.
ESSID
ESSID
This parameter sets the ESSID for the Wireless network. Press “Scan” to scan for the available wireless network. Click on “Connect” and enter the authentication credentials of the Wi-Fi network to connect to. Users can connect to hidden networks by pressing on “Add Network” and configure:
Security Mode
Defines the security mode used for the wireless network when the SSID is hidden, the security protocols supported are:
WEP: Outdated and insecure Wi-Fi encryption protocol using RC4, easily compromised.
WPA/WPA2: Improved Wi-Fi security using PSK, with WPA2 utilizing AES encryption.
WPA-Enterprise(802.1x): Enterprise Wi-Fi security with 802.1X authentication and RADIUS server.
WPA3-SAE: Latest Wi-Fi security with enhanced protections against brute-force attacks.
WPA3-Enterprise(802.1x): Stronger encryption and security for enterprise networks using 802.1X authentication.
Password
Determines the password for the selected Wi-Fi network.
Advanced
Configures IPv4 and IPv6 modes.
Network Settings 🡪 OpenVPN® Settings
OpenVPN® Enable
Enables/Disables OpenVPN® feature. Default is “No”.
Import OpenVPN® Configuration
Imports the configuration file from the current computer. After importing, the local configuration will be overwritten and OpenVPN® function is automatically enabled.
OpenVPN® Server Address
Specify the IP address or FQDN for the OpenVPN® Server.
OpenVPN® Port
Specify the listening port of the OpenVPN® server. The valid range is 1 – 65535. The default value is “1194”.
OpenVPN® Server Secondary Address
Configure OpenVPN® server secondary address. This will be used when the primary SIP server fails.
OpenVPN® Secondary Port
Specify the listening port of the secondary OpenVPN® server. The valid range is 1 – 65535. The default value is “1194”.
Randomly Select Server
If enabled, a server will be chosen randomly to handle OpenVPN® requests. If disabled, requests will be sent to servers in the order of the configuration.
Default setting is “Disabled”.
OpenVPN® Transport
Specify the Transport Type of OpenVPN® whether UDP, TCP, UDP IPV4 Only, TCP IPV4 Only, UDP IPV6 Only, TCP IPV6 Only
The default value is “UDP”.
OpenVPN® CA
Click on “Upload” to upload the Certification Authority of OpenVPN®. For a new upload, users could click on “Delete” to erase the last certificate, and then upload a new one.
OpenVPN® Certificate
Click on “Upload” to upload OpenVPN® certificate. For a new upload, users could click on “Delete” to erase the last certificate, and then upload a new one.
OpenVPN® Client Key
Click on “Upload” to upload OpenVPN® Key. For a new upload, users could click on “Delete” to erase the last certificate, and then upload a new one.
OpenVPN® Client Key Password
Allows user to set password for client.key file
OpenVPN® TLS Key
Uploads the OpenVPN® TLS .key file
OpenVPN® TLS Key Type
Selects the encryption type of the OpenVPN® TLS key. it can be set to : TLS-Auth, TLS-Crypt, TLS-Crypt V2
OpenVPN® Cipher Method
Specifies the Cipher method used by the OpenVPN® server. The available options are:
Blowfish
AES-128
AES-256
Triple-DES
AES-128-GCM
AES-256-GCM
The default setting is “Blowfish”.
OpenVPN® Username
Configures the optional username for authentication if the OpenVPN server supports it.
OpenVPN® Password
Configures the optional password for authentication if the OpenVPN server supports it.
Additional Options
Additional options to be appended to the OpenVPN® config file, separated by semicolons. For example, comp-lzo no;auth SHA256
Note: Please use this option with caution. Make sure that the options are recognizable by OpenVPN® and do not unnecessarily override the other configurations above.
Network Settings 🡪 Advanced Settings
Advanced Network Settings
DNS Refresh Timer (m)
Configures the refresh time (in minutes) for DNS query. If set to “0”, the phone will use the DNS query TTL from DNS server response. the Default value is “0”
DNS Failure Cache Duration (m)
Configures the duration (in minutes) of the previous DNS cache when the DNS query fails. If set to “0”, the feature will be disabled. Note: Only valid for SIP registration. The Default value is “0”
Enable LLDP
Controls the LLDP (Link Layer Discovery Protocol) service. The default setting is “Enabled”.
LLDP TX Interval
Defines LLDP TX Interval (in seconds). Valid range is 1 to 3600. The default setting is “60”.
LLDP Timeout Before DHCP Request (s)
Configures the time (in seconds) the device will wait for LLDP frames before sending out a DHCP request. If the timeout period is set to 0, the device will not wait.
Valid is range is 0 to 30 seconds. Default setting is “0”.
Enable CDP
Enables/Disables CDP “Cisco Discovery Protocol”. The default setting is “Enabled”.
Layer 3 QoS for SIP
Defines the Layer 3 QoS parameter for SIP. This value is used for IP Precedence, Diff-Serv or MPLS. The default value is 26.
Layer 3 QoS for RTP
Defines the Layer 3 QoS parameter for RTP. This value is used for IP Precedence, Diff-Serv or MPLS. The default value is 46.
Enable DHCP VLAN
Enables auto configure for VLAN settings through DHCP. Disabled by default.
Enable Manual VLAN Configuration
Enables/disables manual VLAN configuration. When this option is set to Disabled, the phone will bypass VLAN configuration and only use the DHCP VLAN to configure VLAN tag and priority. Default is “Enabled”.
Layer 2 QoS 802.1Q/VLAN Tag
Assigns the VLAN Tag of the Layer 2 QoS packets. The valid range is 0 – 4094.The default value is 0.
Layer 2 QoS 802.1p Priority Value
Assigns the priority value of the Layer2 QoS packets. The valid range is 0 – 7. The default value is 0
Maximum Transmission Unit (MTU)
Defines the MTU in bytes. The valid range is 576 – 1500.
The default value is 1500 bytes.
PC Port Mode
PC Port Mode
Configure the PC port mode. When set to “Mirrored”, the traffic in the LAN port will go through PC port as well and packets can be captured by connecting a PC to the PC port. The default setting is “Enabled”.
PC Port VLAN Tag
Assigns the VLAN Tag of the PC port. The valid range is 0 – 4094.
The default value is 0.
PC Port Priority Value
Assigns the priority value of the PC port. The valid range is 0 – 7.
The default value is 0.
Proxy
HTTP Proxy
Specifies the HTTP proxy URL for the phone to send packets to. The proxy server will act as an intermediary to route the packets to the destination.
HTTPS Proxy
Specifies the HTTPS proxy URL for the phone to send packets to. The proxy server will act as an intermediary to route the packets to the destination.
Bypass Proxy for
Configures the destination IP address where no proxy server is needed. The phone will not use a proxy server when sending packets to the specified destination IP address.
Remote Control
Action URI Support
Indicate whether the phone is enabled to receive and handle Action URI request.
Remote Control Pop up Window Support
Indicate whether the phone is enabled to pop up Allow Remote Control window.
Action URI Allowed IP List
List of allowed IP addresses from which the phone receives the Action URI
CSTA Control
Indicates whether CSTA Control feature is enabled. Change of this configuration will need the system reboot to make it take effect.
CTI Settings
Affinity Support
Indicate whether Affinity feature is supported.
Preferred Account
Affinity target SIP account.
Static DNS Cache
NAPTR
NAPTR (Naming Authority Pointer) records are used to specify rules for rewriting one type of domain name to another, typically used for handling Uniform Resource Identifiers (URIs) within the domain, when you configure NAPTR in the static DNS cache, you are specifying custom rules for how specific URIs or domain names should be resolved, the options to configure are :
NAPTR DNS Cache Name: The domain name to which this resource record refers.
NAPTR DNS Cache Time Interval (s): The time interval that the resource record may be cached before the source of the information should again be consulted, Default value is 300 seconds.
NAPTR DNS Cache Order: A 16-bit unsigned integer specifying the order in which the NAPTR records must be processed to ensure the correct ordering of rules.
NAPTR DNS Cache Preference: A 16-bit unsigned integer that specifies the order in which NAPTR records with equal “order” values should be processed, low numbers being processed before high numbers.
NAPTR DNS Cache Replacement: The next name to query for SRV records.
NAPTR DNS Cache Service: Specifies the service(s) available down this SRV record path.
SRV
SRV records are DNS records used to identify servers that provide specific services, such as email, SIP (Session Initiation Protocol) servers, or other services, Configuring SRV in the static DNS cache allows you to specify which servers should be used for particular services, helping ensure that your IP phone connects to the correct servers for specific functions, the available options to configure are:
SRV DNS Cache Name: The domain name string with SRV prefix.
SRV DNS Cache Time Interval (s): Specifies the time interval that the resource record may be cached before the source of the information should again be consulted. The default value is 300 seconds.
SRV DNS Cache Priority: Set the priority of this target host.
SRV DNS Cache Weight: Set server selection mechanism.
SRV DNS Cache Target: The domain name of the target host.
SRV DNS Cache Port: Set the port on the target host of this service.
A
A records are used to map a domain name to an IPv4 address. They are the most common type of DNS record and are used to resolve domain names to IP addresses, Configuring A records in the static DNS cache allows you to manually specify the IP addresses associated with specific domain names, ensuring that your IP phone always connects to the intended destination, the options to configure are:
A DNS Cache Name: Set Hostname.
A DNS Cache Time Interval: A DNS Cache Time Interval, Default is 300 seconds.
A DNS Cache IP Address: A DNS Cache IP Address.
Network Settings 🡪 SNMP Settings
Enable SNMP
Enable/Disable SNMP service. Default is No.
Version
Choose between (Version 1, Version 2, or Version 3).
Port
Listening Port of SNMP daemon (Default 161).
Community
Name of SNMP community.
Security Level
noAuthUser: Users with security level noAuthnoPriv and context name as noAuth.
AuthUser: Users with security level authNoPriv and context name as auth.
AuthUser: Users with security level authNoPriv and context name as auth.
SNMP Username
Username for SNMPv3.
Authentication Protocol
Select the Authentication Protocol: “None” or “MD5” or “SHA.”
Privacy Protocol
Select the Privacy Protocol: “None” or “AES” or “DES”.
Authentication Key
Enter the Authentication Key for SNMPv3.
Privacy Key
Enter the Privacy Key for SNMPv3.
SNMP Trap Version
Choose the Trap version of the SNMP trap receiver.
SNMP Trap IP
IP address of trap destination.
SNMP Trap port
Port of Trap destination (Default 162)
SNMP Trap Interval
Time interval between traps (Default is 5).
SNMP Trap Community
Community string associated to the trap. It must match the community string of the trap receiver.
SNMP Trap Username
Username for SNMPv3 Trap.
Trap Security Level
noAuthUser: Users with security level noAuthnoPriv and context name as noAuth.
authUser: Users with security level authNoPriv and context name as auth.
privUser: Users with security level authPriv and context name as priv.
Trap Authentication Protocol
Select the Authentication Protocol: “None” or “MD5” or “SHA”.
Trap Privacy Protocol
Select the Privacy Protocol: “None” “AES” or “DES”. Set to “None” By Default.
Select the Account to dial from. And enter the Speed Dial number in the Value field to be dialed or enter the IP address to set the Direct IP call as Speed Dial.
Busy Lamp Field (BLF):
Select the Account to monitor the BLF status. Enter the extension number in the Value field to be monitored.
Presence Watcher:
This option has to be supported by a presence server and it is tied to the “Do Not Disturb” status of the phone’s extension.
Eventlist BLF:
This option is similar to the BLF option but in this case the PBX collects the information from the phones and sends it out in one single notify message. PBX server has to support this feature.
Speed Dial via active account:
Similar to Speed Dial but it will dial based on the current active account. For example, if the phone is offhook and account 2 is active, it will call the configured Speed Dial number using account 2
Dial DTMF:
Enter a series of DTMF digits, a character from “A-D” or “R” (for Hook Flash) in the Value field to be dialed during the call. “Enable MPK Sending DTMF” has to be set to “Yes” first.
Voicemail:
Select Account and enter Voicemail access number in the Value field.
Call Return:
The last answered calls can be dialed out by using Call Return. The Value field should be left blank. Also, this option is not binding to the account and the call will be returned based on the account with the last answered call.
Transfer:
Select Account and enter the number in the Value field to be transferred (blind transfer) during the call.
Call Park:
Select Account and enter the call park extension in the Value field to park/pick up the call.
LDAP Search:
This option is to narrow the LDAP search scope. Enter the LDAP search base in the Description field. It could be the same or different from the Base in LDAP configuration under Advanced Settings. The Base in LDAP configuration will be used if the Description field is left blank. Enter the LDAP Name/Number filter in the Value field.
For example:
If users set MPK 1 as “LDAP Search” for “Account 1”, and set filters:
Description
ou=video,ou=SZ,dc=grandstream,dc=com
Value sn=Li
Since the Base for LDAP server configuration is: “dc=grandstream,dc=com”, “ou=video,ou=SZ” is added to narrow the LDAP search scope. “sn=Li” is the example to filter the last name.
Conference:
Allow user to set their Multi-Purpose Key to “Conference” mode to trigger a conference.
By setting the extension number in the value box, the users will be able to activate a 3-way conference by simply press the assigned MPK button.
Multicast Paging:
Allows the user to configure the address to send a multicast page to.
Call Log:
Select Account and enter account number in the Value field to allow configuration of call log for other extension.
Monitored Call Park:
Select account from Account field and enter the call park extension in the Value field to park/pick up the call, and also monitor the parked call via Line Key’s light.
Menu:
Select this feature in order to display the Menu from the MPK buttons, no field dis required for configuration.
Information:
Select this feature in order to display the Information popup to show the firmware version, MAC address, IP address and IP Settings from the MPK buttons, no field dis required for configuration.
Message:
Select this feature in order to display the Message menu from the MPK buttons, no field dis required for configuration.
Forward:
Set the MPK Button to perform call forwarding to the destination number configured on the “Value Field”. During ringing press the button to perform the call forward.
DND:
Press the configured key to enabled/Disable DND.
Redial:
On this mode, the configured key can be used to redial numbers.
Presence Eventlist:
This option is similar to the Presence Watcher option but in this case the PBX collects the information from the phones and sends it out in one single notify message.
Note: The PBX server has to support this feature.
Provision:
Select this feature in order to make the phone trigger an instant provisioning
Opendoor:
Select this feature in order to make the phone trigger an open-door action in conjunction with a GDS37xx
Multicast Listen Address:
This feature sets up a multicast listening address for the IP Phone.
Multicast Paging Address:
This Feature sets up a Multicast paging address for paging purposes.
Note: An MPK configuration tutorial video link can be found on the MPK configuration page.
HTTP Command:
This Feature sets up a call through an HTTP command
Call Flip:
Call Flip with MPK is a feature that allows you to transfer an active call from one VoIP phone to another or to a different number using a programmable Multi-Purpose Key, ensuring a seamless transition.
Visual Park:
Used with PortSIP servers, this feature allows the GRP260x phone to act as a visual call parking location.
Silent Call:
This feature allow users to initiate calls from a GRP260x phone to an extension without any audible or visual indication on the LCD screen, providing discreet calling where the call’s status remains hidden which is intended for emergency or panic scenarios.
Note: In silent call mode, the device behaves as follows:
The device’s microphone is activated and transmits audio to the called party.
The speaker remains muted, meaning the caller hears no audio from the callee.
Functional keys on the phone are locked during the call, except number keys, softkeys, and line keys.
Only emergency numbers can be dialed during an active Silent Call session (manually or via VPK; MPK is restricted).
Incoming calls are blocked.
The Silent Call can only be ended by the callee.
Triggering multiple Silent Calls in sequence will only activate the first.
Account
Select the account to be associated with the configured MPK.
Value
Enter the value to be associated with the configured MPK. (Extension Number, Multicast address, SIP URIs….) Note: when a valid SIP URI link initiates a call, the hostname part of the SIP URI link will be displayed on the LCD
Label
Enter the name to be associated with the MPK.
Basic Settings
Transfer Mode via MPK
Perform blind transfer, attended transfer, or a new call with the specific in the Value field when a user presses “Transfer” multiple-purpose key
Enable Transfer via Non-Transfer MPK
MPK with type BLF, Speed dial, etc, will perform as transfer MPK under active call
Programmable Keys → Virtual Multi-Purpose Keys
Mode
Allows the user to configure VPKs with modes such as Shared line, BLF and Speed Dial. Modes:
None
Line
Shared
Speed Dial
BLF
Presence Watcher
Eventlist BLF
Speed Dial via Active Account
Dial DTMF
Voice Mail
Call Return
Transfer
Call Park
Intercom
LDAP Search
Conference
Multicast Paging
Call Log
Monitored Call Park
Menu
Information
Messages
Forward
DND
Redial
Multicast Listen Address
Presence EventlistNew List Item
Provision
Multicast Paging Address
HTTP Command
Call Flip
Visual Park
Silent Call
Note: When a call is received by a monitored extension (BLF or Monitored Call Park) and the VPK is configured on a page other than the first one, the phone LCD will activate Backlight Brightness, and the corresponding page number and page navigation arrow will flicker to indicate the incoming call.
Account
Select the account to be associated with the configured MPK.
Value
Enter the value to be associated with the configured MPK. (Extension Number, Multicast address,SIP URIs…) Note: when a valid SIP URI link initiates a call, the hostname part of the SIP URI link will be displayed on the LCD
Label
Enter the label of the configured MPK.
Preview
Shows a preview of the configured MPK label. After saving, you can print the card style in the preview. For more info about how to install the BLF paper label check the Quick Installation guide.
Programmable Keys → Number Keys
Number Key
Select the function of the key.
None
Speed Dial
Speed Dial via Active Account
Dial DTMF
Voicemail
CallReturn
LDAP Search
Call History
INFO
Messages
DND
Redial
OpenDoor
Provision
HTTP Command
Based on the function the user may configure some or all the fields below.
Account: Select the account to which this key configuration will apply.
Value (User ID): Enter the value which corresponds to the setting intended for the function of the key. (e.g., for speed dial, enter the extension number to dial.)
Label: Enter a name as a label for the key function.
To access the Virtual Extension module interface, users have three options: They can use their browser and enter either the LAN IP or mDNS domain link. Alternatively, they can scan the QR code on the webpage using their phone while connected to the same network as the IP phone. After scanning, a new window will appear, prompting them to log in with their IP phone credentials.
Download App
To download the App, simply Hover over the icon of your operating system(IOS client, or Android client) scan the QR code and the app will be installed.
Mode
Speed Dial:
Select the Account to dial from. And enter the Speed Dial number in the Value field to be dialed or enter the IP address to set the Direct IP call as Speed Dial.
Busy Lamp Field (BLF):
Select the Account to monitor the BLF status. Enter the extension number in the Value field to be monitored.
Presence Watcher:
This option has to be supported by a presence server and it is tied to the “Do Not Disturb” status of the phone’s extension.
Eventlist BLF: This option is similar to the BLF option but in this case the PBX collects the information from the phones and sends it out in one single notify message. PBX server has to support this feature.
Speed Dial via active account: Similar to Speed Dial but it will dial based on the current active account. For example, if the phone is offhook and account 2 is active, it will call the configured Speed Dial number using account 2
Dial DTMF: Enter a series of DTMF digits in the Value field to be dialed during the call. “Enable MPK Sending DTMF” has to be set to “Yes” first.
Voicemail: Select Account and enter Voicemail access number in the Value field.
Call Return: The last answered calls can be dialed out by using Call Return. The Value field should be left blank. Also, this option is not binding to the account and the call will be returned based on the account with the last answered call.
Transfer: Select Account and enter the number in the Value field to be transferred (blind transfer) during the call.
Call Park: Select Account and enter the call park extension in the Value field to park/pick up the call.
LDAP Search: This option is to narrow the LDAP search scope. Enter the LDAP search base in the Description field. It could be the same or different from the Base in LDAP configuration under Advanced Settings. The Base in LDAP configuration will be used if the Description field is left blank. Enter the LDAP Name/Number filter in the Value field.
For example:
If users set MPK 1 as “LDAP Search” for “Account 1”, and set filters:
Since the Base for LDAP server configuration is: “dc=grandstream,dc=com”, “ou=video,ou=SZ” is added to narrow the LDAP search scope. “sn=Li” is the example to filter the last name.
Conference: Allow user to set their Multi-Purpose Key to “Conference” mode to trigger a conference. By setting the extension number in the value box, the users will be able to activate a 3-way conference by simply press the assigned MPK button.
Multicast Paging: Allows the user to configure the address to send a multicast page to.
Call Log:
Select Account and enter account number in the Value field to allow configuration of call log for other extension.
Monitored Call Park:
Select account from Account field and enter the call park extension in the Value field to park/pick up the call, and also monitor the parked call via Line Key’s light.
Menu: Select this feature in order to display the Menu from the MPK buttons, no field dis required for configuration.
Information: Select this feature in order to display the Information popup to show the firmware version, MAC address, IP address and IP Settings from the MPK buttons, no field dis required for configuration.
Message: Select this feature in order to display the Message menu from the MPK buttons, no field dis required for configuration.
Forward: Set the MPK Button to perform call forwarding to the destination number configured on the “Value Field”. During ringing press the button to perform the call forward.
DND:
Press the configured key to enabled/Disable DND.
Redial:
On this mode, the configured key can be used to redial numbers.
Presence Eventlist:
This option is similar to the Presence Watcher option but in this case the PBX collects the information from the phones and sends it out in one single notify message.
Note: The PBX server has to support this feature.
Provision:
Select this feature in order to make the phone trigger an instant provisioning
Opendoor:
Select this feature in order to make the phone trigger an open-door action in conjunction with a GDS37xx
Multicast Listen Address:
This feature sets up a multicast listening address for the IP Phone.
Multicast Paging Address:
This Feature sets up a Multicast paging address for paging purposes.
Note: An MPK configuration tutorial video link can be found on the MPK configuration page.
HTTP Command:
This Feature sets up a call through an HTTP command
Call Flip:
Call Flip with MPK is a feature that allows you to transfer an active call from one VoIP phone to another or to a different number using a programmable Multi-Purpose Key, ensuring a seamless transition.
Visual Park
Used with PortSIP servers, this feature allows the GRP260x phone to act as a visual call parking location.
Silent Call
Silent Call feature allows users to initiate a call to another extension without triggering any audible or visible notification. The GRP260x does not display caller ID or dialing screen. In this mode:
The device’s microphone is activated and transmits audio to the called party.
The speaker remains muted, meaning the caller hears no audio from the callee.
Functional keys on the phone are locked during the call, except number keys, softkeys, and line keys.
Only emergency numbers can be dialed during an active Silent Call session (manually or via VPK; MPK is restricted).
Incoming calls are blocked.
The Silent Call can only be ended by the callee.
Triggering multiple Silent Calls in sequence will only activate the first.
Account
Select the account to be associated with the configured MPK.
Value
Enter the value to be associated with the configured MPK. (Extension Number, Multicast address…)
Label
Enter the label of the configured MPK.
Preview
Shows a preview of the configured Virtual MPks label.
Programmable Keys → Idle Screen Softkeys
Custom Idle Screen Softkey Layout
Enables/disables softkey layout.Default is disabled
Custom Softkey
Press on Add Custom Softkey radio button to add/configure up to 3 custom softkeys. Supported key modes are speed dial, speed dial via active account, and voicemail. Note: The softkey icons have been updated and now have the option to be customized on preference based on the key mode, either speed Dial, speed dial via active, or voicemail.
Custom Softkey Layout
The softkeys listed under “Enabled” tab is displayed on the phone’s idle screen. Select the softkey from “Available” list to enable it. Up to 6 softkeys can be selected.
Programmable Keys → Call Screen Softkeys
Custom Call Screen Softkey Layout
Enables/disables custom softkey layout Default is disabled
Enforce Softkey Layout Position
Whether to enforce the custom softkey layout position When set to ‘YES’, GUI will still preserve the space if the configured softket is unable to show Disabled by Default
Custom Softkey
Press on Add Custom Softkey radio button to add/configure up to custom softkeys Supported key modes are speed dial, speed dial via active account and voicemail.
Custom Softkey Layout
Dialing state:
Custom softkey layout when device is under DIALING state.
Note: the LDAP softkey in dialing state allows users to perform call transfer using LDAP search.
Ringing State:
Custom softkey layout when device is u,der RINGING state.
Available softkeys: End Call, Conference, Group Listen
Calling State:
Custom softkey layout when device is under CALLING state.
Available softkeys: End Call, Conference.
Call Connected State:
Custom softkey layout when the device is under CALL CONNECTED state.
Available softkeys: End Call, Conference, New Call, Swap, Transfer, call park, Send DTMF, Call Record, End Record, Noise shield, Call Hold, BS Call Center, GDS Opendoor, Group Listen, Cancel Specified transfer
On Hold State:
Custom softkey layout when device is under ON HOLD state.
Available softkeys: End Call, Resume, New Call, Conference, Swap, Transfer, BS call center, GDS Opendoor, Group Listen
Call Failed State:
Custom softkey layout when device is under CALL FAILED state.
Available softkeys: End Call , Redial
Transfer State:
Custom Softkey layout when device is under TRANSFER state.
Custom softkey layout when device is under CONFERENCE CONNECTED state.
Available softkeys: End Call, Conference Info, Hold, Add, Noise Shield, Group Listen
Onhook Dialing State:
Custom softkey layout when the device is under the ONHOOK DIALING state
Available softkeys: End Call, Back Space, Dial, Share Line, Local Contacts, Call History, Voice Intercom, Remote Contacts 1, Remote Contacts 2, Remote Contacts 3, Remote Contacts
Call Flip:
Call Flip with MPK is a feature that allows you to transfer an active call from one VoIP phone to another or to a different number using a programmable Multi-Purpose Key, ensuring a seamless transition.
The softkeys listed under “Enabled” tab will be displayed on the phone’s idle screen.Select the softkey from “Available” list to enable it.
Programmable Keys → Call Screen Softkeys
Custom Call Screen Softkey Layout
Enables/disables custom softkey layout
Enforce Softkey Layout Position
Configures whether to enforce custom softkey layout position.
When set to “YES”, GUI will still preserve the space if the configured softkey is unable to show.
Custom Softkey
Add Custom Softkey
– Key Mode: Select the icon to display for the softkey and select the function of the button.
Speed Dial
Speed Dial Active
Dial DTMF
Voice Mail
Silent Call
– Label: Enter the custom label of the softkey.
– Value (User ID): Enter the user ID on which this softkey will be displayed.
Custom Softkey Layout
Call Status
Select the phone status to customize the softkey layout.
Dialing
Ringing
Calling
Call Connected
On Hold
Call Failed
Transfer
Conference
Conference Connected
Onhook Dialing
Programmable Keys → Advanced Settings
Auto Provision List Starting Point
Configures the type of keys that will be used first on the Auto Provision Eventlist BLF feature. the user can choose from the two options below:
VPK (Virtual Programmable Key): Uses virtual programmable keys on the device.
Exty APP: Utilizes Expansion Modules or Application-specific keys.
Transfer Mode via Programmable Keys
Configures the transfer mode to use when pressing the “Transfer” MPK. Choose from Blind Transfer, Attended Transfer, or New Call, All for selection.
Enable Transfer via Non-Transfer Programmable Keys
MPK with type BLF, Speed dial, etc., will perform as transfer MPK under active call
Allow Programmable Key Configuration via LCD
Configure to enable Programmable Key configuration via LCD by pressing and holding MPK/VPKs.
VPK Paging Auto Return Timeout(s)
Define the timeout period in seconds for returning to the main interface after paging through the VPK button. 0 means there will be no return, The default value is 0.
Programmable Keys Settings Definitions
System Settings Page Definitions
System Settings > Time and Language
Date and Time
NTP Server
Defines the URL or IP address of the NTP server. The phone may obtain the date and time from the server. The default setting is “pool.ntp.org”.
Secondary NTP Server
Defines the URL or IP address of the NTP server. The phone may obtain the date and time from the server. Allow user to configure 2 NTP server domain names. GRP will loop through all the IP addresses resolved from them.
NTP Update Interval
Time interval for updating time from the NTP server. Valid time value is in between 5 to 1440 minutes.
The default setting is “1440” minutes.
Enable Authenticated NTP
Configures whether to enable NTP authentication. If enabled, a cryptographic signature appended to each network packet. If the key is incorrectly configured, the phone will refuse to use the time provided by the NTP server.
Authenticated NTP Key
Uploads the key file for authenticated NTP. Note: Only support MD5 key type.
Allow DHCP Option 42 Override NTP Server
Defines whether DHCP Option 42 should override NTP server or not. When enabled, DHCP Option 42 will override the NTP server if it is set up on the LAN. The default setting is “Yes”.
Time Zone
Configures the date/time used on the phone according to the specified time zone. The default setting is “Auto”.
Allow DHCP Option 2 to Override Time Zone Setting
Allows device to get provisioned for Time Zone from DHCP Option 2 in the local server. The default setting is enabled.
Self-Defined Time Zone
This parameter allows the users to define their own time zone, when “Time Zone” parameter is set to “Self-Defined Time Zone”.
The syntax is: std offset dst [offset], start [/time], end [/time]
Default is set to: MTZ+6MDT+5,M4.1.0,M11.1.0
MTZ+6MDT+5
This indicates a time zone with 6 hours offset with 1 hour ahead (when daylight saving) which is U.S central time. If it is positive (+) if the local time zone is west of the Prime Meridian (A.K.A: International or Greenwich Meridian) and negative (-) if it is east.
M4.1.0,M11.1.0
The 1st number indicates Month: 1,2,3.., 12 (for Jan, Feb, .., Dec)
The 2nd number indicates the nth iteration of the weekday: (1st Sunday, 3rd Tuesday…)
The 3rd number indicates weekday: 0,1,2,..,6( for Sun, Mon, Tues, … ,Sat)
Therefore, this example is the DST which starts from the First Sunday of April to the 1st Sunday of November.
Date Display Format
Configures the date display format on the LCD. The following formats are supported.
yyyy-mm-dd: 2019-03-02
mm-dd-yyyy: 03-02-2019
dd-mm-yyyy: 02-03-2019
dddd, MMMM dd: Saturday, March 02
The default setting is yyyy-mm-dd.
Time Display Format
Configures the time display in 12-hour or 24-hour format on the LCD. The default setting is in 12-hour format.
Language
Display Language
Selects display language on the phone.
System Settings > Input Method
Input Method for Contacts
To set the input method for contacts, default value: 123 input method.
Enable the device to use public key authentication as an alternative option to password authentication.
The length of the SSH public key is 2048 bits.
LCD Access
Configuration via Keypad Menu
Configures access control for keypad Menu settings.
Unrestricted: all options on LCD menu can be accessed.
Basic settings only: only options for basic setting can be displayed on LCD menu.
Constraint Mode: accessing options other than basic settings will require permission. Warning: If the admin password is lost while constraint mode is enabled, your device may become permanently unusable. Remember to be careful when using constraint mode to avoid irreversible damage.
Locked Mode: MENU is disabled.
Factory Reset Security Level
Configure the password inquiry for factory reset.
Default: The password is needed when configuration via keypad menu is no Unrestricted
Always Require Password: The password is needed no matter what configuration via keypad menu mode is.
No Password Required: No password is needed no matter what configuration via keypad menu mode is.
Wi-Fi Settings Security Level
Configure the password inquiry for Wi-Fi settings.
Default: The password is needed when configuration via keypad menu is no Unrestricted
Always Require Password: The password is needed no matter what configuration via keypad menu mode is.
No Password Required: No password is needed no matter what configuration via keypad menu mode is.
Web Access
HTTP Web Port
Configures the HTTP port under the HTTP web access mode. The valid range is 80 – 65535. The default value is “80”.
HTTPS Web Port
Configures the HTTPS port under the HTTPS web access mode. The valid range is 443 – 65535. The default setting is “443”.
Web Access Mode
Sets the protocol for web interface.
HTTPS
HTTP
Disabled
Both HTTP and HTTPS
The default setting is “HTTPS”.
Web Access Control
Web access control by using Allow List or Block List for IP addresses.
Web Access Control List
Only allow the IP address list as an allow list or restrict the IP address list as a block list to access the Web.
Web Session Timeout
Configures timer to logout web session during idle. The valid range is 2-60 min. The default value is 10 min
Enable User Web Access
Administrator can toggle this setting to disable or enable user web access. The default setting is “Disabled”.
Validate Server Certificates
After enabling this feature, phone will validate the server’s certificate. If the server that our phone tries to register on is not on our list, it will not allow server to access the phone.
Web/Restrict mode Lockout Duration
Specifies the time in minutes that the web or LCD login interface will be locked out to user after five login failures. This lockout time is used for web login, and LCD restrict mode admin login. Range is 0-60 minutes.
The default setting is “5”.
Web/Restrict Mode lockout Attempt Limit
Configure attempt limit before lockout.
Default is 5. Range is 1-10.
User Info Management
Test Password Strength
Checks password strength to ensure better security. Password needs at least 9 characters and 3 of the following options:
numerics (0-9)
capital letters (A-Z)
lower case (a-z)
special characters (‘ ./’`@*-=,|&?!%()~_#’)
Disabled by Default.
User Password
New Password
Set new password for web GUI access as User. This field is case sensitive.
Confirm Password
Enter the new User password again to confirm.
Admin Password
Current Password
The current admin password is required for setting a new admin password.
New Password
Set new password for web GUI access as Admin. The admin password is case sensitive with a maximum length of 25 characters.
Confirm Password
Enter the new Admin password again to confirm.
Client Certificate
Minimum TLS Version
Configures the minimum TLS version supported by the phone. The minimum TLS version must be less than or equal to the maximum TLS version.
The TLS version can be TLS 1.0, TLS 1.1, TLS 1.2, or TLS 1.3
The Default value is set to “TLS 1.2”
Maximum TLS Version
Configures the maximum TLS version supported by the phone. The maximum TLS version must be greater than or equal to the minimum TLS version. The TLS version can be TLS 1.0, TLS 1.1, TLS 1.2, Unlimited,
The Default value is “Unlimited”
Enable/Disable Weak Cipher Suites
This feature defines the function for weak cipher suites.
Enable Weak TLS Ciphers Suites
Disable Symmetric Encryption RC4/DES/3DES
Disable Symmetric Encryption SEED
Disable All Weak Symmetric Encryption
Disable All Weak TLS Ciphers Suites
Note: By default, this setting is set to “Disable All Weak TLS Ciphers”.
SIP TLS Certificate
SSL Certificate used for SIP Transport in TLS/TCP.
SIP TLS Private Key
SSL Private key used for SIP Transport in TLS/TCP.
Note: SIP TLS Private supports at least 2048 characters.
SIP TLS Private Key Password
SSL Private key password used for SIP Transport in TLS/TCP.
Custom Certificate
The uploaded custom certificate will be used for SSL/TLS communication instead of the phone default certificate. Note: An invalid Custom certificate will display a warning message
CA Signature Algorithm
This feature allows users to configure CA signature algorithm. Please note that this configuration must be consistent with the root certificate deployed on your server. Otherwise, the TLS communication might fail.
Trusted CA Certificate
Trusted CA Certificates (1 – 6)
Allows to upload and delete the CA Certificate file to phone.
Note: Users can either upload the file directly from web or they can choose to provision it from their cfg.xml file.
Load CA Certificates
Phone will verify the server certificate based on the built-in, custom or both trusted certificates list.
The default setting is “Default Certificates”.
SCEP
Basic Settings
Enable SCEP
Enables/disables the Simple Certificate Enrollment Protocol (SCEP) for automated certificate management.
SCEP Server URL
Specifies the URL of the SCEP server (CA URL or RA URL). The protocol header must be included in the URL. Currently, only “HTTP” is supported.
Proxy Server URL
Defines the CA proxy server address if required for network communication.
CA FingerPrint Infomation
Provides the fingerprint information provided by CA Institution.
Challenge Password
Sets a challenge password to be sent along with the Certificate Signing Request (CSR) while applying for a certificate.
Local Configuration
Local Public and Private Key Length
Configures the key length for generating local public and private keys. The supported values are:
1024 bit
2048 bit
3072 bit
4096 bit
The default setting is “2048 bit”.
The Name of Certificate Applicant
Specifies the name of the entity requesting the certificate. This field is required.
The Country of Certificate Applicant Located
Indicates the country where the applicant is located.
The State of Certificate Applicant Located
Specifies the state or region of the applicant.
The Locality of Certificate Applicant Located
Defines the locality or city of the applicant.
The Organization of Certificate Applicant Located
Identifies the organization of the certificate applicant, such as companies, government agencies, non-profit organizations, etc.
The organization unit of Certificate Applicant
Specifies the department or unit within the organization.
HTTP Authentication
User ID
Sets the username for HTTP authentication when accessing the SCEP server.
Password
Defines the password for HTTP authentication.
Certificates and Updates
CA Certificate
View the CA certificate issued by CA institution.
CA Certificate Alternative Name
Configure an alternative name for the CA-signed certificate. The following options are supported:
DNS Name (dNSName): A hostname or domain name, e.g., www.example.com.
IP Address (iPAddress): An IPv4 or IPv6 address, e.g., 192.168.0.1 or 2001:db8::1.
Email Address (rfc822Name): An email address, e.g., user@example.com.
X.500 Distinguished Name (directoryName): An X.500 directory name, e.g., /C=US/ST=CA/L=Los Angeles/O=Example Inc./CN=www.example.com.
Uniform Resource Identifier (URI) (uniformResourceIdentifier): A URI, e.g., https://www.example.com.
Kerberos Service Name (krb5PrincipalName): A Kerberos service name, e.g., HTTP/www.example.com.
Note: The default value $MAC refers to the MAC address printed on the label of the phone case.
Update Interval before Certificate Expiration
Configure the effective time interval (1-30 day) for updating certificates before expiration (CA public key expiration or CA certificate expiration), and update certificates after reaching this interval.
Default setting is “20” days.
Scope of Use
Choose the usage modules for SCEP-managed certificates and public keys. When a module is checked, its certificate will be managed by SCEP. If unchecked, the SCEP-managed certificate for that module will be directly deleted. If the certificate is uploaded independently in the relevant module, it is determined whether to continue relying on SCEP to manage the certificate based on subsequent behavior. The available scopes are:
SSL/TLS communication
Ethernet 802.1X
OpenVPN®
Keypad Lock
Enable Keypad Locking
If set to “Yes”, the keypad can be locked by pressing and holding the STAR * key for about 4 seconds. And will also allow automatic locking.
Keypad Lock Type
If set to “All Keys”, all keys will be locked and no emergency calls can be made. If set to “Customized”, only “Functional Keys” will be locked but you are still allowed to make emergency calls. the keys will be locked based on the user configuration.
Password to Lock/Unlock
Password to Lock/Unlock
Keypad Lock Timer
Configures the timeout (in seconds) of idle screen for locking keypad.
Valid range is 0 to 3600.
Emergency
Defines emergency call numbers. If multiple emergency call numbers are entered, they should be separated by ‘,’.
System Settings > Preferences
Display Control
LCD
Backlight Brightness: Active
Configures the LCD brightness when the phone is active. Valid range is 0 to 8 where 0 is off and 8 is the brightest.
Backlight Brightness: Idle
Configures the LCD brightness when the phone is idle. The valid range is 0 to 8 where 0 is off and 8 is the brightest, and its value cannot exceed the active value The Default value is 1.
Active Backlight Timeout
Configures the timeout interval of the LCD backlight. The valid range is 0 to 90. The Default value is 1
Enable Missed Call Backlight
If set to “Yes”, the LCD backlight will be turned on when there is a missed call on the phone. The Default value is “Yes”
Configure the softkey bar style
Configures the softkey bar style, four options are available for selection.
Style 1 is the default value.
LED
New Message LED Indicator
Configures the LED indicator mode when there is a new voicemail or text message on the phone. If set to “Off”, the LED indicator will not light up. It can be set to the following values: “Blinking”, “Off” Or “Solid”, Set to “Blinking” By Default.
Enable Incoming Call Indicator
If enabled, the upper right corner LED indicator will light up for the GRP2603(P)/GRP2604(P), while the message waiting indicator LED will light for GRP2602(P/G/W)/GRP2601(P/W), signaling that there is an incoming call. Disabled by Default.
Line LED Color Scheme
Configures line key LED color scheme to Default or Light up mode.
Default: off(idle)/green(in use)
Light up: green(idle)/red(in use)
Audio Control
Call Tone Volume
Configures the call tone volume in dB. The valid range is -15 to 15.
Speaker Ring Volume
Configures speaker ring volume. The valid range is 0 to 8.
Lock Speaker Volume
Lock volume adjustment when the option is enabled
No: Speaker volume isn’t locked.
Ring: Only ringing volume will be locked
Talk: Only volume during the call is locked during a call.
Both: The speaker volume is locked during both ring time and call.
Enable Warning Tone
Configures whether to enable the warning tone of the phone. If disabled, all pop-up and notifications will play no tone.
Group Listen with handset
Allow handset to be able to listen when picked up during a call with headset
Group Listen with Speaker
Group Listen with Speaker
Headset
Headset Key Mode
When headset is connected to the phone, users could use the HEADSET button in “Default Mode” or “Toggle Headset/Speaker”.
Default Mode:
When the phone is in idle, press HEADSET button to off hook the phone and make calls by using headset. Headset icon will display on the screen in dialing/talking status.
When there is an incoming call, press HEADSET button to pick up the call-using headset.
When there is an active call using headset, press HEADSET button to hang up the call.
When Speaker/Handset is being used in dialing/talking status, press HEADSET button to switch to headset. Press it again to hang up the call. Or, press speaker/Handset to switch back to the previous mode.
Toggle Headset/Speaker:
When the phone is in idle, press HEADSET button to switch to Headset mode. The headset icon will display on the left side of the screen
In this mode, if pressing Speaker button or Line key to off hook the phone, headset will be used.
When there is an active call, press HEADSET button to toggle between Headset and Speaker.
Disable Headset Key:
In this mode, the headset key will be disabled, no action will be performed when pressing the headset key.
Default value is set to “Default Mode”.
Headset Type
Selects whether the connected headset is normal RJ11 headset, Plantronics EHS, Jabra EHS, Sennheiser EHS headset, and VBeT EHS.
Always Ring Speaker
Configures enabling/disabling the speaker to ring when the headset is used on “Toggle Headset/Speaker” mode. it can be set to “No”, “Yes, Both” or “Yes, Speaker Only”,
The Default Value is “Yes, Both”
Group Listen with handset
Allow handset to be able to listen when picked up during a call with headset. Disabled by Default.
Group Listen with Speaker
In a call, phone will display soft key to enable speaker listening when audio mode handset or headset. Disabled by Deafult.
Headset TX Gain (dB)
Configures the transmission gain of the headset.
The default value is 0dB.
Headset RX Gain (dB)
Configures the receiving gain of the headset.
The default value is 0dB.
Enable Headset Noise Shield 2.0
When enabled, the remote party will not hear the environmental noise during a call using the headset. Choose according to the TX loudness of the earphone. When the TX loudness of the headset is loud, please select the “Loud Headset”, and when the TX loudness of the headset is soft, please select the “Thin Headset”. “Moderate Headset” is selected by default.
Handset
Handset TX Gain (dB)
Configures the transmission gain of the handset.
Enable Handset Noise Shield 2.0
When the Handset Noise Shield feature is enabled, the remote party will hear less environmental noise during a call. If set to “High Shielding”, most of the environmental noise can be shielded. If set to “Soft Shielding”, some environmental comfort noise will remain for the remote party. The Default Value is “High Shielding”
Handset Sidetone Volume
Configures Handset sidetone volume. The valid range is 0 to 30. The Default value is 15.
Enable HAC
if enabled, the phone will compatible with nearby hearing AIDS.
Disabled by Default.
Other Noise Cancellation
Priority Noise Cancellation Method
Choose the priority method for built-in noise cancellation. The available options are:
AI Noise Cancellation: this will prioritize AI Noise Cancellation during calls.
Traditional Noise Cancellation: this will prioritize Noise Shield 2.0 during calls.
System Settings > Energy Saving
Instantaneous energy saving ratio
Shows a live energy-saving ratio preview based on the energy-saving mode selected.
Usage
Displays the Deep energy saving duration relative to the phone’s enabling duration
Energy saving
Displays a diagram of energy spent in MWh throughout the phone’s activity period.
By default, it shows a comparison between the energy spent in the current day and the day before.
Energy Saving Master Control
When configured at Standard Mode, the device will behave as it has been prior to addition of the Energy Saving Control feature. All energy related features will function according to the individual configurations.
When configured at Customized Energy Saving Mode, the device will enable relevant energy-saving measures and support users to operate some basic configuration items.
When configured at Maximum Energy Saving Mode, the device will ignore all individual configurations and use the setting that will maximize energy saving. No customization is possible under this mode.
Note: in the Customized Energy Saving mode, if the configured idle LCD brightness is greater than active LCD brightness , an error message will be displayed.
By default set to “Standard Mode”.
Backlight Brightness: Active
Configures the LCD brightness when the phone is active. Valid range is 0 to 8 where 0 is off and 8 is the brightest.
Backlight Brightness: Idle
Configures the LCD brightness when the phone is idle. Valid range is 0 to 8 where 0 is off and 8 is the brightest,and its value cannot exceed the active value.
Active Backlight Timeout
Configures the timeout interval of the LCD backlight. The valid range is 0 to 90.
Enable Missed Call Backlight
If set to “Yes”, the LCD backlight will be turned on when there is a missed call on the phone. It cannot be set to “Yes” in full energy-saving mode. The default value is “No”
System Settings > TR-069
Enable TR-069
Enables TR-069
ACS URL
URL for TR-069 Auto Configuration Servers (ACS).
Default setting is: https://acs.gdms.cloud
TR-069 Username
ACS username for TR-069.
TR-069 Password
ACS password for TR-069.
Periodic Inform Enable
Enables periodic inform. If set to “Yes”, device will send inform packets to the ACS. The default setting is “Yes”.
Periodic Inform Interval
Sets up the periodic inform interval to send the inform packets to the ACS.
Default is 86400.
Connection Request Username
The username for the ACS to connect to the phone.
Connection Request Password
The password for the ACS to connect to the phone.
Connection Request Port
The port for the ACS to connect to the phone.
CPE SSL Certificate
The Cert File for the phone to connect to the ACS via SSL.
CPE SSL Private Key
The Cert Key for the phone to connect to the ACS via SSL.
Start TR-069 at Random Time
When enabled, TR-069 will send out first INFORM message to server on randomized timing between 1 to 3600 seconds after phone boots up.
System Settings Definitions
Maintenance Page Definitions
Maintenance > Upgrade and Provisioning
Firmware
Upgrade via Manually Upload
Upload Firmware File to Update
Upload and start upgrade firmware.
Upgrade via Network
Firmware Upgrade via
Allows users to choose the firmware upgrade method via TFTP, HTTP, HTTPS, FTP, FTPS
Firmware Server Path
Defines the server path for the firmware server.
Firmware Server Username
The username for the firmware server.
Firmware Server Password
The password for the firmware server.
Firmware File Prefix
If configured, only the firmware with the matching encrypted prefix will be downloaded and flashed into the phone.
Firmware file Postfix
If configured, only the firmware with the matching encrypted postfix will be downloaded and flashed into the phone.
Upgrade Detection
Upgrade
Press to start upgrade process.
Config File
Configure Manually
Download Device Configuration
Click to download phone’s configuration file in .txt format.
Note: Configuration file does not include passwords or CA/Custom certificate
Download Device Configuration (XML)
Click to download phone’s configuration file in .xml format.
Note:
Configuration file does not include passwords or CA/Custom certificate.
You can download a help template by clicking on the “XML Help document” link.
Download User configuration
This allows users to download part of the configuration that does not include any personal settings like Username and Passwords. Also, it will include all the changes manually made by user from web UI, or config file uploaded from “Upload Device Configuration”, but not include the changes from the server provision via TFTP/FTP/FTPS/HTTP/HTTPS.
Upload Device Configuration
Uploads configuration file to phone.
Upload Third-party Vendor Configuration
The IP phone configuration files of other manufacturers can be uploaded and take effect. Currently, only Yealink and Fanvil are supported.
Export backup Package
Export backup package which contains device configuration along with personal data.
Restore from Backup package
Click to upload backup package and restore.
Configure via Network
Config Upgrade Via
Allows users to choose the config upgrade method: TFTP, FTP, FTPS, HTTP or HTTPS.
The default setting is “HTTPS”.
Config Server Path
Defines the server path for provisioning. Note: Protocol header can be added in the Config Server path (Eg:https://) without the need to configure it on the “Config Upgrade via” parameter.
Config Server Username
The username for the HTTP/HTTPS server.
Config Server Password
The password for the HTTP/HTTPS server.
Always Authenticate Before Challenge
Only applies to HTTP/HTTPS. If enabled, the phone will send credentials before being challenged by the server.
Config File Prefix
Enables your ITSP to lock configuration updates. If configured, only the configuration file with the matching encrypted prefix will be downloaded and flashed into the phone.
Config File Postfix
Enables your ITSP to lock configuration updates. If configured, only the configuration file with the matching encrypted postfix will be downloaded and flashed into the phone.
Authenticate Conf File
Authenticates configuration file before acceptance.
XML Config File Password
The password for encrypting XML configuration file using OpenSSL. This is required for the phone to decrypt the encrypted XML configuration file.
Provision
Auto Upgrade
Automatic Upgrade
Enables automatic upgrade and provisioning.
The default setting is “No”.
Start Upgrade at Random Time
Configures whether the phone will upgrade automatically at a random time within the configured time interval.
The default setting is “No”
Firmware Upgrade and Provisioning
Specifies how firmware upgrading and provisioning request to be sent: Always
Check for New Firmware, Check New Firmware only when F/W pre/suffix
Changes, Always Skip the Firmware Check.
The default setting is “Always Check for New Firmware”.
Firmware Upgrade Confirmation
If set to “Yes”, the phone will ask the user to upgrade. If there is no response, the phone will proceed with the upgrade.
If set to “No”, the phone will automatically upgrade without user input.
Default setting is Yes.
DHCP Option
Allow DHCP Option 43 and Option 66 Override Server
DHCP option 66 originally was only designed for TFTP server. Later, it was extended to support an HTTP URL. GRP phones support both TFTP and HTTP server via option 66. Users can also use DHCP option 43 vendor specific option to do this. DHCP option 43 approach has priorities. The phone is allowed to fall back to the original server path configured in case the server from option 66 fails. The default setting is “Yes”.
Allow DHCP Option 120 to override SIP Server
Enables DHCP Option 120 from local server to override the SIP Server on the phone. The default setting is “No”.
Additional Override DHCP Option
When enabled, users could select Option 150 or Option 160 to override the firmware server instead of using the configured firmware server path or the server from option 43 and option 66 in the local network. Please note this option will be effective only when option “Allow DHCP Option 43 and Option 66 to Override Server” is enabled.
The default setting is “None”.
Config Provision
Download and Process ALL Available Config Files
By default, device will provision the first available config in the order of cfgMAC, cfgMAC.xml, cfgMODEL.xml, cfg.xml and devMAC.cfg (corresponding to device specific, model specific, and global configs). If set to Yes, device will download and apply (overwrite) all available configs in the same order.
User Protection
When user protection is on, pvalues that user sets will not be changed by provision or provider.
3CX Auto Provision
Phone will multicast SUBSCRIBE for provision if this feature is enabled.
Advanced Settings
Validate Hostname in Certificate
To validate the hostname in the SSL certificate
Enable SIP Notify Authentication
Device will challenge NOTIFY with 401 when set to Yes
Factory reset
Press Start to begin Factory Reset of the phone.
Maintenance > System Diagnosis
Syslog
Syslog Protocol
If set to SSL/TLS, the syslog messages will be sent through secured TLS protocol to syslog server.
Default setting is “UDP”.
Note: The CA certificate is required to connect with the TLS server.
Syslog Server
The URL or IP address of the syslog server for the phone to send syslog to.
Note: By adding port number to the Syslog server field (i.e., 172.18.1.1:1000), the phone will send syslog to the corresponding port of that IP.
Syslog Level
Selects the level of logging for syslog.
The default setting is “None”. There are 4 levels: DEBUG, INFO, WARNING and ERROR.
Syslog messages are sent based on the following events:
Product model/version on boot up (INFO level).
NAT related info (INFO level).
sent or received SIP message (DEBUG level).
SIP message summary (INFO level).
inbound and outbound calls (INFO level).
registration status change (INFO level).
negotiated codec (INFO level).
Ethernet link up (INFO level).
SLIC chip exception (WARNING and ERROR levels).
Memory exception (ERROR level).
Syslog Header Format
Configures the preferred header format for Syslog. The options are:
Legacy (Default setting)
RFC3164 Compliant
The RFC3164 compliant header begins with “PRI” which represent both the Facility (0 – 23) and severity level (0 – 7) of the event. The message includes the timestamp, hostname, process id and the log message.
For more information regarding the representation of the numerical values for the facility and severity, please refer to RFC3164.
Syslog Keyword Filter
Syslog will be filtered based on keywords provided. If you enter multiple keywords, it should be separated by ‘,’. Please note that no spaces are allowed.
Send SIP Log
Configures whether the SIP log will be included in the syslog messages. The default setting is “No”.
Note: By setting Send SIP Log to Yes, the phone will still send SIP log from syslog even when Syslog Level set to NONE.
Maintain System Log Information after Factory Reset
If Enabled, syslog settings and internal logs will be saved across a factory reset. Disabled by default.
Packet Capture
With RTP Packets
Defines whether the packet capture file contains RTP or not. The default setting is “No”.
Note: This option is enabled by default.
Generate WLAN Session Keys File
After this configuration is enabled, the packet capture will carry the WLAN session key file, named 80211_keys, which records the WLAN session keys that the device has gone through from the start to the end of the capture process.
Note: This option is disabled by default.
With Secret Key Information
Configures whether the packet capture file contains secret key information or not. Enabled by Default
Note: This option is enabled by default.
Packet Capture Data Coverage
The size of packet capturing data is limited to 5M. If enable this option, the latest packet capturing data will overwrite the first packet capturing data after the data reaches 5M. If disabled this option, packet capturing will be stopped after the data reaches 5M.
Disabled by Default.
Note: This option is disabled by default.
Ping
Ping
Enter Ping target’s IP address or URL and click on start.
Traceroute
Traceroute
Input target’s IP address or URL and click on start
Remote Diagnostics
Remote Diagnostics
When enabled, this device will allow remote access and remote collection of logs. It will automatically end when it expires.
Start
to begin the remote diagnostics , click on the “start” button
Access Address
Displays the IP Address and port number of the access address
Expiration Time
Displays the Expiration time of the Remote Diagnostics , The Expiration time is set to 48 hours since the start of the Remote Diagnostics
Maintenance > Outbound Notification
Action URL
Phone Status
Setup Completed
Configures the Action URL to send when phone finishes setup process.
Registered
Configures the Action URL to send when phone successfully registers a SIP account.
Unregistered
Configures the Action URL to send when phone unregisters a SIP account.
Register failed
Configures the Action URL to send when phone fails to register a SIP account.
Idle to Busy
Configures the Action URL to send when phone’s state changes from idle to busy.
Busy to Idle
Configures the Action URL to send when phone’s state changes from busy to idle.
Auto Provision Completed
Configures the Action URL to send when phone’s auto provisioning process is completed.
IP Change
Configures the Action URL to send when the IP address changes.
Call Operation
Off-hook
Configures the Action URL to send when phone is in off-hook state.
On-hook
Configures the Action URL to send when phone is in on-hook state.
Incoming Calls
Configures the Action URL to send when phone receives an incoming call.
Outgoing Calls
Configures the Action URL to send when phone places a call.
Missed Call
Configures the Action URL to send when phone has a missed call.
Established Call
Configures the Action URL to send when phone establishes a call.
Forwarded Call
Configures the Action URL to send when phone forwards an incoming call.
Terminated Call
Configures the Action URL to send when phone terminates a call.
Answered Call
Configures the Action URL to send when phone answers an incoming call.
Rejected Call
Configures the Action URL to send when phone rejects an incoming call.
Blind Transfer
Configures the Action URL to send when phone performs blind transfer.
Attended Transfer
Configures the Action URL to send when phone performs attended transfer.
Transfer Completed
Configures the Action URL to send when phone successfully transfers a call.
Transfer Failed
Configures the Action URL to send when phone fails to transfer a call.
Hold Call
Configures the Action URL to send when phone places a call on hold.
Unhold Call
Configures the Action URL to send when phone resumes the call on hold.
Mute Call
Configures the Action URL to send when phone mutes a call.
Unmute Call
Configures the Action URL to send when phone unmutes a call.
Call Settings
Enable DND
Configures the Action URL to send when phone enables DND.
Disable DND
Configures the Action URL to send when phone disables DND.
Enable Call Forward
Configures the Action URL to send when phone enables Call Forward.
Disable Call Forward
Configures the Action URL to send when phone disables call forward.
Open Forward Always
Configures the Action URL to send when phone enables call forward always function.
Close Forward Always
Configures the Action URL to send when phone disables call forward always function.
Open Call Forward Busy
Configures the Action URL to send when phone disables call forward always function.
Close Call Forward Busy
Configures the Action URL to send when phone disables call forward busy function
Open Call Forward No Answer
Configures the Action URL to send when phone enables call forward no answer function.
Close Call Forward No Answer
Configures the Action URL to send when phone disables call forward no answer function.
Destination
Destination Name
Identify the destination name. It must be unique.
Protocol
Configure the protocol associated with the destination server. Currently XMPP and SMTP are supported.
Enable SSL
Configure whether to use SSL to encrypt for SMTP protocol. This option is not editable for XMPP.
Destination Address
Configure destination server address, e.g., talk.google.com.
Port
Configure destination server port, e.g., 5222.
Domain
Configure the destination server domain for XMPP protocol. This option is not editable for SMTP.
Username
Configure the authorization username of the destination server.
Password
Configure the authorization user password for the destination server.
From
Configure the sender name for SMTP protocol. This option is not editable for XMPP.
To
Configure the receiver’s address.
Extra Attribute Name
Configure extra attribute’s name reserved for protocol specific attributes such as “jid” for XMPP protocol. If “jid” is specified, username and domain will be overridden.
Extra Attribute Value
Configure extra attribute’s value reserved for protocol specific attributes such as “abc@gmail.com” for “jid” of XMPP protocol. If it is specified, username and domain will be overridden.
Notification
Event
Configures the event, which will trigger an outbound notification.
Destination
Configures the name of the destination where the outbound notification will be sent to.
Subject
Configures the subject of Email notification. This option is only applicable to SMTP protocol and it is not editable for other protocols.
Message
Configures the message body or the outbound notification.
Extra Attribute Name
Configure extra attribute’s name reserved for specific attributes for a given notification in the future.
Extra Attribute Value
Configures extra attribute’s value reserved for specific attributes for a given notification in the future.
Maintenance > Voice Monitoring
Session Report
VQ RTCP-XR Session Report
When enabled, the phone will send a session quality report to the central report collector at the end of each call. Note: the GRP260x uses the same server/port that is used for SIP registration to process XR session reports
Interval Report
VQ RTCP-XR Interval Report
When enabled, phone will send an interval quality report to the central report collector periodically throughout a call.
VQ RTCP-XR Interval Report Period
Configure the interval (in seconds) of phone sending an interval quality report to the central report collector periodically throughout a call.
Alert Report
Warning Threshold for Moslq
Configure the threshold value of listening MOS score (MOS-LQ) multiplied by 10. The threshold value of MOS-LQ causes the phone to send a warning alert quality report to the central report collector.
Critical Threshold for Moslq
Configure the threshold value of listening MOS score (MOS-LQ) multiplied by 10. The threshold value of MOS-LQ causes the phone to send a critical alert quality report to the central report collector.
Warning Threshold for Delay
Configure the threshold value of one way delay (in milliseconds) that causes the phone to send a warning alert quality report to the central report collector.
Critical Threshold for Delay
Configure the threshold value of one way delay (in milliseconds) that causes the phone to send a critical alert quality report to the central report collector.
Display Report
Display Report on Web UI
When enabled, the phone will display the quality report on the Web GUI. Enabled by Default.
Display Report on LCD
When enabled, phone will display the quality report on LCD. Disabled by Default
Custom Display Layout on LCD
Sets available Items to be displayed on LCD report.
Maintenance > Scheduled Tasks
Working Time
Configures office hours for the effective time configuration of scheduled tasks. For example: set to lock the phone during non-working hours, set forward during working hours.
Scheduled Tasks
Add
Configures a new shceduled task based on :
Scheduled Tasks Type: Select the type of scheduled task: Scheduled Reboot, Scheduled lock, or Scheduled Forward, Set to Scheduled Reboot by Default.
Repetition period: Configures the recurring day of the scheduled task: Every day, Every Week, Every Month, No Repeat, set to no-repeat by Default
Effective Time: Configures the effective time or time period of the scheduled task every day. Set to 00:00 by Default
Delete
Deletes the Scheduled Tasks
Maintenance Settings Definitions
Application Page Definitions
Application 🡪 Web Service
Use Auto Location Service
To enable or disable auto location services on the phone. (Reboot Required)
Application 🡪 XML Application
Idle Screen
Idle Screen XML Download
Configures to enable idle screen XML download via HTTP, HTTPS or TFTP.
Download Screen XML at Boot-up
If set to “Yes”, the idle screen XML file will be downloaded when the phone boots up.
Use Custom Filename
Specifies the custom file name for XML idle screen downloaded.
Idle Screen XML Server Path
Specifies the custom file name for XML idle screen downloaded.
XML File Example
Click to download an example XML file based on which you can make custom changes.
Note: to enable users to customize idle screen softkeys and ignore the ones set in the xml file, please add the following attribute <SoftKeys ignore=”true”>
Top Screen
Softkey Label
Specifies the softkey name displayed on the idle screen for the user to enter XML application.
Server Path
Configure the server path to download the idle screen XML file. This field can be an IP address or URL, with up to 256 characters.
Application 🡪 Contacts
Contacts
Add Contact
Press Add to create a new contact. You can define the following parameters when creating a new contact:
First Name
Last Name
Company
Department
Job Title
Work
Home
Mobile
Conference
Accounts
Groups
Ringtone
Note:
Contact’s “Work” field maximum length is 128 characters.
The maximum numbers of groups that can be added to a single contact is 128 groups
Edit
Edits the contact parameters.
Delete
Deletes a specific contact entry.
Delete All Contacts
Press to delete all contacts.
Group Management
Add Group
Specifies Group’s name to add new group. More than 30 Groups supported.
Edit Group
Edits selected group.
Delete Group
Delete Selected group.
Phonebook Management
Enable Phonebook XML Download
Configures to enable phonebook XML download. Users could select HTTP/HTTPS/TFTP to download the phonebook file.
The default setting is “Disabled”.
HTTP/HTTPS Username
The username for the HTTP/HTTPS server.
HTTP/HTTPS Password
The password for the HTTP/HTTPS server.
Phonebook XML Server Path
Configures the server path to download the phonebook XML.
This field could be IP address or URL, with up to 256 characters.
Phonebook Download Interval
Configures the phonebook download interval (in minutes).
If set to 0, automatic download will be disabled. The default value is 0. Valid range is 5 to 720 minutes.
Remove Manually-edited Entries on Download
If set to “Yes”, when XML phonebook is downloaded, the entries added manually will be automatically removed. The default setting is “Yes”.
Import Group Method
When set to “Replace”, existing groups will be completely replaced by imported one.
When set to “Append”, the imported groups will be attended with the current one.
The default setting is “Replace”.
Sort Phonebook by
Configures to sort phonebook based on the selection of first name, last name or auto. If you select “Last name”, the contact’s last name will be displayed first, and the phone book will be sorted by last name; if you select “First name”, the contact’s first name will be displayed first, and the phone book will be sorted by first name; If you select “Auto”, the contact will be displayed based on whether the contact contains Chinese, Japanese, and Korean characters. If there are these characters, the contact’s last name will be displayed first.
The Default setting is “Auto”.
Download XML Phonebook
Click on “Download” to download the XML phonebook file to local PC
Upload XML Phonebook
Click on “Upload” to upload local XML phonebook file to the phone.
Default Search Mode
Configure the default phone book search mode.it can be set to Exact Match or Quick Match. The default value is Quick Match
Application 🡪 LDAP
Obtain from UCM Server
Obtain LDAP configuratio file
Sets the option to obtain the LDAP configuration file from the ucm the phone is registered to, if activated, the Original LDAP file will be overwritten.
Enable UCM LDAP Auto-config Feature on LCD
When it is turned off, the setting soft key supporting UCM LDAP automatic configuration will no longer be displayed on the LCD. Enabled by Default.
Manual Import
Import LDAP configuration file
Sets the option to Import the LDAP configuration file, if activated, The original LDAP file will be overwritten.
Local Configuration
LDAP Protocol
Configures the LDAP protocol to LDAP or LDAPS. The default setting is “LDAP”. LDAPS is a feature to support LDAP over TLS.
Server Address
Configures the IP address or DNS name of the LDAP server.
Port
Configures the LDAP server port. The default port number is “389”.
Base DN
Configures the LDAP search base.
This is the location in the directory where the search is requested to begin.
Example:
dc=grandstream, dc=com
ou=Boston, dc=grandstream, dc=com
Username
Configures the bind “Username” for querying LDAP servers. Some LDAP servers allow anonymous binds in which case the setting can be left blank.
Password
Configures the bind “Password” for querying LDAP servers. The field can be left blank if the LDAP server allows anonymous binds.
LDAP Number Filter
Configures the filter used for number lookups.
Examples:
(|(telephoneNumber=%)(Mobile=%)) returns all records which has the “telephoneNumber” or “Mobile” field starting with the entered prefix;
(&(telephoneNumber=%) (cn=*)) returns all the records with the “telephoneNumber” field starting with the entered prefix and “cn” field set.
LDAP Name Filter
Configures the filter used for name lookups.
Examples:
(|(cn=%)(sn=%)) returns all records which has the “cn” or “sn” field starting with the entered prefix;
(!(sn=%)) returns all the records which do not have the “sn” field starting with the entered prefix;
(&(cn=%) (telephoneNumber=*)) returns all the records with the “cn” field starting with the entered prefix and “telephoneNumber” field set.
LDAP Mail Filter
Configures the filter used for email lookups.
Examples:
(|(mail=%)(mailBox=%)) returns all records which has the “mail“ or “mailbox” field containing the entered filter value;
(!(mail=%)) returns all the records which do not have the “mail“ field containing the entered filter value;
(&(mail=%) (cn=*)) returns all the records with the “mail“ field containing the entered filter value and “cn“ field set
LDAP Mail Attributes
Specifies the “mail” attributes of each record which are returned in the LDAP search result. This field allows users to configure multiple space separated email attributes.
LDAP Version
Selects the protocol version for the phone to send the bind requests. The default setting is “Version 3”.
LDAP Name Attributes
Specifies the “name” attributes of each record which are returned in the LDAP search result. This field allows the users to configure multiple space separated name attributes.
Example:
gn
cn sn description
LDAP Number Attributes
Specifies the “number” attributes of each record which are returned in the LDAP search result.
This field allows the users to configure multiple space separated number attributes.
Example:
telephoneNumber
telephoneNumber Mobile
LDAP Display Name
Configures the entry information to be shown on phone’s LCD. Up to 3 fields can be displayed.
Example:
%cn %sn %telephoneNumber
Max. Hits
Specifies the maximum number of results to be returned by the LDAP server. If set to 0, server will return all search results. The default setting is 50.
Search Timeout
Specifies the interval (in seconds) for the server to process the request and client waits for server to return. The default setting is 30 seconds.
Sort Results
Specifies whether the searching result is sorted or not.
Default setting is “No”.
LDAP Lookup
Configures to enable LDAP number searching when dialing / receiving calls.
Lookup Display Name
Configures the display name when LDAP looks up the name for incoming call or outgoing call. This field must be a subset of the LDAP Name Attributes.
Example:
gn
cn sn description
LDAP Dialing Default Account
Configures the default account used when dialing LDAP contact
Exact Match Search
Search for exact match result.
Default setting is “No”.
Application 🡪 Remote Phonebook
The user can configure up to 5 XML Remote Phonebooks. Note: It is now possible to configure multiple departments on each remote phonebook.
Display Name
Configures the entry information to be shown on phone’s LCD.
URL
Configures the XML Phonebook URL.
Username
The user name for the phonebook.
Password
The password for the phonebook.
Remote Phonebook Update Interval
Configures the Remote Phonebook download Interval (in minutes). If set to 0, automatic download will be disabled. Valid range is 5 to 720.
Application 🡪 Call History
Delete
Users can select an entry, then click “Delete” to remove it from the list.
Delete All
Click on Delete All to remove all Call History stored in the phone.
Note: Users could use the drop-down list to show only selected call history type (All, Answered, Dialed, Missed, and Transferred) and use navigation keys to browse pages when many entries exist.
Application 🡪 Online Contacts
Contacts Search URL
Configures the URL to search contacts. This field could be protocol,server address,path,or query parameters, with up to 256 characters. Path and query parameters can use built-in variables in the format of {var}. Optional variables include: {localNumber}: Local number {remoteNumber}: Remote number {sipServer}: Account registration server {model}: Phone model {version}: Version number {mac}: Phone MAC address {Exactsearch}:whether to query accurately (0-fuzzy, 1-exact) {Condition}:query criteria (entered number/name, etc.) {Pagecount}:The maximum number of query results displayed on a page {Pagenum}:Number of pages at the beginning of the query
Configures the HTTP POST to search contacts. This field could be protocol, server address, path, or query parameters, with up to 1024 characters. Path and query parameters can use built-in variables in the format of {var}. Optional variables include: {localNumber}: Local number {remoteNumber}: Remote number {sipServer}: Account registration server {model}:Phone model {version}:Version number {mac}:Phone MAC address {Exactsearch}:whether to query accurately (0-fuzzy, 1-exact) {Condition}: query criteria (entered number/name, etc.) {Pagecount}: The maximum number of query results displayed on a page {Pagenum}: Number of pages at the beginning of the query
When the configuration item is empty (including all blank data), the phone sends a get request, otherwise, the phone sends a post request. It Supports XML and JSON data formats.
Contacts Search Auth Username
Sets The username for the Searching HTTP/HTTPS server.
Contacts Search Auth Password
Sets The password for the Searching HTTP/HTTPS server.
Contact Search Response Syntax
Configure contact search response syntax.Response syntax is mandatory. Enter a URL or response content to parse. If you enter a URL and click respond, the system automatically obtains the response content and result. The format of response syntax is key:val[,key:val]. Each line displays one rule. The comma “, “is a newline character. The key includes: ● success ● reason ● counts ● total ● name ● company ● department ● title ● email ● firstName ● lastName ● extensionCompany ● extensionHome ● extensionMobile
Application Settings Definitions
External Service Page Definitions
External Service > GDS
GDS
Connect to a GDS37XX and send OpenDoor request.
Service Type: Select GDS as service type.
Account: The account to be used on the phone to interact with the GDS37XX.
System Identification: A name or a number to identify the GDS37XX.
System Number: The SIP extension or the IP address of the GDS37XX depending on the deployed scenario, Peering or Registration.
Access Password: The password set on the GDS37XX to unlock the door.
System Ringtone: Select the system ringtone from the dropdown list to be played when there is an incoming call from the configured system number of the GDS37xx.
Notes:
When using Peering scenario, on “System Number” field of the GRP260x specify the IP address of the peered GDS37XX.
When using Registration scenario and both GRP260x and GDS37XX are registered on the same SIP server, specify the SIP extension of the GDS37XX on “System Number” field on GXP16XX.
The “Access Password” on GRP260x should be matching “Remote PIN to Open the door” on GDS37XX.
External Service > Call Center
Call Center Codes
Set the disposition code and the unavailable code for quick selection on the phone side.
Wrap-up Countdown
Configure the countdown times when the agent status is Wrap-up and execute the countdown on the LCD. If set to 0, the countdown is disabled.
External Service > Broadsoft XSI
Authentication Login
Server
Broadsoft XSI server address with protocol.
Port
Port of the Broadsoft XSI server.
XSI Action Path
Configure the deployment path for Broadsoft XSI Actions. If it is empty, the path “com.broadsoft.xsi-actions” will be used.
XSI Authentication Type
Defines the authentication type to use login credentials or SIP credentials. If set to “Login Credentials”, please fill in User ID and Password in the following options; If set to “SIP Credentials”, please fill in user ID, Authentication ID, and Authentication Password.
BroadWorks User ID
SIP User ID for Broadsoft XSI server.
Auto Login
If set to “Yes”, the device will automatically login in the background after booting up, so that the BS Xsi always remains logged in. LCD can get the latest Directories, can directly enter the BS Xsi user service, and trigger the update of data in the background.
Service Settings
Sort Phonebook by
Sort phonebook based on the selection of first name or last name.
BroadSoft Directory Update Interval (m)
Configures the BroadSoft phonebook download interval (in minutes). If set to 0, automatic download will be disabled. Valid range is 5 to 4320.
Broadsoft Contacts Download Limitation
The maximum contacts that can be downloaded for each BroadSoft XSI server directory. The valid range is from 0 to 2000. If set to 0, the server’s default contact limit will be used. If the total contact records returned by the server is larger than this limit then it will not be downloaded, and the device will be limited to remote search.
BroadSoft Contacts Search limitation
The maximum remote search records that can be downloaded for the BroadSoft XSI server directory. The valid range is from 0 to 2000. If set to 0, there is no limit. If the search result total records exceed this value, it will not be downloaded, and you will need to narrow the search scope.
Network Directories
Type
Enable/Disable Broadsoft Network directories. The directory types are:
Group Directory: Enable/Disable and rename the BroadWorks Xsi Group Directory features on the phone. If keep the Name box blank, the phone will use the default name “Group” for it.
Enterprise Directory: Enable/Disable and rename the BroadWorks Xsi Enterprise Directory features on the phone. If keep the Name box blank, the phone will use the default name “Enterprise” for it.
Group Common: Enable/Disable and rename the BroadWorks Xsi Group Common Directory features on the phone. If keep the Name box blank, the phone will use the default name “Group Common” for it.
Enterprise Common: Enable/Disable and rename the BroadWorks Xsi Enterprise Common Directory features on the phone. If keep the Name box blank, the phone will use default name “Enterprise Common” for it.
Personal Directory: Enable/Disable and rename the BroadWorks Xsi Personal Directory features on the phone. If keep the Name box blank, the phone will use the default name “Personal” for it.
Missed Call Log: Enable/Disable and rename the BroadWorks Xsi Missed Call Log features on the phone. If keep the Name box blank, the phone will use the default name “Missed” for it.
Placed Call Log: Enable/Disable and rename the BroadWorks Xsi Placed Call Log features on the phone. If keep the Name box blank, the phone will use the default name “Outgoing” for it
Received Call Log: Enable/Disable and rename the BroadWorks Xsi Placed Call Log features on the phone. If keep the Name box blank, the phone will use the default name “Incoming” for it.
Name
Defines the directory name.
External Service > E911 Service
Enable E911
Enable Enhanced 911 call. Default is disabled
HELD Protocol
Configure HELD transfer protocol. HTTP or HTTPS
HELD Synchronization Interval.
The valid synchronization interval is between 30 to 1440 minutes. The synchronization is off when the interval is 0.
Location Server
Configure the primary Location Information Server (LIS) address
Location Server Username
Configure the user name of the primary Location Information Server (LIS)
Location Server Password
Configure the password of the primary Location Information Server (LIS)
Secondary Location Server
Configure the seconary Location Information Server (LIS) address.
Secondary Location Server Username
Configure the user name of the secondary Location Information Server (LIS)
Secondary Location Server Password
Configure the password of the secondary Location Information Server (LIS)
HELD Location Types
Configure “locationType” element in the location request. “geodetic”, “civic” and “location URI”
HELD Use LLDP Information
If “Yes”, the information from LLDP-suport switch is used to generate ChassisID and PortID; otherwise, the mac address of gateway and phone is used as default.
HELD NAI
If “Yes”, Network Access Identifier (NAI) is included as a device identity in the location request sent to the Location Information Server (LIS)
E911 Emergency Numbers
A user can configure multiple emergency numbers separated with the delimiter symbol “;”.
Geolocation-Routing Header
If “Yes”, E.911 INVITE message includes the “Geolocation-Routing” header with the value “Yes”
Geolocation Header Format
Choose the standard of the format of the Geolocation Header.
RFC6442: The geolocation header format will correspond to RFC6442. (E.g., Geolocation: <cid: 8476BD6B-5FDD-339D-900B-AEAB0AA0429A>)
Legacy: The geolocation header will corr Geolocation: 8476BD6B-5FDD-339D-900B-AEAB0AA0429A
Note: By default this option is set to “Legacy”.
Priority Header
If “Yes”, E.911 INVITE message includes the “Priority” header with the value “emergency”
External Service Settings Definitions
NAT SETTINGS
If the devices are kept within a private network behind a firewall, we recommend using STUN Server. The following settings are useful in the STUN Server scenario:
STUN Server
Under Settings→General Settings, enter a STUN Server IP (or FQDN) that you may have, or look up a free public STUN Server on the internet and enter it in this field. If using Public IP, keep this field blank.
Use Random Ports
It is under Settings→General Settings. This setting depends on your network settings. When set to “Yes”, it will force random generation of both the local SIP and RTP ports. This is usually necessary when multiple GRPs are behind the same NAT. If using a Public IP address, set this parameter to “No”.
NAT Traversal
It is under Accounts X→Network Settings. The default setting is “No”. Enable the device to use NAT traversal when it is behind a firewall on a private network. Select Keep-Alive, Auto, STUN (with STUN server path configured too), or other options according to the network setting.
PACKET CAPTURE
GRP260X is embedded with a packet capture function. The related options are under Maintenance→System Diagnosis→Packet Capture.
Packet Capture in Idle
Users can also define whether RTP packets will be captured or not from the With RTP Packets option.
When the capture configuration is set, press the Start button to start packet capture. The Status will become RUNNING while capturing, as shown in Figure 7: Packet Capture when running. Press the Stop button to end the capture.
Press the Download button to download the capture file to your local PC. The capture file is in .pcap format.
Packet Capture when running
Remote SSH capture
Remote SSH capture is the process of remotely accessing and capturing network traffic on a target machine via a secure shell (SSH) connection.
When configured, The Remote SSH option will allow us to capture the network traffic that is flowing through the GRP260x IP phone. This allows us to inspect the traffic, analyze it, and potentially identify any security issues or anomalies, to do this on the Wireshark network analyzer, we will need to follow the below steps :
1. Enable SSH under System settings → Security settings → SSH Access
2. Enable the sshdump and ciscodump components when installing Wireshark.
3. Once Wireshark is installed with the needed components, Launch the SSH remote capture configuration page, By clicking the icon shown below
4. Define the SSH server address and port, which are the captured device IP address and port.
5. Authenticate using the credentials of the device’s web UI.
6. Set the remote capture command to other:pcap.
Once the steps are followed, an “SSH remote capture” option will be displayed on the main page of Wireshark, to start capturing, click on “SSH remote capture” as shown below
and when capturing a packet in the web UI of the grandstream IP phone it can be viewed and monitored on Wireshark software directly as shown in the example below:
Note
Please contact technical support for steps to decrypt encrypted captured packets.
UPGRADING AND PROVISIONING
Warning
The following hardware versions do not support firmware downgrade after upgrading to version 1.0.5.37:
GRP2601(P) hardware version 1.9A
GRP2602(P) hardware version 1.9A
GRP2604(P) hardware version 1.7A
GRP2603P / GRP2604P hardware version 1.5A
GRP2603P hardware version 1.5B
GRP2603 / GRP2604 hardware version 1.6B
Unified Firmware
The GRP2601 / GRP2601P / GRP2602 / GRP2602P /GRP2602W / GRP2603 / GRP2603P / GRP2604 / GRP2604P support unified firmware for all GRP260X models.
GRP260X Unified Firmware
Firmware Upgrade
The GRP260X series can be upgraded via TFTP / FTP / FTPS / HTTP / HTTPS by configuring the URL/IP Address for the TFTP / HTTP / HTTPS / FTP / FTPS server and selecting a download method. Configure a valid URL for TFTP, FTP/FTPS, or HTTP/HTTPS, the server name can be FQDN or IP address.
Open a web browser on a PC and enter the IP address of the phone. Then, log in with the administrator username and password. Go to the Maintenance🡪Upgrade and Provisioning page, enter the IP address or the FQDN for the upgrade server in the “Firmware Server Path” field, and choose to upgrade via TFTP, HTTP/HTTPS, or FTP/FTPS. Update the change by clicking the “Save and apply” button. Then “Reboot” or power cycle the phone to update the new firmware.
When upgrading starts, the screen will show the upgrading progress. When done you will see the phone restart again. Please do not interrupt or power cycle the phone when the upgrading process is on.
Firmware upgrading takes around 60 seconds in a controlled LAN or 5-10 minutes over the Internet. We recommend completing firmware upgrades in a controlled LAN environment whenever possible.
No Local TFTP/FTP/HTTP Servers
For users who would like to use remote upgrading without a local TFTP/FTP/HTTP server, Grandstream offers a NAT-friendly HTTP server. This enables users to download the latest software upgrades for their phones via this server. Please refer to the webpage:
Alternatively, users can download a free TFTP, FTP, or HTTP server and conduct a local firmware upgrade. A free window version TFTP server is available for download from:
Unzip the firmware files and put all of them in the root directory of the TFTP server.
Connect the PC running the TFTP server and the phone to the same LAN segment.
Launch the TFTP server and go to the File menu🡪Configure🡪Security to change the TFTP server’s default setting from “Receive Only” to “Transmit Only” for the firmware upgrade.
Start the TFTP server and configure the TFTP server in the phone’s web configuration interface.
Configure the Firmware Server Path to the IP address of the PC.
Update the changes and reboot the phone.
End users can also choose to download a free HTTP server from http://httpd.apache.org/ or use the Microsoft IIS web server.
Custom Ringtones Provisioning
The custom ringtones can be provisioned from the link configured under the firmware server path, up to 6 ringtones can be customized. The phone will be looking for ringx.ogg as shown below, where x can be from 1 to 6:
Custom ringtone provisioning
Codec: must be Opus
Frequency: 16K
Audio Channel: Mono
Phone Provisioning
Configuration File Download
Grandstream SIP Devices can be configured via the Web Interface as well as via a Configuration File (binary or XML) through TFTP, FTP/FTPS, or HTTP/HTTPS. The “Config Server Path” is the TFTP, FTP/FTPS, or HTTP/HTTPS server path for the configuration file. It needs to be set to a valid URL, either an FQDN or IP address format. The “Config Server Path” can be the same or different from the “Firmware Server Path”.
A configuration parameter is associated with each field on the web configuration page. A parameter consists of a Capital letter P and 2 to 5-digit numeric numbers. i.e., P2 is associated with the “New Password” in the Web GUI🡪System Settings🡪Security Settings 🡪 User Info Management 🡪 AdminPassword. For a detailed parameter list, please refer to the corresponding configuration template.
When the GRP260x series boots up or reboots, it will issue a request to download an XML file named “cfgxxxxxxxxxxxx.xml”, where “xxxxxxxxxxxx” is the MAC address of the phone, i.e., “cfg000b820102ab” and “cfg000b820102ab.xml”. If the download of the “cfgxxxxxxxxxxxx.xml” file is not successfully followed by a configuration file named “cfgxxxxxxxxxxxx”, the phone will issue a request to download a specific model configuration file “cfg<model>.xml”, where <model> is the phone model, i.e., “cfggrp2601.xml” for the GRP2601, “cfgrp2602” for the GRP2602, “cfgrp2603” for the GRP2603 and “cfgrp2604” for the GRP2604. If this file is not available, the phone will issue a request to download the generic “cfg.xml” file. The configuration file name should be in lowercase letters, If not found, the phone will request a file named “dev[MacAddress].cfg” where “MacAddress” is the MAC address of the device, With this provisioning file, users can provision the device with both P-values and aliases.
Config File Download
Note: (attempt to download the config file again)
When doing provision on the phone, if your first config file contains p-values listed below, the phone will try to download the potential second cfg.xml file and apply the second file without rebooting. Maximum 3 extra attempts.
Those P-values are:
*212 -- Config upgrade via

*234 -- Config prefix

*235 -- Config postfix

*237 -- Config upgrade Server

*240 – Authenticate Config File

*1359 – XML Config File Password

*8463 – Validate Server Certificate

*8467 – Download and process ALL Available Config Files

*20713 – Always authenticate before challenge

*22011 – Bypass Proxy For

*22030 – Enable SSL host verification for provision
Note: (P-values that trigger Auto-Provision)
If the p-values listed below are changed while managing configuration on web UI or LCD, the provisioning process will be triggered:
* 192 -- Firmware upgrade server

* 232 -- Firmware prefix

* 233 -- Firmware postfix

* 6767 -- Firmware Upgrade Via

* 6768 -- Firmware HTTP/HTTPS Username

* 6769 -- Firmware HTTP/HTTPS Password

* 237 -- Config upgrade Server

* 212 -- Config upgrade via

* 234 -- Config prefix

* 235 -- Config postfix

* 1360 -- Config HTTP/HTTPS username

* 1361 -- Config HTTP/HTTPS password.
Note
P-Value that forces reboot when changes are applied by downloading the config file
When P-value 22421 (or alias “provision.config.forceReboot”) is set to 1 in the config file, the phone will need to reboot if any change is applied by downloading the config file. Specifically following the process below:
First-time download:
Phone downloaded a config file (in any supported format) with P22421 set to 1 included.
Phone found there is change(s) compared with the current setting on the phone (Any valid P-value change, no matter if it does need a reboot to apply or not).
The phone will update to the new setting (will not save P22421 itself) and will go into the normal reboot process (e.g.: if there is an active call, the phone will wait until it is finished)
Second-time download:
After reboot, the phone may download the same config file again (if the config file path did not change).
Phone checked the config file and found no P-value needed to be updated.
The phone will not reboot again.
Note: (Certificates and keys provisioning)
Users can configure the phone to get all the needed certificates during boot up. Instead of putting the certificate/key content in the text directly from the Web interface or uploading them manually, they can choose to provision them from the configuration file by putting the URL in the P-value field of each certificate and/or key. (e.g., http://ProvisionServer_address/SIP-TLS-Certificate.pem) The phone will then process the URL, search for the appropriate certificate/Key file, download it, and then apply it to the phone.
Certificates Files Download
For more details on XML provisioning, please refer to:
After the phone sends, the config file request to the Broadsoft provisioning server via HTTP/HTTPS, if the provisioning server responds “401 Unauthorized” asking for authentication, the phone’s LCD will prompt a window for the user to enter username and password. Once the correct username and password are entered, the phone will send the config file request again with authentication. Then the phone will receive the config file to download and get provisioned automatically.
Besides manually entering the username and password in the LCD prompt, users can save the login credentials for the provisioning process as well. The username and password configuration are under the phone’s Web UI🡪Maintenance🡪Upgrade and provisioning page: “HTTP/HTTPS Username” and “HTTP/HTTPS Password”. If the saved username and password are correct, the login window will be skipped. Otherwise, the login window will be popped up to prompt users to enter the correct username and password again.
Note
Starting from firmware version 1.0.3.83, the option to display an upgrade prompt on the LCD screensaver page was added
RESTORE FACTORY DEFAULT SETTINGS
Warning
Restoring the Factory Default Settings will delete all configuration information on the phone. Please backup or print all the settings before you restore them to the factory default settings. Grandstream is not responsible for restoring lost parameters and cannot connect your device to your VoIP service provider.
Restore Factory Settings using the LCD menu
Please follow the instructions below to reset the phone:
Press the MENU button to bring up the keypad configuration menu.
Navigate to Settings > Advanced Settings.
Select “Factory Reset”.
A warning window will pop out to make sure a reset is requested and confirmed.
Press the “Yes” Softkey to confirm and the phone will reboot, or “No” Softkey to cancel the Reset.
Restore to Factory Default via Web GUI
Login GRP2601/GRP2602/GRP2603/GRP2604 Web GUI.
Navigate to Maintenance → Upgrade and provision → Advanced Settings → Factory Reset.
Press on the Start Button situated against the Factory reset option
Click “OK” to confirm and the phone will reboot, or “Cancel” to cancel the Reset.
CHANGELOG
This section documents significant changes from previous versions of user manuals for GRP260X. Only major new features or major document updates are listed here. Minor updates for corrections or editing are not documented here.
Firmware Version 1.0.7.66
No major changes.
Firmware Version1.0.7.64
No major changes.
Firmware Version 1.0.7.63 (Beta Version)
Added support for Call Monitor Function for Zoom. [Advanced Features]
Added support for Local Call Features Mode. [Feature Codes]
Added support for BLF and Monitored Call Park call indication on non-primary page. [Virtual Multi-Purpose Keys]
Grandstream is a registered trademark and the Grandstream logo is the trademark of Grandstream Networks, Inc. in the United States, Europe, and other countries.
CAUTION
Changes or modifications to this product not expressly approved by Grandstream, or operation of this product in any way other than as detailed by this guide could void your manufacturer warranty.
WARNING
Please do not use a different power adapter with devices as it may cause damage to the products and void the manufacturer’s warranty.
CERTIFICATION
U.S. FCC Part 68 Regulatory Information
This equipment complies with Part 68 of the FCC rules. Located on the equipment is a label that contains, among other information, the ACTA registration number and ringer equivalence number (REN). If requested, this information must be provided to the telephone company.
The REN is used to determine the quantity of devices which may be connected to the telephone line. Excessive REN’s on the telephone line may result in the devices not ringing in response to an incoming call. In most, but not all areas, the sum of the REN’s should not exceed five (5.0). To be certain of the number of devices that may be connected to the line, as determined by the total REN’s contact the telephone company to determine the maximum REN for the calling area.
This equipment cannot be used on the telephone company-provided coin service. Connection to Party Line Service is subject to State Tariffs.
If this equipment causes harm to the telephone network, the telephone company will notify you in advance that temporary discontinuance of service may be required. If advance notice is not practical, the telephone company will notify the customer as soon as possible. Also, you will be advised of your right the file a complaint with the FCC if you believe it is necessary.
The telephone company may make changes in its facilities, equipment, operations, or procedures that could affect the operation of the equipment. If this happens, the telephone company will provide advance notice in order for you to make the necessary modifications in order to maintain uninterrupted service.
If any trouble experienced with this equipment, please contact (Agent in the US):
Company Name: Grandstream Networks, Inc.
Address: 126 Brookline Ave, 3rd Floor Boston, MA 02215, USA
Tel: 1-617-5669300
If the trouble is causing harm to the telephone network, the telephone company may request you to remove the equipment from the network until the problem is resolved.
This equipment uses the following USOC jacks: RJ45C.
It is recommended that the customer install an AC surge arrester in the AC outlet to which this device is connected. This is to avoid damaging the equipment caused by local lightning strikes and other electrical surges.
Since this device has the HAC function, the earpiece is easy to absorb small, please take care to avoid scratching.
U.S. FCC Part 15 Regulatory Information
This device complies with part 15 of the FCC Rules. Operation is subject to the following two conditions:
(1) This device may not cause harmful interference, and (2) this device must accept any interference received, including interference that may cause undesired operation.
Any Changes or modifications not expressly approved by the party responsible for compliance could void the user’s authority to operate the equipment.
Note: This equipment has been tested and found to comply with the limits for a Class B digital device, pursuant to part 15 of the FCC Rules. These limits are designed to provide reasonable protection against harmful interference in a residential installation. This equipment generates, uses, and can radiate radio
Frequency energy and, if not installed and used in accordance with the instructions, may cause harmful interference to radio communications. However, there is no guarantee that interference will not occur in a particular installation. If this equipment does cause harmful interference to radio or television reception, which can be determined by turning the equipment off and on, the user is encouraged to try to correct the interference by one or more of the following measures:
Reorient or relocate the receiving antenna.
Increase the separation between the equipment and receiver.
Connect the equipment into an outlet on a circuit different from that to which the receiver is connected.
Consult the dealer or an experienced radio/TV technician for help.
This equipment complies with FCC radiation exposure limits set forth for an uncontrolled environment. This equipment should be installed and operated with minimum distance 20cm between the radiator& your body. This transmitter must not be co-located or operating in conjunction with any other antenna or transmitter.
Caution: Exposure to Radio Frequency Radiation
This equipment complies with EU radiation exposure limits set forth for an uncontrolled environment. This equipment should be installed and operated with minimum distance of 20 cm between the radiator and your body.
CE Authentication
Hereby, Grandstream Networks, Inc. declares that the radio equipment GRP2602W are in compliance with Directive 2014/53/EU.
The full text of the EU declaration of conformity is available at the following internet address:
GRP260x firmware contains third-party software licensed under the GNU General Public License (GPL). Grandstream uses software under the specific terms of the GPL. Please see the GNU General Public License (GPL) for the exact terms and conditions of the license. Grandstream GNU GPL-related source code can be downloaded from the Grandstream website from: https://www.grandstream.com/legal/open-source-software



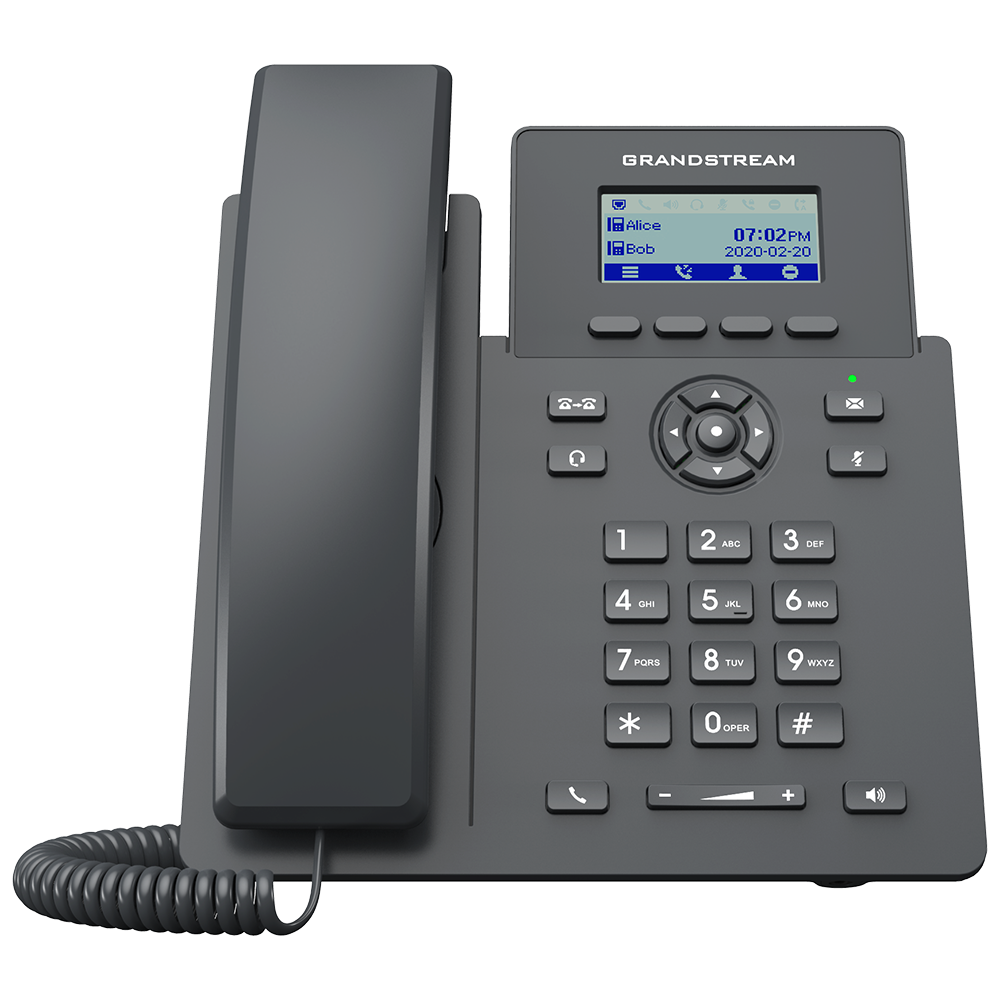
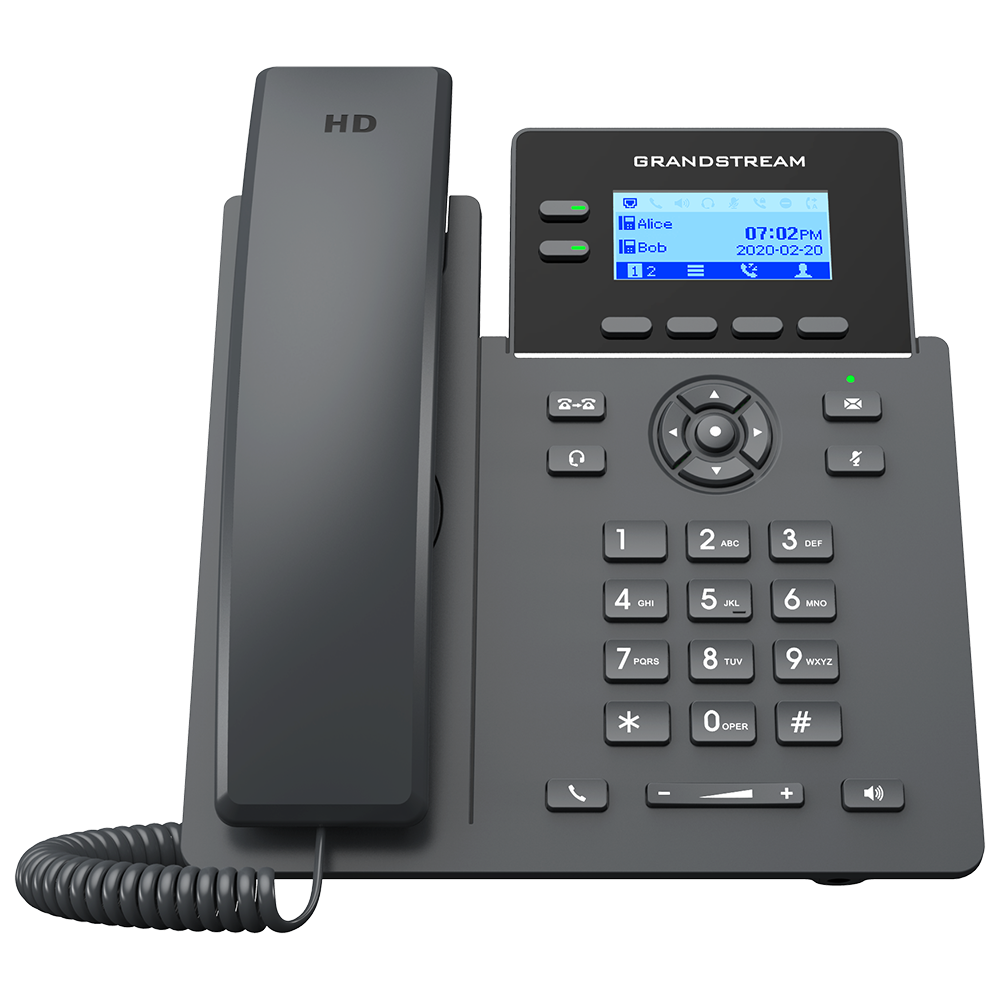
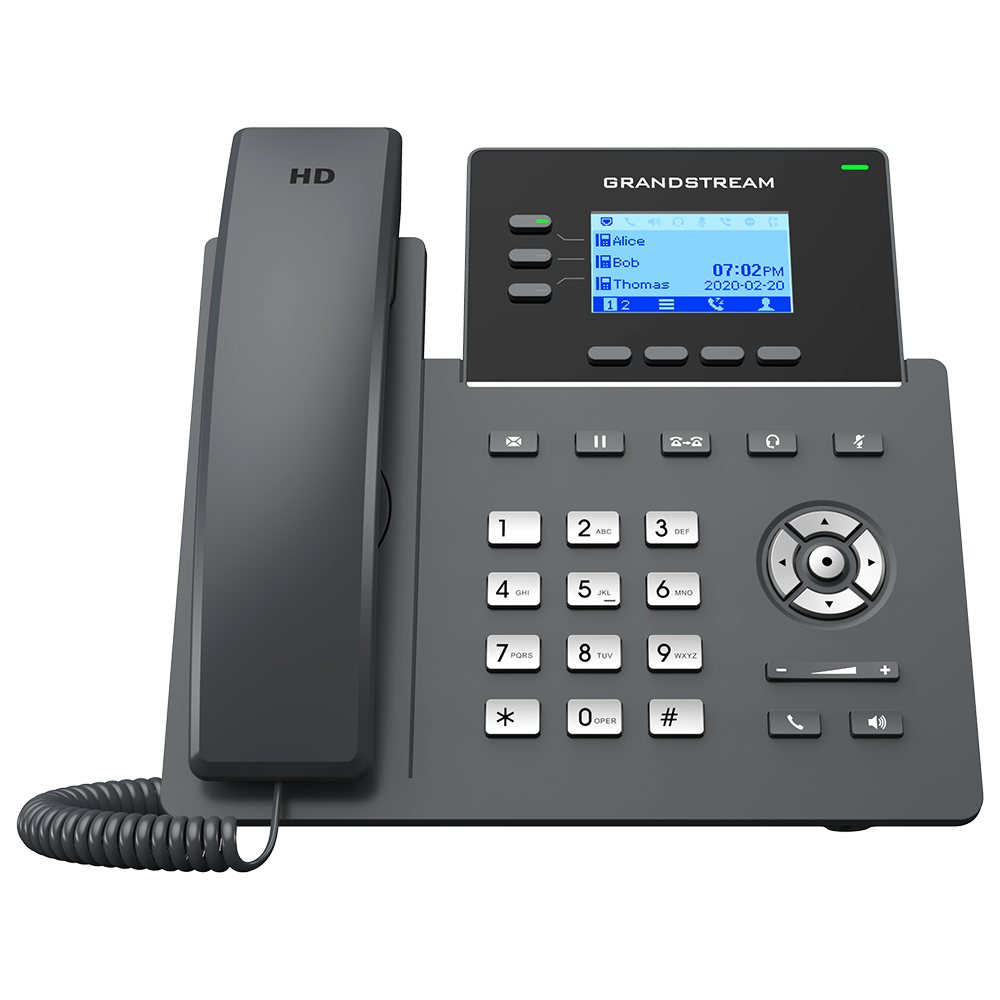
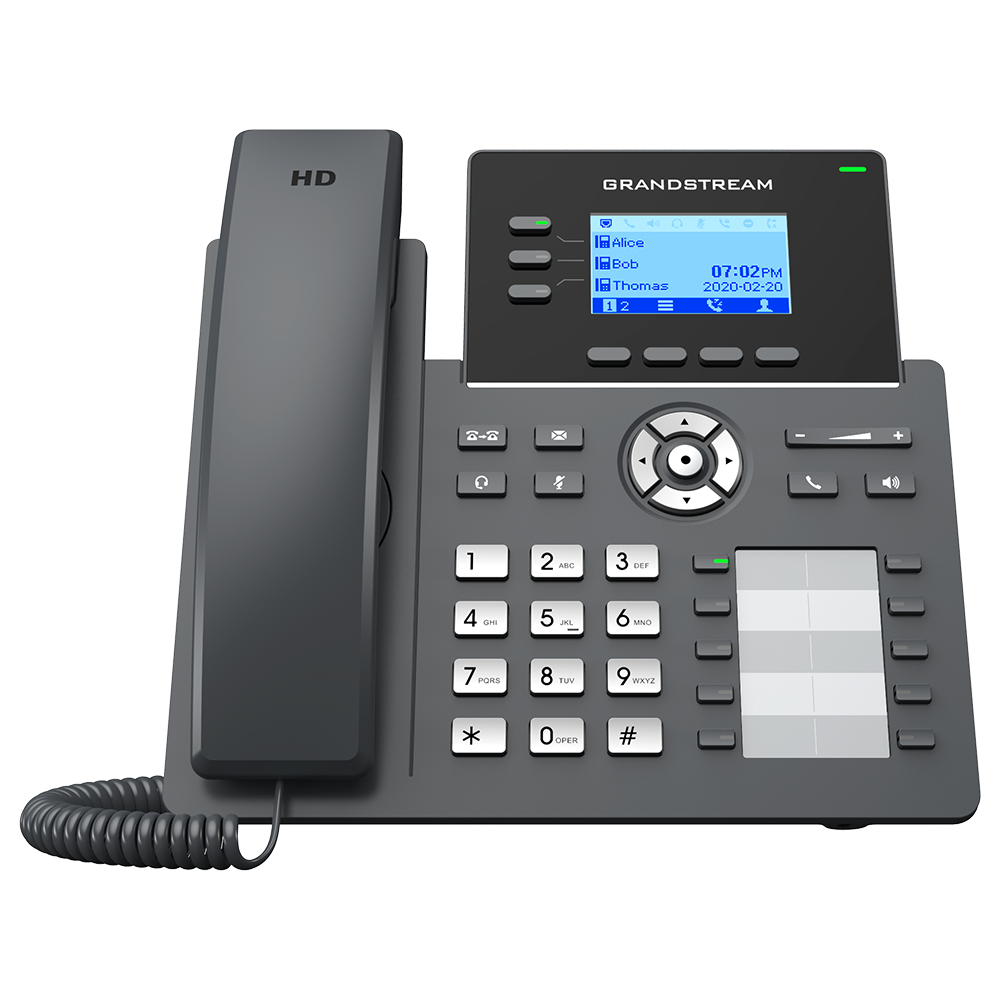
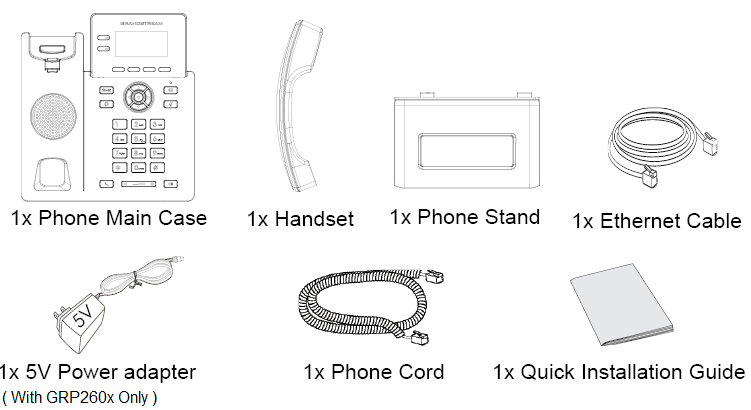
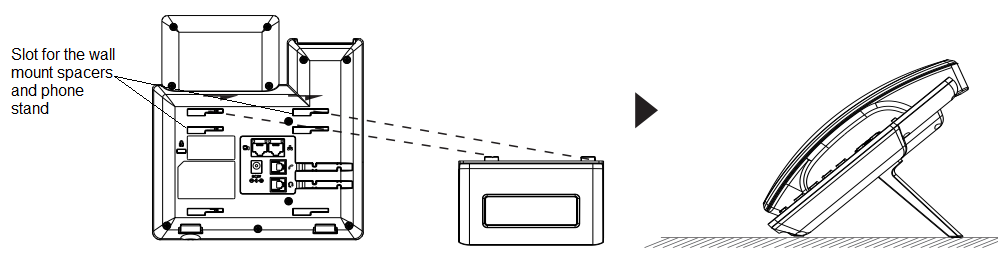
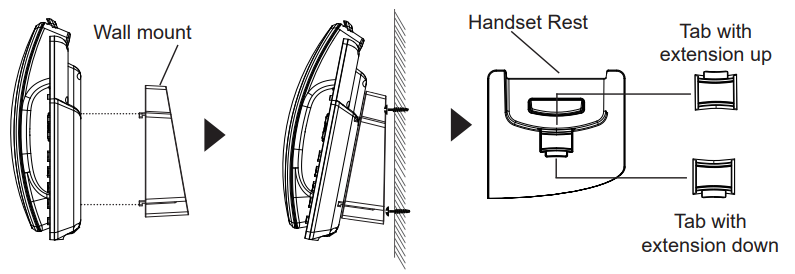
 . Then enter the Network’s information.