GCC6010/GCC6011 – Quick Installation Guide

  • Updated on September 22, 2025 PDF Download

Overview

GCC601X(W) series are defined as mid-range all-in-one convergence devices. Integrates VPN Router, NGFW, Switch or Wi-Fi AP, and IP PBX, covering the collaborative office capabilities of data communication and UC audio and video service. Featuring GbE RJ-45 and SFP ports, it enables high-speed multi-WAN port connectivity for enterprises. This series is convenient and fast to deploy and manage through the local simple Web UI, GDMS, mobile APP, or console. Support unified management and centralized control of Grandstream terminal devices including APs, Switches, and UC endpoints. It is also a security firewall that provides excellent performance and defenses against the most advanced network attacks while achieving unified management and consistent security in complex hybrid environments. Ideal for small and medium enterprises, campuses, government, hotels, remote offices/SOHO, etc.

Package Content
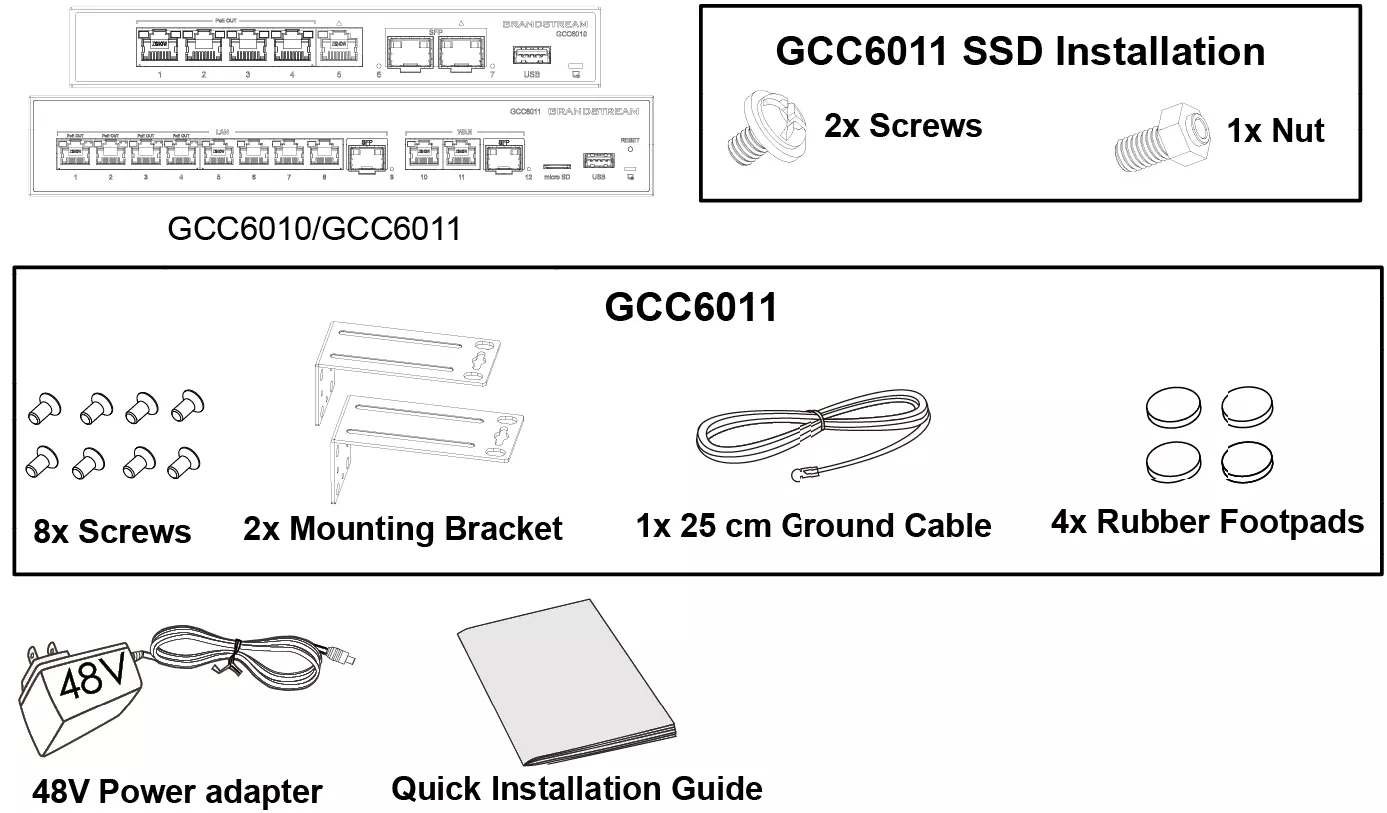
GCC6010GCC6011 Package Content
Precautions:

  • Do not attempt to open, disassemble, or modify the device.
  • Do not expose this device to temperatures outside range of 0 °C to +45 °C (in operation) and -30 °C to +60 °C (in storage).
  • Do not expose the GCC6010/GCC6011 to environments outside of the following humidity range: 5-95% RH (non-condensing).
  • Do NOT power cycle the GCC6010/GCC6011 during system boot up or firmware upgrade. You may corrupt firmware images and cause the unit to malfunction.

GCC6010/GCC6011 Ports

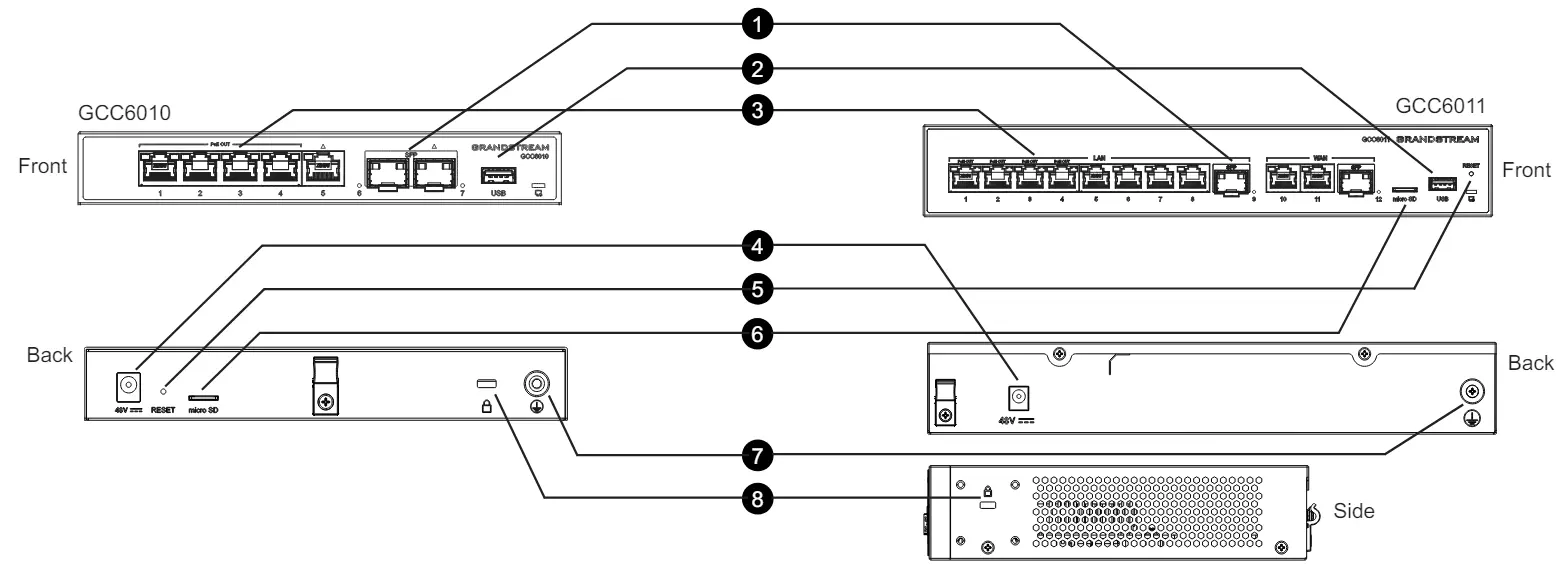
GCC6010GCC6011 ports

Ports

Description

1

2.5G SFP Port

2

USB 3.0 Port

3

Ethernet Port

4

DC48V

5

RESET

6

Micro SD

7

Grounding terminal

8

Kensington Lock

GCC6010/GCC6011 ports description

Connecting the GCC6010/GCC6011

Connecting GCC6010GCC6011
  1. GCC6010/GCC6011 can be powered on using the right PSU 48VDC 1A (48W).
  2. Connect the WAN port to an optical fiber broadband modem, ADSL broadband modem, or community broadband interface.
  3. Connect a PC to one of the LAN ports.

Alert

Warning: The dedicated grounding terminal must be permanently connected to earth ground

  • Warning: Always disconnect the power supply before installing or moving power cables.
  • The equipment must be permanently grounded prior to operation. The grounding wire must be ≥16 AWG (1.25 mm²) in cross-sectional area.
  • Warning: When powering down equipment with multiple power inputs, all power cables—including RPS connections must be completely disconnected.


Alert

When the equipment is operating, do not look directly into optical ports or fiber connectors.

  • Caution: Unauthorized modification or alteration of the optical module’s functions or performance, in violation of the instructions in this manual, may result in hazardous laser radiation.


Notes:

  • The default password information is printed on the MAC label on the bottom of the unit. The default username is “admin”.
  • Ports with this symbol △ on GCC6010 are configured to be used as a WAN port by default at the factory.
  • The default gateway is 192.168.80.1 (gcc.grandstream.com).

GCC6010GCC6011 login page

Installation

Wall Mount

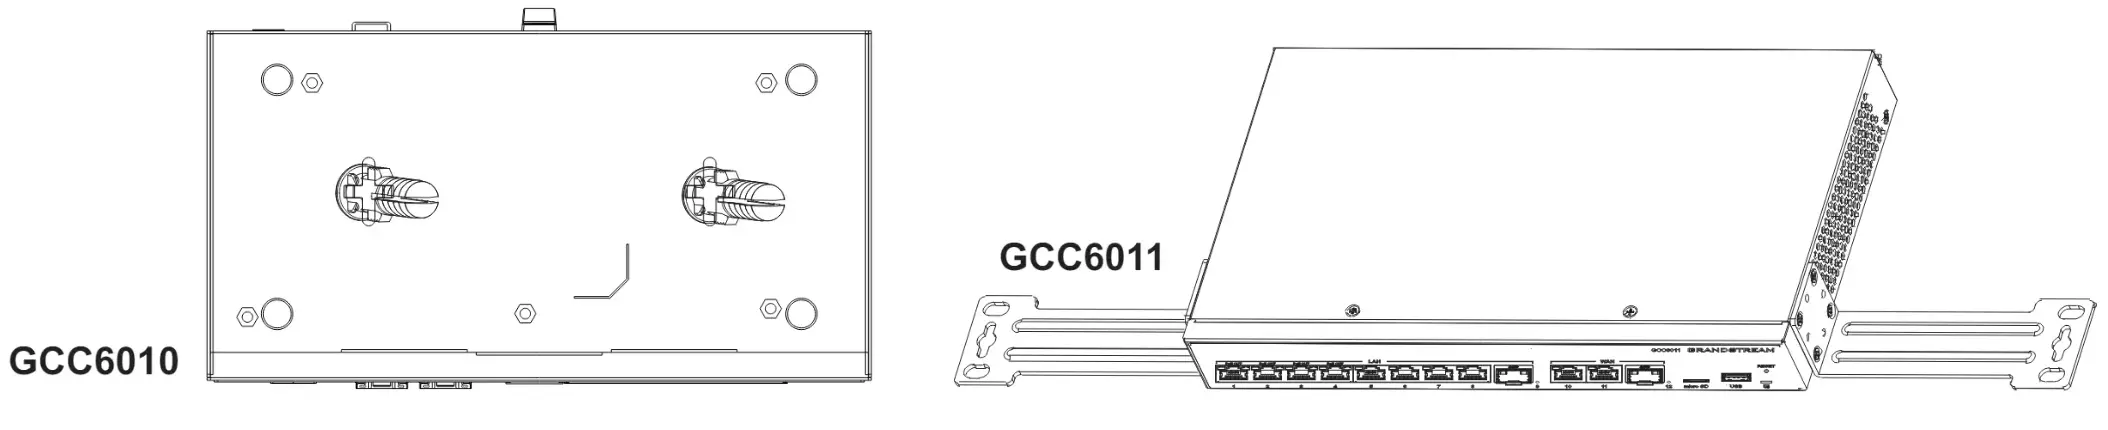
GCC6010GCC6011 wall mount
  • GCC6010
  1. Using a drill, make two holes in the wall. Put a plastic anchor and screw (not provided) on each hole.
  2. Mount the GCC6010 on the mounting screws.
  • GCC6011
  1. Use the provided screws to fix the two L-shaped Mounting bracket (rotated 90°) on both sides of the GCC6011.
  2. Stick the device port up and horizontally on the selected wall, mark the position of the screw hole on the L-shaped mounting brackets with a marker. Then, drill a hole at the marked position with an impact drill, and drill the plastic anchors (not provided) into the drilled hole in the wall.
  3. Use a screwdriver to tighten the screws (prepared by yourself) that have passed through the L-shaped mounting brackets to ensure that the GCC6011 device is firmly installed on the wall.

19″ Standard Rack Installation (GCC6011)
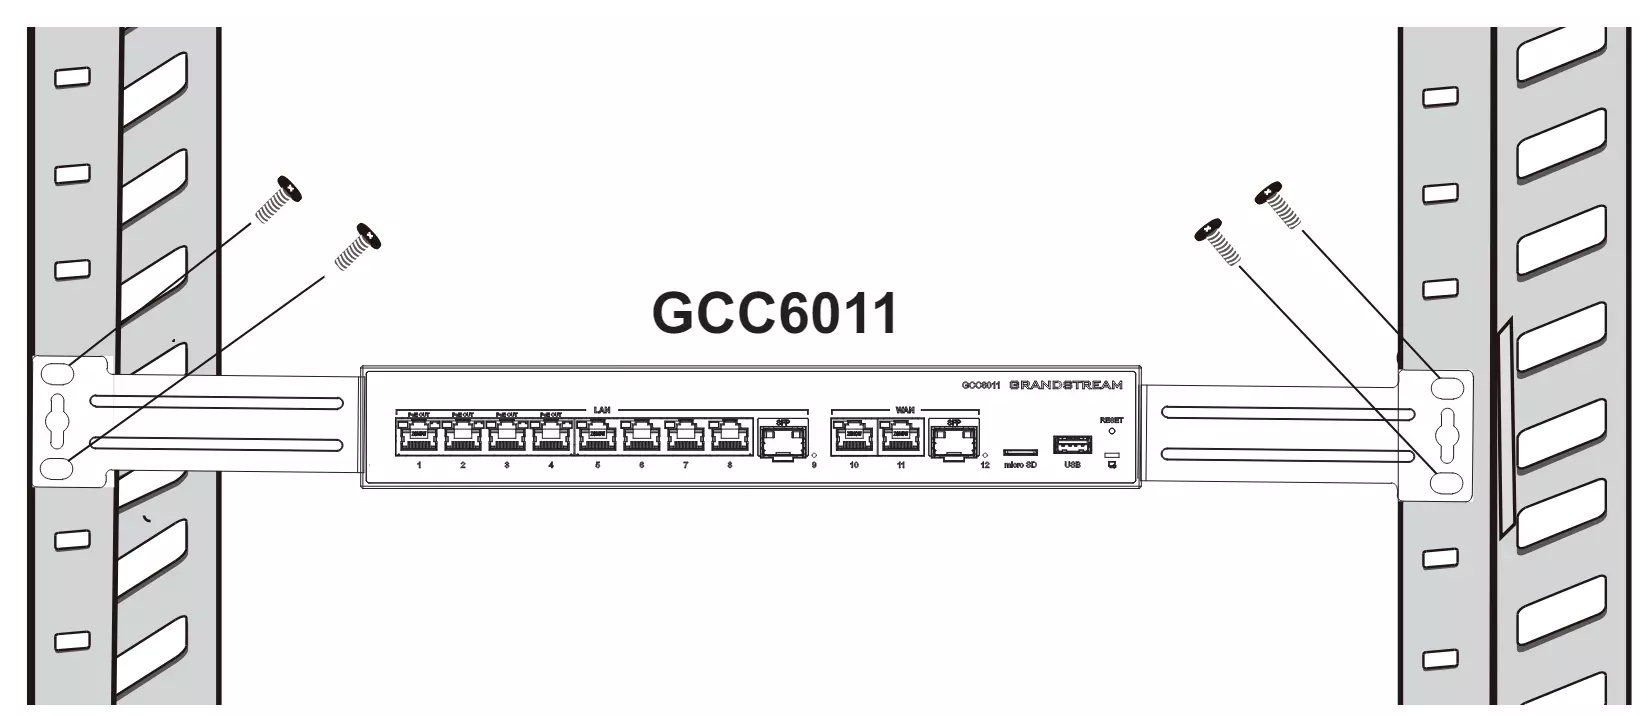
GCC6011 19 standard rack installation
  1. Check the grounding and stability of the rack.
  2. Install the two L-shaped rack-mounting in the accessories on both sides of the switch, and fix them with the provided screws.
  3. Place the switch in a proper position in the rack and support it with the bracket.
  4. Fix the L-shaped rack mounting to the guide grooves at both ends of the rack with screws (prepared by yourself) to ensure that the switch is stably and horizontally installed on the rack.

  • The GCC6010/GCC6011 is not pre-configured to support or make emergency calls to any type of hospital, law enforcement agency, medical care unit (“Emergency Service(s)”) or any other kind of Emergency Service. You must make additional arrangements to access Emergency Services. It is your responsibility to purchase SIP-compliant Internet telephone service, properly configure the GCC6010/GCC6011 to use that service, and periodically test your configuration to confirm that it works as you expect. It is also your responsibility to purchase traditional wireless or landline telephone services to access Emergency Services.
  • GRANDSTREAM DOES NOT PROVIDE CONNECTIONS TO EMERGENCY SERVICES VIA THE GCC6010W. NEITHER GRANDSTREAM NOR ITS OFFICES, EMPLOYEES OR AFFILIATES MAY BE HELD LIABLE FOR ANY CLAIM, DAMAGE, OR LOSS, AND YOU HEREBY WAIVE ANY AND ALL SUCH CLAIMS OR CAUSES OF ACTION ARISING FROM OR RELATING TO YOUR INABILITY TO USE THE GCC6010W TO CONTACT EMERGENCY SERVICES, AND YOUR FAILURE TO MAKE ADDITIONAL ARRANGEMENTS TO ACCESS EMERGENCY SERVICES IN ACCORDANCE WITH THE IMMEDIATELY PRECEDING PARAGRAPH.
  • The GNU GPL license terms are incorporated into the device firmware and can be accessed via the Web user interface of the device at my_device_ip/gpl_license. It can also be accessed here: https://www.grandstream.com/ legal/open-source-software. To obtain a CD with GPL source code information please submit a written request to info@grandstream.com.

Refer to online documents and FAQ for more detailed information:
http://www.grandstream.com/our-products

For Certification, Warranty, and RMA information,
please visit www.grandstream.com


Was this article helpful?

Related Articles

Need Support?
Can’t find the answer you’re looking for? Don’t worry we’re here to help!
Contact Support