


Today, many small and medium-sized businesses are choosing on-premises IT solutions, which will fit their special business needs. As for the telephony systems, VoIP (Voice over IP) has emerged in the last years as major technology providing all necessary features that enterprise-grade PBXs can offer.
One of the major functionalities that a VoIP system must provide is the call center features, allowing SMBs to implement their own local call center and better serve their customers by phone calls.
There are hundreds of different hardware/software providers across the globe that integrate call center functionalities into their solutions, and every call center system has its pros and cons. When selecting the right call center system for your business, contact center, or call center, it’s important to decide which features you want your phone system to have.
Grandstream IP-PBX systems include built-in call center capabilities designed to meet these operational needs. In the following guide, we will cover in detail the major modules and features provided by standard IP-PBX platforms to help you run your call center in the most efficient way possible.
Call Center Features List
Grandstream IP-PBXs platforms include most of the essential features required for call center implementations. The following sections cover these modules and functionalities in detail.
Call Queues
A Grandstream IP-PBX supports one of the fundamental building blocks of every call center system: call queues.
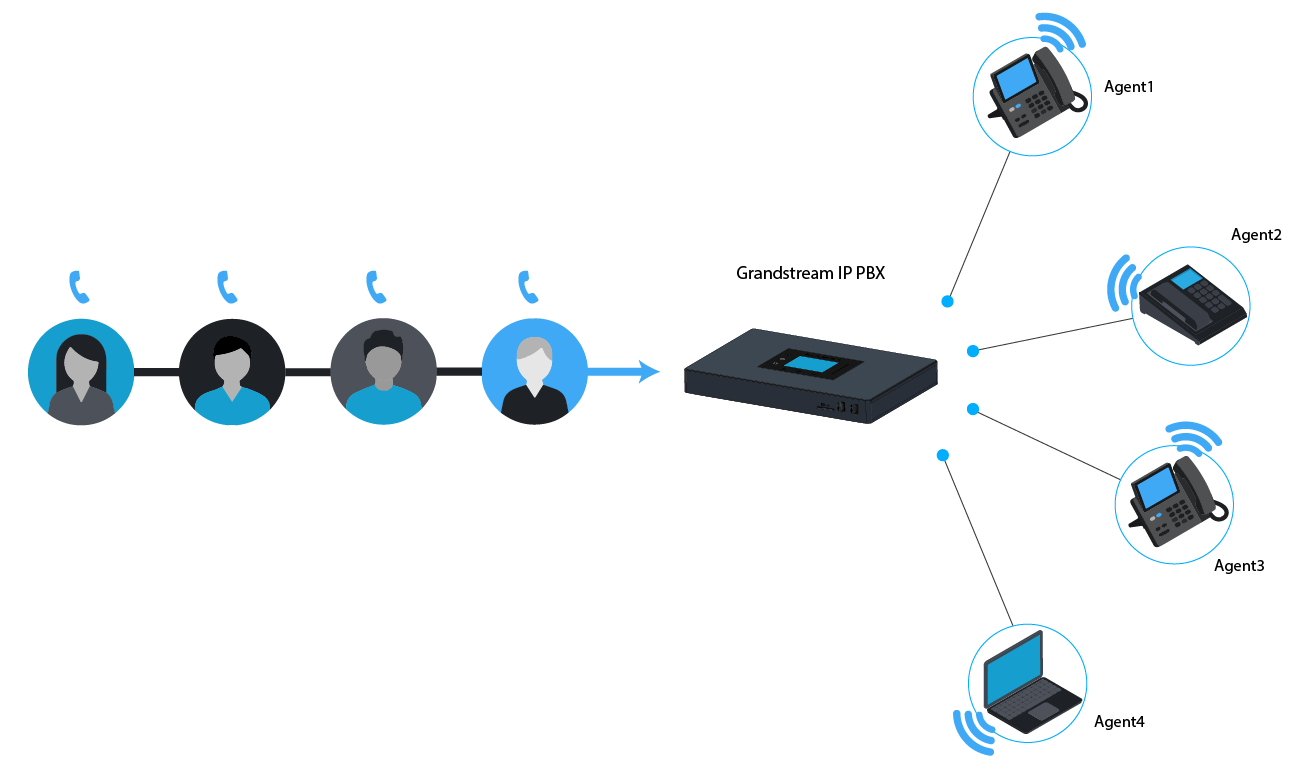
Typically, a call queue consists of:
- Callers: Inbound callers holding in line for the next available agent.
- Agents: Designated extension members assigned to handle queue calls, organized as static or dynamic members.
- Routing & Call Distribution: Rules defining how incoming calls are distributed to available agents (including ring strategies and skill/proficiency level routing).
- Music & Announcements: Audio media, periodic queue status updates, and custom promotional announcements played to callers while waiting.
- Call Handling & Operations: Options such as call recording, virtual callback queueing, max wait limits, and Service Level Agreement (SLA) tracking.
Grandstream IP-PBX call queue settings and parameters include:
Basic Settings | |
General | |
Extension | Configure the call queue extension number. |
Name | Configure the call queue name to identify the call queue. |
Proficiency Routing | If enabled, incoming calls will be routed to the agents with the highest available proficiency level (lower number = higher profiency). If multiple agents have the same level, the Ring Strategy for Same Proficency Level will be used to route calls among those agents. Please make sure to assign proficiency levels to the agents. Note: This option applies to both static and dynamic agents. |
Strategy (Ring Strategy of Equal Skill Level when Proficiency Routing is enabled) | Select the strategy for the call queue.
The default setting is “Ring All“. |
Music On Hold | Select the Music On Hold class for the call queue. Note: Music On Hold classes can be managed from Web GUI > PBX Settings > Music On Hold. |
Max Queue Length | Configure the maximum number of calls to be queued at once. This number does not include calls that have been connected with agents, only calls that are still in queue. When this maximum value is exceeded, the caller will hear a busy tone and be forwarded to the configured failover destination. Default value is 0 (unlimited). |
Agent Rest Time (s) | Configure the amount of time in seconds after ending a call where the agent will not receive additional calls. Once this time has passed, the agent will be able to receive calls again. If set to 0, agents can receive additional calls immediately after ending a call. Default value is 10 seconds. |
Retry Time (s) | Configure the number of seconds to wait before ringing the next agent. The minimum is 1 and the default setting is 5 seconds. Since only 3 digits can be entered, the max value is 999. |
Agent Ring Time | Configure the number of seconds to ring an agent. The minimum is 5 and the default setting is 30 seconds. Since only 3 digits can be entered, the max value is 999. |
Auto Record | If enabled, the calls on the call queue will be automatically recorded. The recording files can be accessed in Queue Recordings under Web GUI > Call Features > Call Queue. Users can choose whether to automatically record only internal calls, external calls or all calls. By default, Auto Record is disabled. |
Prompt Language | Choose the language of the prompt which will be played to the caller. When the option “default” is selected, the language defined in PBX Settings > Voice Prompt > Language Settings will be selected. |
Welcome Prompt | |
Enable | Enable the welcome prompt. |
Custom Prompt | Choose the initial tone that plays when the user dials the queue number. Note: The user can upload a custom prompt directly from this parameter. Only the following file formats are supported: .tar, .tgz, .tar.gz, .mp3, .wav, .gsm, .alaw, .ulaw |
Play Full Welcome Prompt | If enabled, queue agents will not be rung until after the welcome prompt is done playing. Otherwise, queue agents will be rung while the welcome prompt is being played to the caller. |
Satisfaction Survey Prompt | |
Custom Prompt | After a queue agent hangs up a call, a prompt will play asking the caller to rate their satisfaction on a scale of 1 to 5, with 5 being the highest. Notes: The user can upload a custom prompt directly from this parameter. Only the following file formats are supported: .tar, .tgz, .tar.gz, .mp3, .wav, .gsm, .alaw, .ulaw
|
Max Wait Time | |
Max Wait Time | Configures the amount of time (in seconds) a caller will be kept in queue before the the call is automatically routed to the configured Max Wait Time Destination. If set to 0, callers will be kept in queue indefinitely. Default is 60 seconds. |
Destination | The call will be routed to this destination if no one in this queue answers after the max wait time expires. |
Reset Agent Call Counter | |
Enable | Specifies the frequency at which the agent call counter will be reset. This will affect counter data used for agent ring strategies and the queue switchboard data. |
Repeat | Set the repeat frequency to One-time, Daily, Weekly or Monthly. |
Date/Time | Set the date and time. |
Destination Prompt Cycle | |
Enable | If enabled, the callers will hear the configured custom prompt at set intervals while waiting. If they press “1,” they are immediately routed to a predefined failover destination. |
Destination Prompt Cycle | Configure the voice prompt cycle (in seconds) of this call queue. When playing the voice prompt, you can press 1 to transfer to failover destination. |
Custom Prompt | When playing a custom prompt, press 1 to enter the failover destination. Otherwise, continue waiting in queue. Note: The user can upload a custom prompt directly from this parameter. Only the following file formats are supported: .tar, .tgz, .tar.gz, .mp3, .wav, .gsm, .alaw, .ulaw |
Destination | After the specified amount of time, the caller will be prompted to press 1 to immediately get redirected to the configured failover destination. |
Advanced Settings | |
Virtual Queue | |
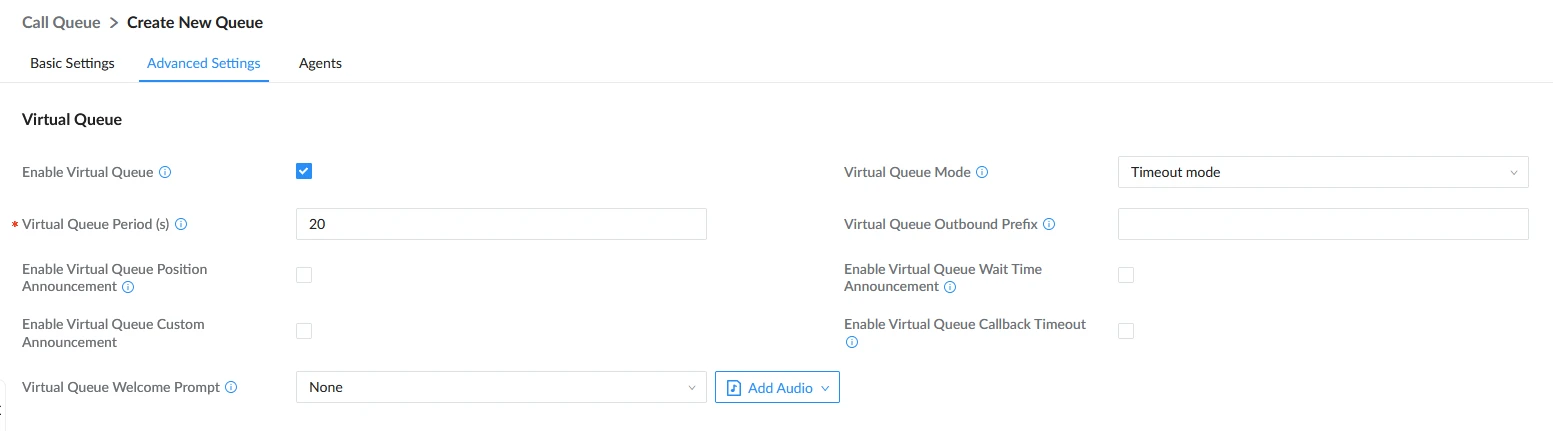
Enable Virtual Queue | If enabled, the system will activate a virtual queue for users, allowing them to opt for a callback instead of waiting. Callers will be prompted to either remain in the queue or choose a number that the PBX will use to reach them, ensuring they retain their position in line. |
Virtual Queue Mode |
|
Virtual Queue Period (s) | The amount of time in seconds that must pass before virtual queue is offered to callers when using Timeout mode or Auto mode. |
Virtual Queue Outbound Prefix | System will add this prefix to dialed numbers when calling back users. |
Enable Virtual Queue Position Announcement | If enabled, the system will inform callers waiting in the queue of their positions in line. |
Enable Virtual Queue Wait Time Announcement | If enabled, the estimated wait time for the call to get answered will periodically be announced to the caller. |
Enable Virtual Queue Callback Timeout | If enabled, agents will have a set amount of time to answer a virtual queue callback. |
Write Timeout | The amount of time in seconds that agents will have to answer a virtual queue callback. If the value is less than the Agent Ring Time, then the Agent Ring Time will take effect. |
Virtual Queue Welcome Prompt | Upload the file of your welcome prompt of the virtual queue. Only the following file formats are supported: .tar, .tgz, .tar.gz, .mp3, .wav, .gsm, .alaw, .ulaw |
Queue Announcement | |
Enable Position Announcement | If enabled, the system will inform callers waiting in the queue of their positions in line. |
Enable Wait Time Announcement | If enabled, the estimated wait time for the call to get answered will periodically be announced to the caller. Note: Wait time will not be announced if less than one minute. |
Announcement Interval | The interval at which caller positions and estimated wait times will be announced. Valid range is between 20 and 600 seconds. Default value is 20. |
Agent ID Announcement | If enabled, a system prompt containing the agent ID will be played to the caller when answered by an agent. |
Premium Code | Callers can increase their priority in queue by entering their premium code and # within 5 seconds of the premium code prompt ending. |
Premium Code Prompt | After enabling the position announcement, the premium code related functions can be set to share the same announcement cycle with the position announcement. |
Custom Announcement | |
Custom Prompt | The system will periodically play this annoucement to callers that enter the queue. Only the following file formats are supported: .tar, .tgz, .tar.gz, .mp3, .wav, .gsm, .alaw, .ulaw |
Announcement Interval (s) | Configures the interval for playing the queue’s custom announcement. Valid range is between 20 and 600 seconds. Default value is 60. |
Empty Queue | |
Leave When Empty | Configure whether the callers will be disconnected from the queue or not if the queue has no agent anymore. The default setting is “Strict”.
|
Dial in Empty Queue | Configure whether the callers can dial into a call queue if the queue has no agent. The default setting is “No”.
|
Failover Destination | Choose the destination where the call will be directed when the queue is empty or when all the agents are not logged in, here are the destinations that can be configured:
|
CTI | |
Enable Agent Login | Enabling agent login will cause the dynamic agents to be unavailable. |
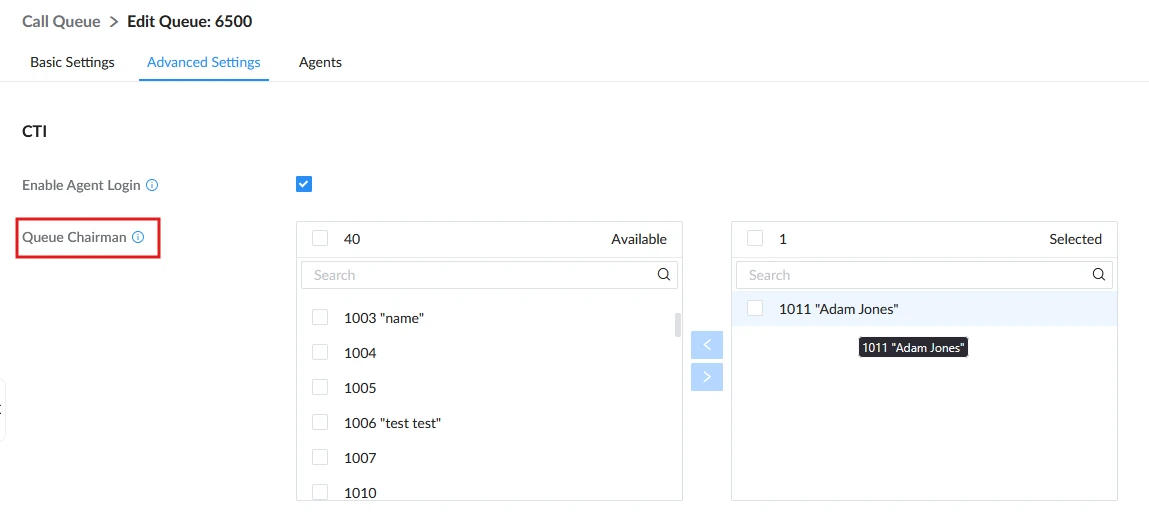
Queue Chairman | The queue chairman can log into his web portal to operate the queue. |
Service Level Agreement (SLA) | |
Enable SLA | Toggles Service Level Agreement (SLA), which is percentage measurement of the queue group’s ability to answer incoming calls within a defined amount of time. If a queue group’s calculated SLA percentage is below the configured threshold value, alerts will be generated and sent out via email to the specified recipients. |
SLA Time (s) | Configures the amount of time in seconds that agents must answer incoming queue calls within to satisfy service quality requirements. Answering calls past this time will negatively affect the SLA measurement, and an alert will be generated once it hits below the specified SLA alert threshold. Supported values are 1 to 180. Default value is 20. |
SLA Alert Email Notification | Enable SLA alert email notification. |
Alert Threshold (%) | Configures the SLA alert threshold. If the percentage of queue calls answered within the configured SLA Time go below this value, an alert email will be generated and sent to the configured recipients. Supported values are 1 to 100. Default value is 80. |
SLA Alert Interval (m) | Configures the minimum amount of time (in minutes) between alert sending. If a new alert is generated within this period, it will not be sent to recipients until the next alert interval. The valid range is from 1 to 120. The default value is 120. |
SLA Alert Email Template | The template of the SLA alert email notifications. |
Alert Email Recipients | Send SLA alert notifications to the configured alert email recipients. If a recipient does not have an email address configured, they will not receive the alert notifications. |
Other Settings | |
Report Hold Time | If enabled, the PBX will report (to the agent) the duration of time of the call before the caller is connected to the agent. The default setting is “No”. |
Replace Display Name | If enabled, the PBX will replace the caller display name with the Call Queue name so that the caller knows the call is incoming from a Call Queue. |
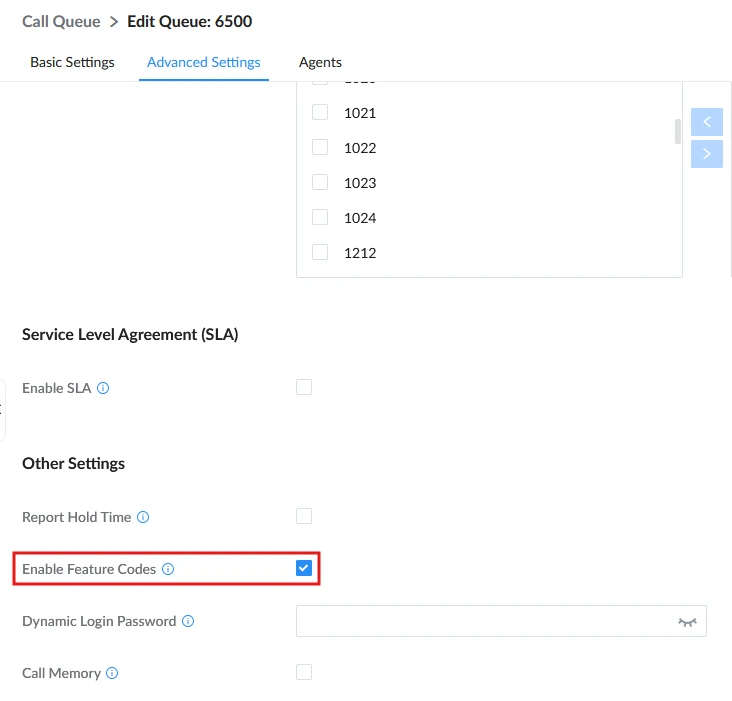
Enable Feature Codes | Enable feature codes option for call queue. For example, *83 is used for “Agent Pause” |
Autofill | Enable/Disable the Autofill feature which distributes calls automatically to available agents as soon as they become free instead of having callers wait in a traditional queue. |
Dynamic Login Password | If enabled, the configured PIN number is required for dynamic agent to log in. The default setting is disabled. |
Alert-Info | When present in an INVITE request, the Alert-info header field specifies an alternative ring tone to the UAS. |
Call Memory | If enabled, the system will remember the last agent a caller has talked to. If the caller enters the queue again within the configured Retrieval Time (Days), the remembered agent will be prioritized for answering the call. |
Memory Retention Time (Days) | Sets the amount of time that callers will be remembered for Call Memory agent matching. Calls to the queue after this period of time will no longer prioritize the caller’s last agent. Valid range is 1 to 30 days. Default value is 7. |
Enable RPID Header | Toggles the sending of Remote-Party-ID header to the caller. Requires enable Send Remote Party ID configuration in ToS page. |
Agents | |
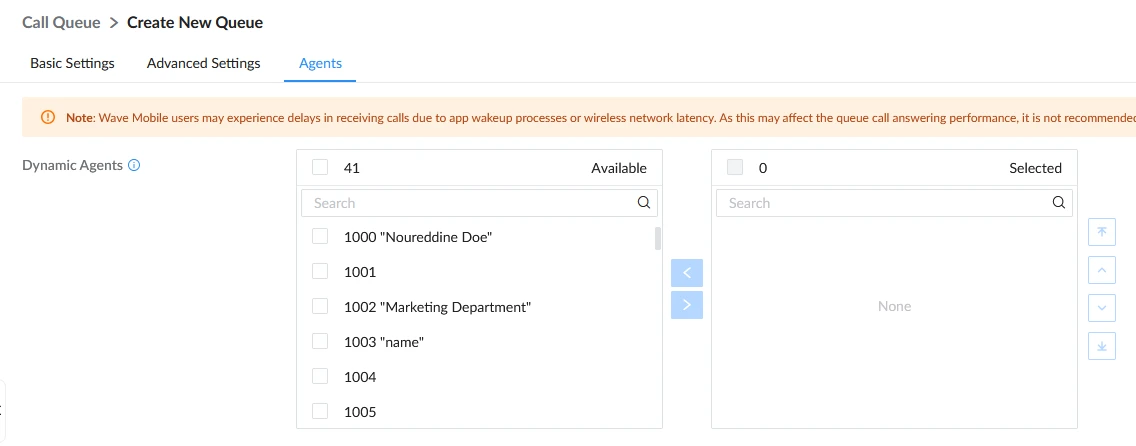
Dynamic Agents | Configure the dynamic agents of this queue, allowing dynamic agents to sign into the queue and receive incoming calls from the queue. The total number of static agents and logged in dynamic agents needs to meet the number limit of the agents on this device. |
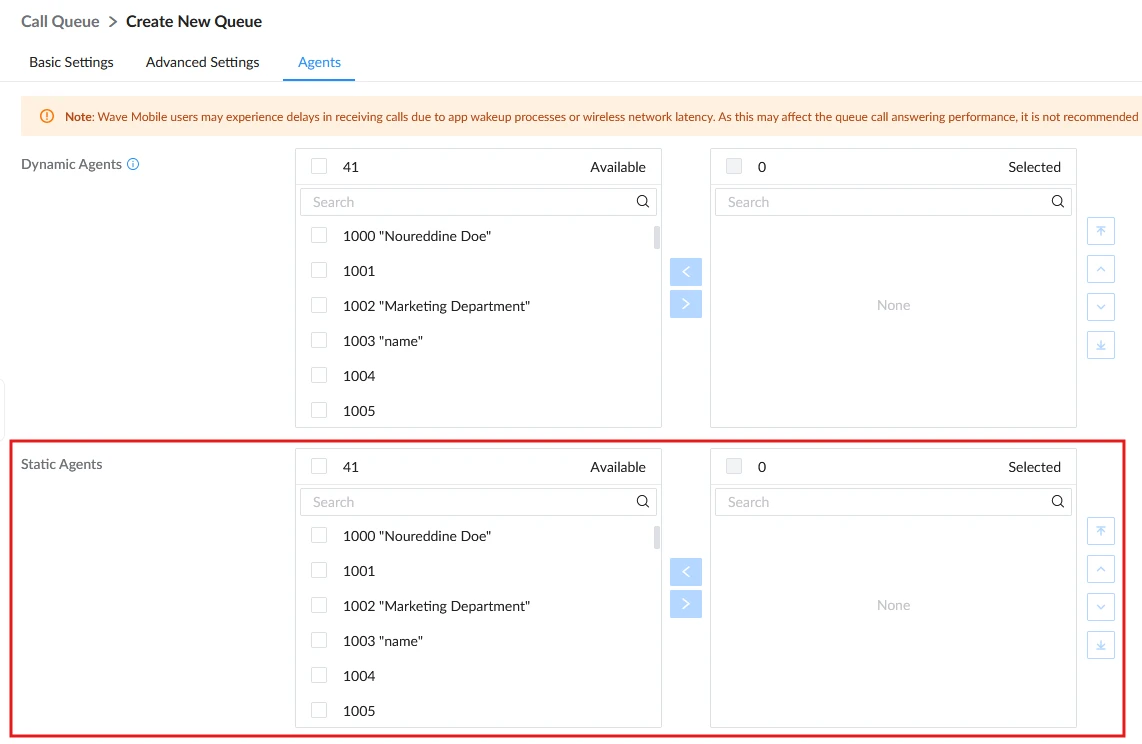
Static Agents | Go to “Agents” Tab and Select the available users to be the static agents in the call queue. Choose from the available users on the left to the static agents list on the right. Click on < or > to choose. And use UP and Down arrow to select the order of the agent within the call queue. |
Call Queue Configuration
Below are the steps for creating and configuring call queues in a Grandstream IP-PBX web management interface:
- Access the PBX web GUI under Basic Call Features → Call Queue.
- Click on “Add” to create a new call queue.

- Specify the call queue extension number under Extension field.
- Define a name for this call queue.
- Select the desired call distribution strategy under Strategy (e.g., Ring All, Round Robin).
- Go to “Agents” tab to assign static or dynamic agents to handle incoming calls.
- Press Save button and apply the new changes.
For Agents’ configuration and management, please check [Agents Management] for more details.
Virtual Queue
The Virtual Call Queue feature allows customers to request an automated callback instead of waiting on hold in an ACD (Automatic Call Distributor) queue.
When a customer’s waiting time exceeds a configurable threshold, the system prompts them to either remain in queue or enter a callback number while retaining their position in the queue. When an agent becomes available and the customer’s turn arrives, the IP-PBX automatically initiates a call to the registered callback number.
This feature can be configured under the Advanced Settings tab of call queues.
Position Announcement
Grandstream IP-PBXs support call queue position announcements, where a caller’s position in line is announced upon entering the queue.
This information helps callers decide whether to wait for an agent, request a virtual callback, or hang up.
To configure virtual queue and position announcement features in your IP-PBX, follow these generalized steps:
- Access the PBX web GUI under Basic Call Features → Call Queue.
- Edit the call queue and go to Advanced Settings.
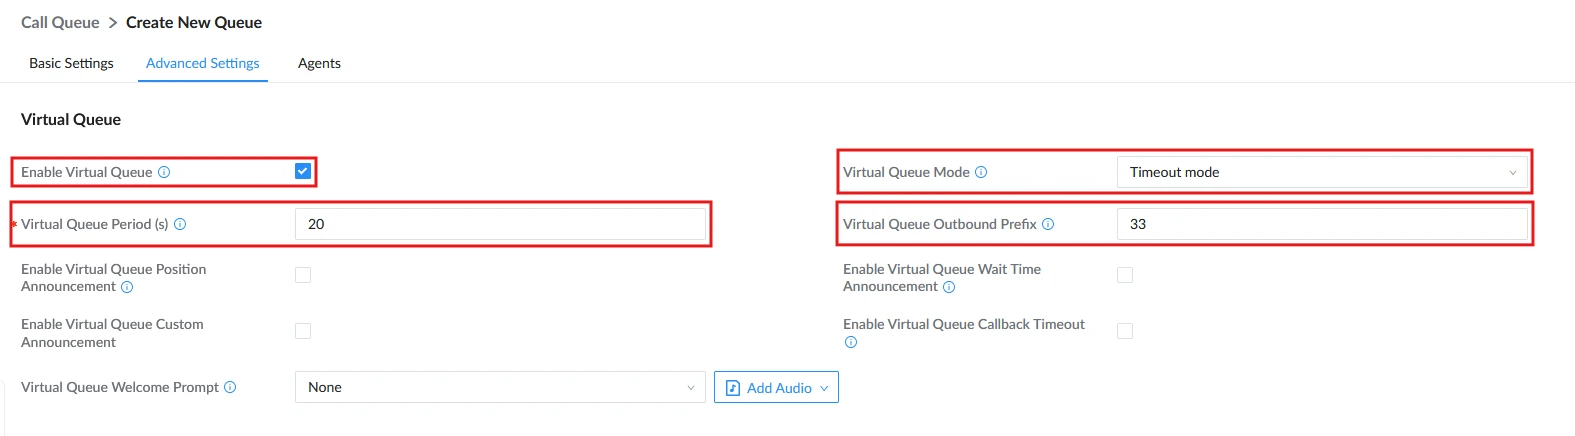
- Enable the Virtual Queue option and select the preferred trigger mode (e.g., DTMF-triggered, Timeout, or Auto).
- Set the Virtual Queue Period (e.g., 30 seconds) to determine when the callback offer is presented.
- Specify the Virtual Queue Outbound Prefix to match your PBX outbound dial rules for automated callbacks.
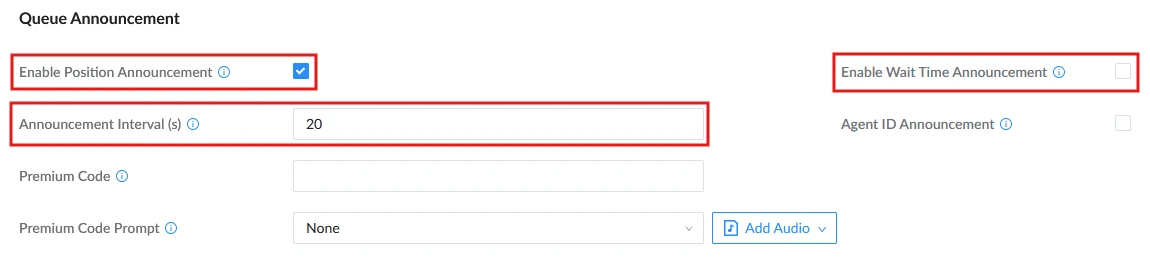
- Enable Enable Position Announcement to inform callers of their line position.
- Configure the Announcement Interval (e.g., every 30 seconds).
- (Optional) Enable Wait Time Announcement to periodically update callers on estimated wait times.
- Save and apply the configuration.
Music On Hold and Audio Prompts
Grandstream IP-PBX systems support Music on Hold (MoH) along with customizable voice prompts to keep callers engaged while waiting in line. When a call enters a queue, callers typically hear a welcome prompt or IVR selection menu, followed by background music with periodic audio notifications.
Common audio media managed within queue settings include:
- Music on Hold (MoH): Background audio or promotional announcements played while callers wait for an available agent.
- Welcome Prompts: Initial greeting audio played immediately upon queue entry.
- Position & Wait Time Announcements: Periodic updates informing callers of their current position in line or estimated wait time.
- Destination Prompts: Periodic messages offering options to transfer to an alternative destination or enter a virtual queue.
- Post-Call Survey Prompts: Interactive prompts played after call completion to collect caller feedback and rating scores.
The audio prompt files are managed under PBX Settings → Voice Prompt and can then be assigned to specific call queues as needed
Agents Management
Call center agents who handle incoming queue calls and customer communications can be assigned in two main ways: Static Agents and Dynamic Agents. The following sections detail each agent type and how they are managed within an IP-PBX system.
Agent limits depend on your specific IP-PBX system capabilities, hardware specs, and licensing. The following table describes the maximum call queue agents supported for each IP-PBX model:
PBX Model | Maximum Number of Agents in Call Queue | ||||
UCM630X | |||||
UCM6301 | 25 | ||||
UCM6302 | 50 | ||||
UCM6304 | 80 | ||||
UCM6308 | 160 | ||||
UCM630XA | |||||
UCM6300A | 25 | ||||
UCM6302A | 50 | ||||
UCM6304A | 80 | ||||
UCM6308A | 160 | ||||
GCC IP-PBX | |||||
GCC6010 | 24 (Standard Package) | 25 (with PBX Upgrades) | |||
GCC6011 | 24 (Standard Package) | 25 (with PBX Upgrades) | |||
GCC6010W | 24 (Standard Package) | 25 (with PBX Upgrades) | |||
GCC6020 | 50 | ||||
GCC6021 | 50 | ||||
SoftwareUCM | |||||
SoftwareUCM | 25 (Plans with extensions ≤ 500) | 50 (Plans with extensions ≤ 1000) | 80 (Plans with extensions ≤ 2000) | 160 (Plans with extensions ≤ 3000) | 200 (Plans with extensions ≤ 5000) |
CloudUCM | |||||
CloudUCM | = Number of Extenions (Plans with extensions ≤ 100) | 100 (Plans with extensions ≥ 100) | |||
Static Agents
The administrator can assign static agents to a call queue using the following steps.
- Access the web GUI menu Basic Call Features → Call Queue → Edit Queue.
- Click on Agents tab.
- Select the static members (agents) of the queue.
Dynamic Agents
Dynamic agents have the flexibility to log in and out of assigned call queues on demand, such as signing in upon arriving at work and logging out at the end of their shift.
To configure dynamic agents, administrators should follow these steps:
- Access your PBX administration portal, edit the desired call queue, and navigate to the Agents configuration tab.
- Assign the permitted user extensions as Dynamic Agents for that queue.
- Save and apply the configuration.
- Navigate to Basic Call Features → Call Queue → Global Queue Settings → Dynamic Agent Login Settings.
- Configure the dynamic agent login/logout suffixes (e.g., dial * after the queue extension to log in, and ** to log out).
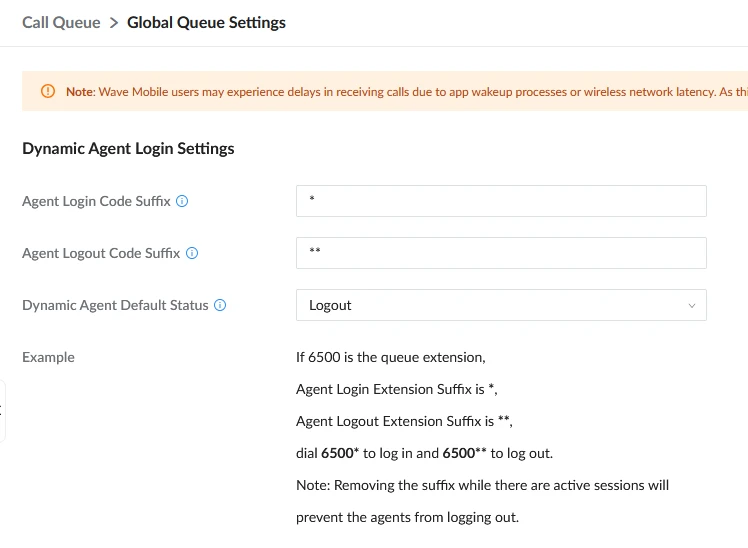
- Save and Apply.
Once configured, assigned dynamic agents can log in or out by dialing the queue extension followed by the appropriate feature code suffix directly from their desk phone or softphone.
Agents Pause
When an agent needs to step away from their queue temporarily (such as taking a lunch break or attending a meeting), they can change their status to prevent calls from being sent to their extension.
Agents manage their pause status using the following steps:
- Dial the configured Agent Pause feature code. (*83 by default).
- When prompted, enter the key corresponding to the desired Pause Reason. (See table below for default settings)
- Unpause at any time to resume calls by dialing the Agent Unpause feature code. (*84 by default)
The default Agent Pause Reason Settings are as follow:
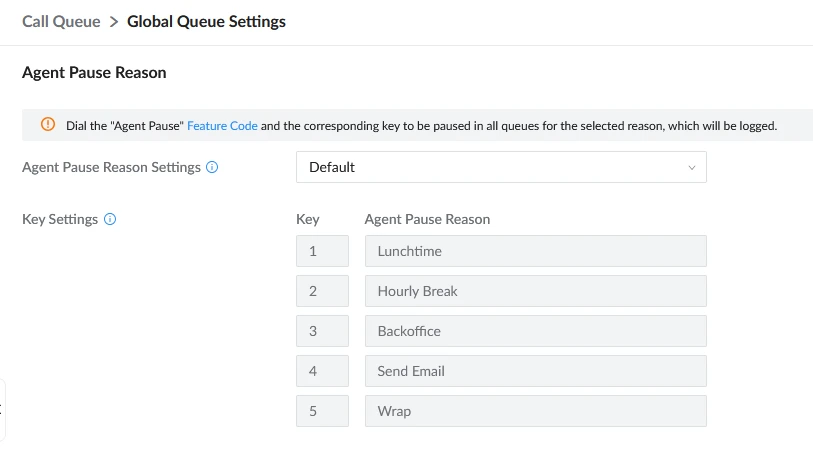
Key | Agent Pause Reason |
1 | Lunchtime |
2 | Hourly Break |
3 | Backoffice |
4 | Send Email |
5 | Wrap |
Agent Easy Login
Instead of requiring agents to memorize dynamic feature codes or extension numbers, administrators can enable interactive softkey login directly on compatible IP phones. This allows static members to view their assigned call queues on screen and toggle their availability with a simple button press.
To enable agent login on the PBX, please refer to the steps below:
- Access the PBX Web UI with your admin credentials and navigate to Basic Call Features → Call Queue.
- Edit the target queue and navigate to Advanced Settings.
- Under CTI, check the Enable Agent Login option.
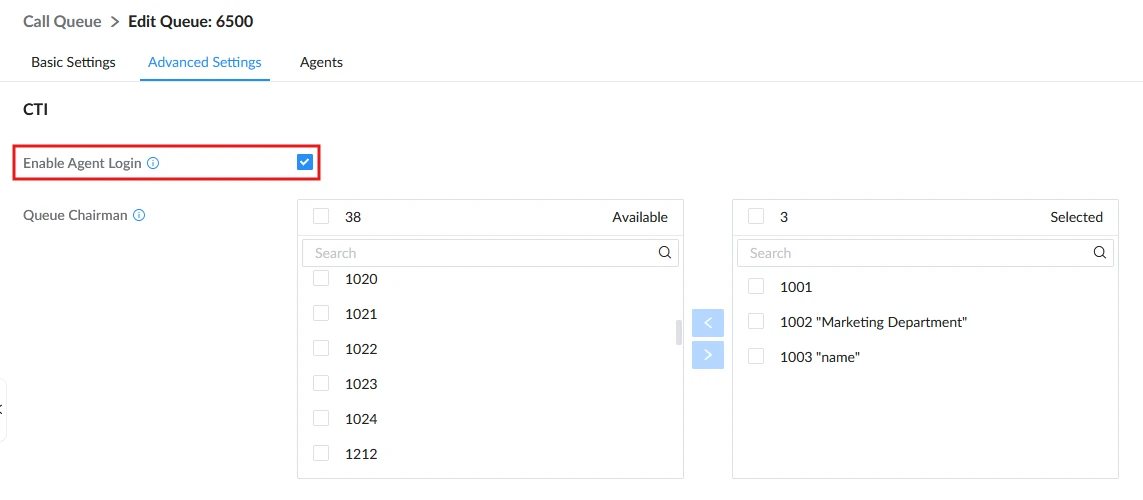
- Assign the permitted user extensions under the Agents configuration tab.
- Save and apply the changes.
On the supported IP phone, follow these instructions:
- Access the web interface using admin privilege, and ensure the static agent extension is registered.
- Navigate to Account → Advanced Settings.
- Locate the Special Feature setting and select the UCM call center feature option.
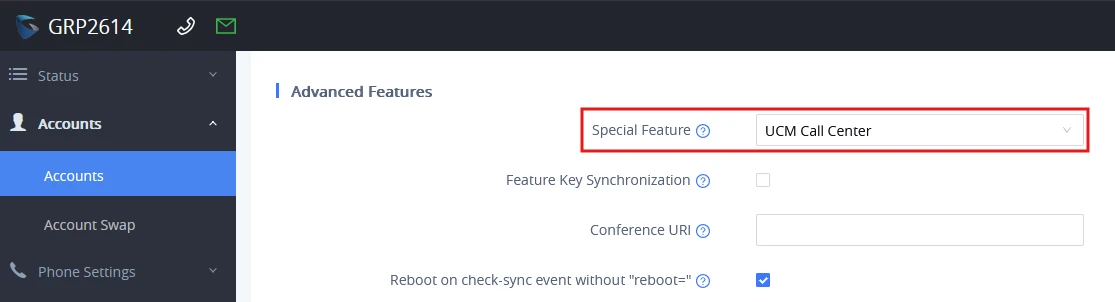
- Save and apply the phone settings.
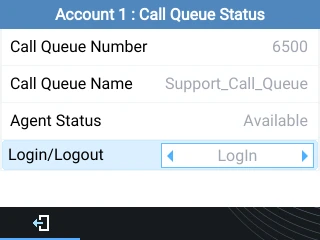
- A designated call center softkey will appear on the main screen of the IP phone as shown below.
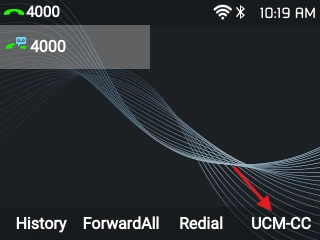
- Press the softkey to open the list of assigned call queues.
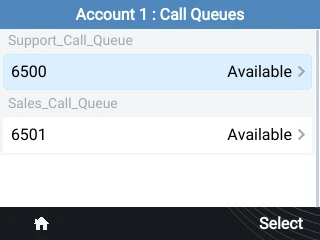
- Select a queue from the list and toggle between Available (Logged In) and Unavailable (Logged Out).
Incoming Calls Distribution
Automatic call distribution on Grandstream IP-PBXs comes with many different strategies that can be set under the basic options of each call queue separately.
Below are the descriptions of each strategy implementation:
- Ring All: Rings all available agents simultaneously until one answers.
- Linear: The calls will follow the order of configured agents (applicable to static agents only).
- Least Recent: Directs calls to the agent who has been idle the longest since their last call.
- Fewest Calls: Assigns the call to the agent who has answered the lowest number of calls.
- Random: Distributes calls randomly among available agents.
- Round Robin: Rotates calls sequentially among agents while remembering the last agent who answered.
- Proficiency Routing (Skill-Based): Routes incoming calls to agents with the highest assigned proficiency level first. If multiple agents share the same skill level, the system falls back to the configured secondary ring strategy (e.g., Round Robin or Ring All) to distribute calls among them.
Service Level Agreement
Service Level Agreement allows monitoring of the quality of the service provided to the customers. The quality of the service is defined by answering the received calls within a time period to make sure that there are enough agents in the queue.
To be able to configure Service Level Agreement, please navigate to Basic Call Features → Call Queue, edit/create a queue, then under Advanced Settings you will find “Enable SLA”, tick that option to have the related configuration displayed.
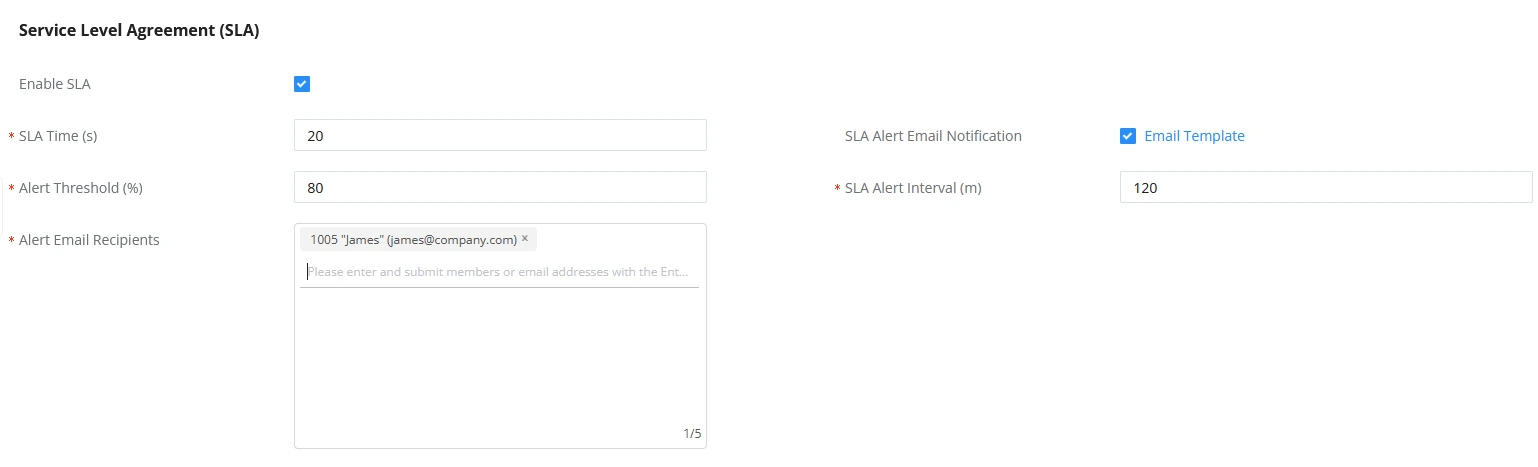
- SLA Time (s): The SLA Time is the amount of time in which a call should be picked up by an agent in the call queue, to assure a quick response time to the number of calls received. Thus, offering a better service to the clients.
- SLA Alert Email Notification: Enable this option to receive an email triggered by exceeding the SLA time.
- Alert Threshold: The minimum percentage of the calls answered within the SLA time. Once this threshold is exceeded the email notification will be triggered.
- SLA Alert Interval (m): The minimum time period between two SLA email alerts.
- Alert Email Recipients: The list of emails to which the alert will be sent.
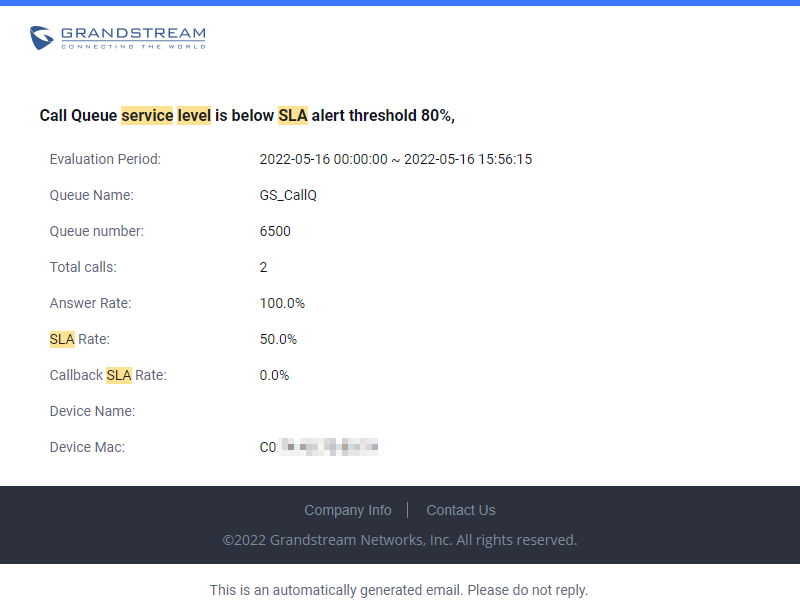
Once the threshold of calls is not answered within the configured time, an email alert will be automatically sent.
The alert email will look like the figure below.
Call Control
Agents have full control over active calls using standard call management features necessary for daily operations:
- Call Hold: Temporarily pause active conversations.
- Call Transfer: Route callers to another agent, extension, or external number (attended or blind).
- 3-Way Conferencing: Join multiple parties into a single active call.
- Call Park: Place a call on a shared parking space for another agent to retrieve.
Agents can manage calls using two primary methods:
- Standard Feature Keys or Codes on the Phone: Agents can use dedicated hardware buttons on the IP phone (e.g., Transfer, Hold) or feature codes provided by the PBX. (Note: Ensure feature codes are enabled within the queue’s advanced settings.)
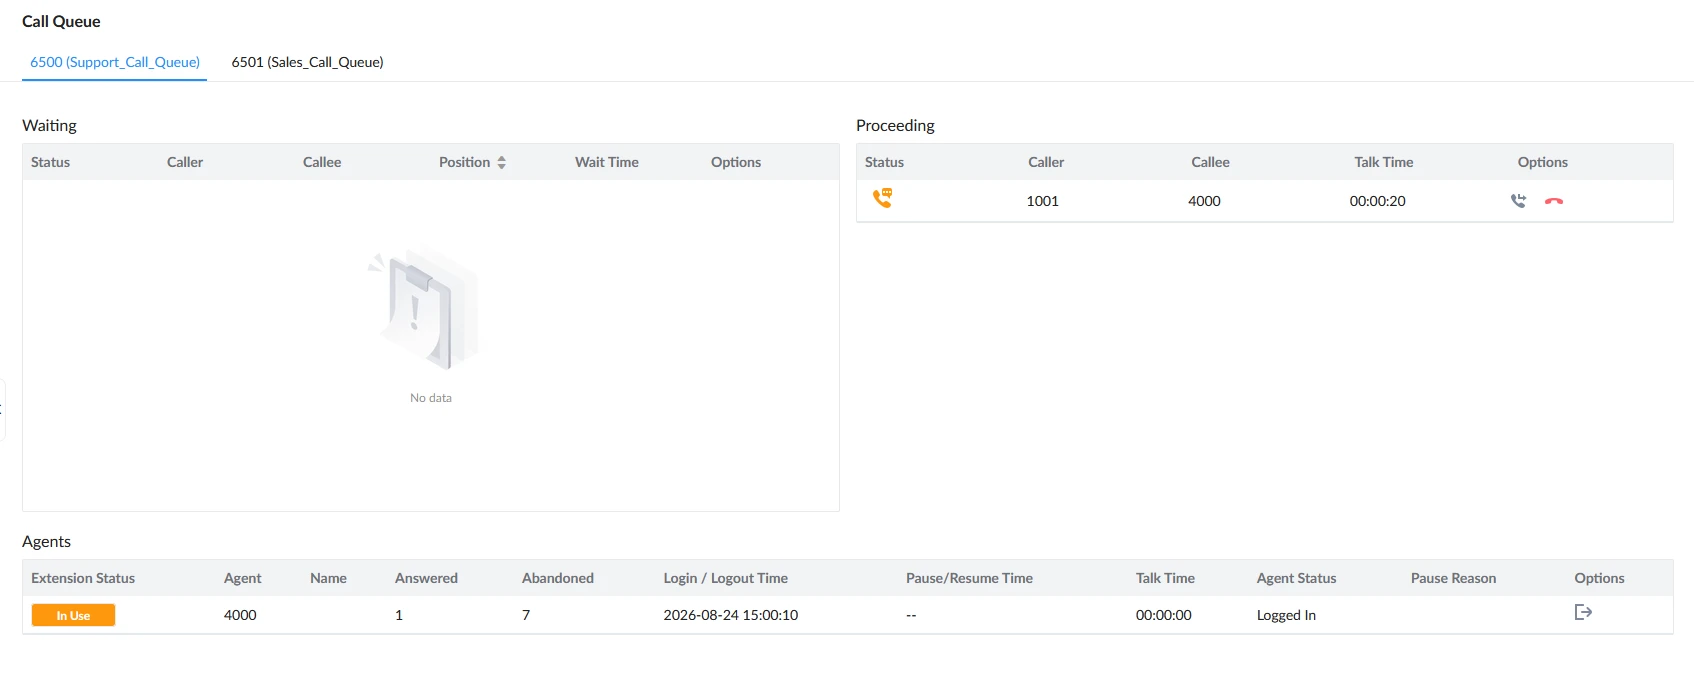
- Queue Switchboard Interface: Agents can log into their user portal to monitor active calls and execute call control actions with a single click.
Monitoring
Grandstream IP-PBXs support call monitoring capabilities designed for supervisors and coaching personnel to check call quality and assist agents in real time. These monitoring functions can be executed via feature codes or directly through a CTI switchboard web interface.
Call Barging
With call barging, supervisors can use feature codes after enabling the Spy option under Basic Call Features → Feature Codes page to do the following operations:
- Listen: In “Listen” mode, the extension monitoring the call can hear both parties in the active call but the audio of the user on this extension will not be heard by either party in the monitored active call.
- Whisper: In “Whisper” mode, the extension monitoring the call can hear both parties in the active call. The user on this extension can only talk to the selected monitored extension and he/she will not be heard by the other party in the active call. This can be usually used to supervise calls.
- Barge: In “Barge” mode, the extension monitoring the call can talk to both parties in the active call. The call will be established similar to the three-way conference.
Supervisor Configuration
To setup and give special permissions for monitoring and control to the supervisor account, the following steps can be followed:
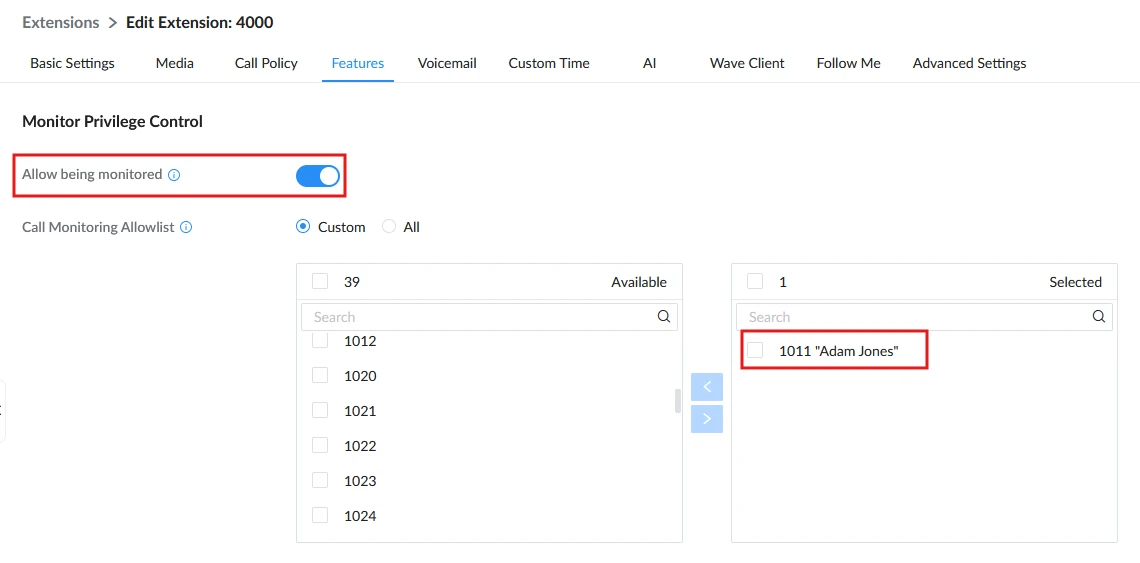
- Access the PBX web GUI under Extension/Trunk → Extensions and edit the agent’s extension.
- Go to features Tab and enable “Allow being monitored“.
- Under “Call Monitoring Allowlist” select the extension of the supervisor.
- Press Save and go to Basic Call features → Feature Codes → Feature Codes then “Enable Spy”.

- Go under Basic Call Features → Call Queue → Advanced settings and select the supervisor’s extension under Queue Chairman option, this will give the supervisor control through the switchboard.
- Save and apply the changes.
Call Queue Statistics and Reports
Grandstream IP-PBXs provide built-in queue statistics and reporting capabilities to help managers evaluate agent performance, monitor real-time queue activity, and analyze historical trend data.
To keep analytical data clear, the PBX system separates operational data into two main sections: Call Queue Statistics (real-time/dashboard operational metrics) and Call Queue Reports (historical, and scheduled export reports).
Call Queue Statistics
Call queue statistics can be used for performance measurement and agent evaluation, thus helping managers and supervisors making the right decision to improve the call center day to day operations.
The call queue statistics provided by Grandstream IP-PBXs have filtering options which can be used to get detailed information about the performance of each queue separately or the full system.
The following figure shows a sample of statistics that lists the average unanswered and abandoned calls, as well as the average call and waiting time.
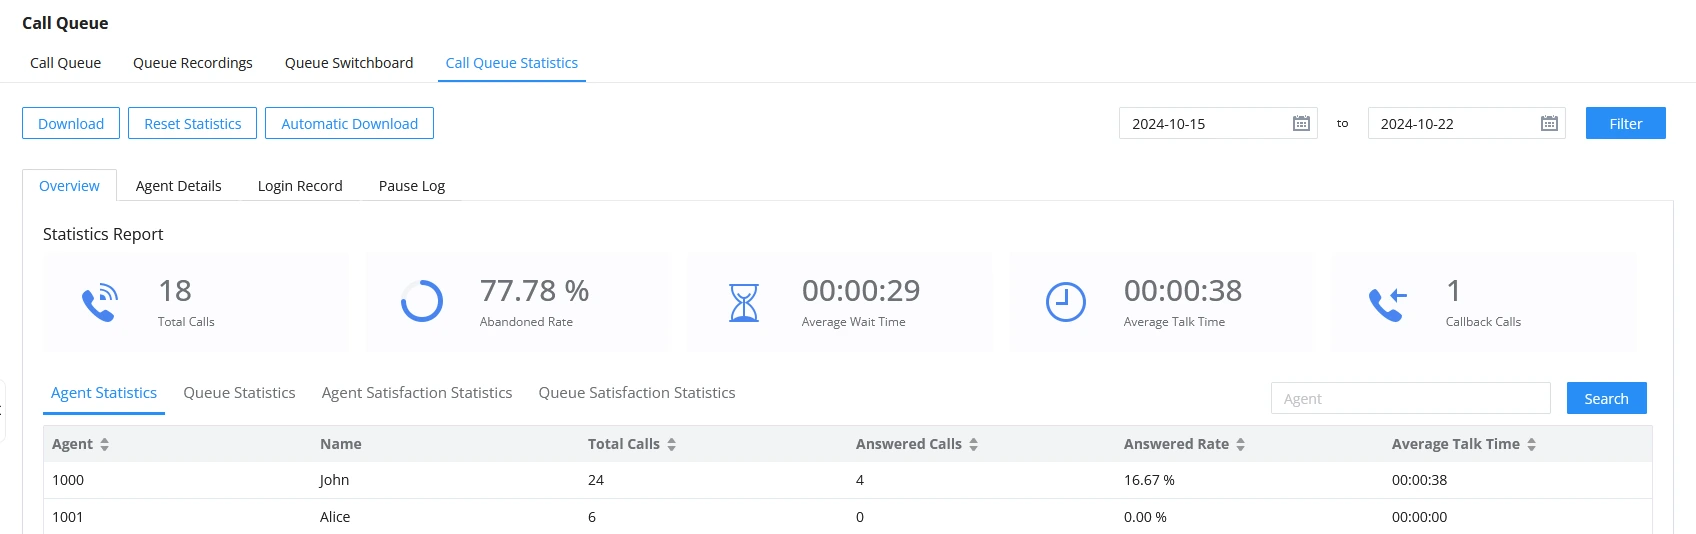
This section will describe in details the information that can be found on the Basic Call Features → Call Queue → Call Queue Statistics page.
Overview
This tab shows the agent statistics report, which includes an overall report of all queues along with the following more specific information:
- Total calls, answered calls/rate and the average talk time for each agent.
- Total Calls, answered calls/rate, abandoned calls/rate, transfer out calls/rate, average wait time, average talk time, callback calls and SLA callback for each queue that includes agents.
- Agent satisfaction statistics by agent which includes the number of calls not surveyed and not evaluated as well as the score sorted by levels.
- Queue satisfaction statistics that show the same information as agent satisfaction statistics but for the overall queue.
Agent Details
Users can find details specific to agents such as:
- Agent extension, name and queue.
- Time of the call and whether or not it was abandoned.
- The Caller ID number, wait time and talk time.
- The service satisfaction feedback.
Login Record
Using this tab, supervisors can have visibility on the login time/duration and the logout time for each agent as well as their respective queue.
Pause Log
This report is used to keep track of pause time, duration, reason and resume time for each agent. This can be helpful for supervisor to verify if the agents are adhering to their schedules.
Call Queue Statistics Download
Users can click on the download button to download all the call queue statistics in one csv file.
Users can also configure the call queues statistics to be sent automatically to the configured email address at a specified frequency and time by clicking on the automatic download button to access to the following configuration settings:
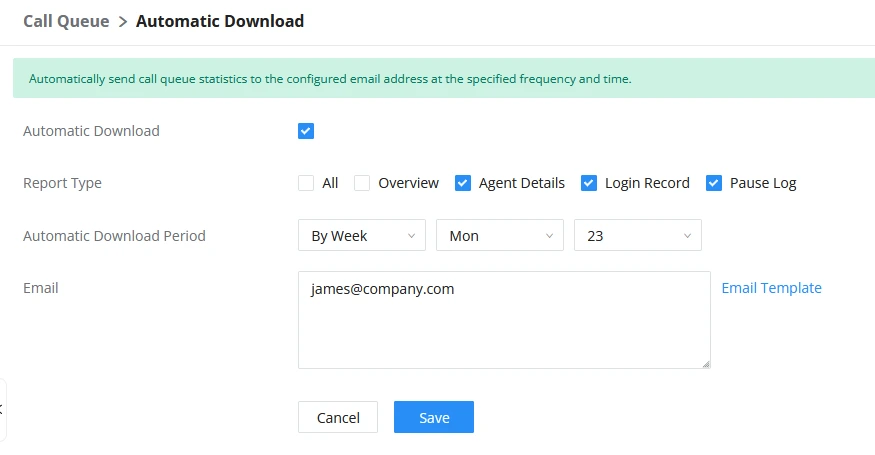
Option | Description |
Automatic Download | Enables the call queue statistics automatic download. |
Report Type | Specifies the type of records to download: All, Overview, Agent details, Login Record, Pause Log. |
Automatic Download Period | Specifies the automatic download period. The default option is “By Day”. At the specific time of each day, week or month, the last cycle of new records will be sent to the user. |
Configures the email address to receive the call queue statistics. Note: Multiple email addresses are supported and need to be separated with semicolons as follows: “xxx;xxx”. |
Call Queue Automatic Download
Call Queue Reports
The Call Queue Reports section provides comprehensive, dedicated analytics for call queue performance, agent activities, and queue response metrics across the UCM. Administrators can use these reports to analyze call flow efficiency, monitor agent productivity, and track queue responsiveness over selected time periods.
To access these reports, please navigate to CDR → Statistics → Call Queue Report and select a report type from the drop-down menu to view its detailed metrics.
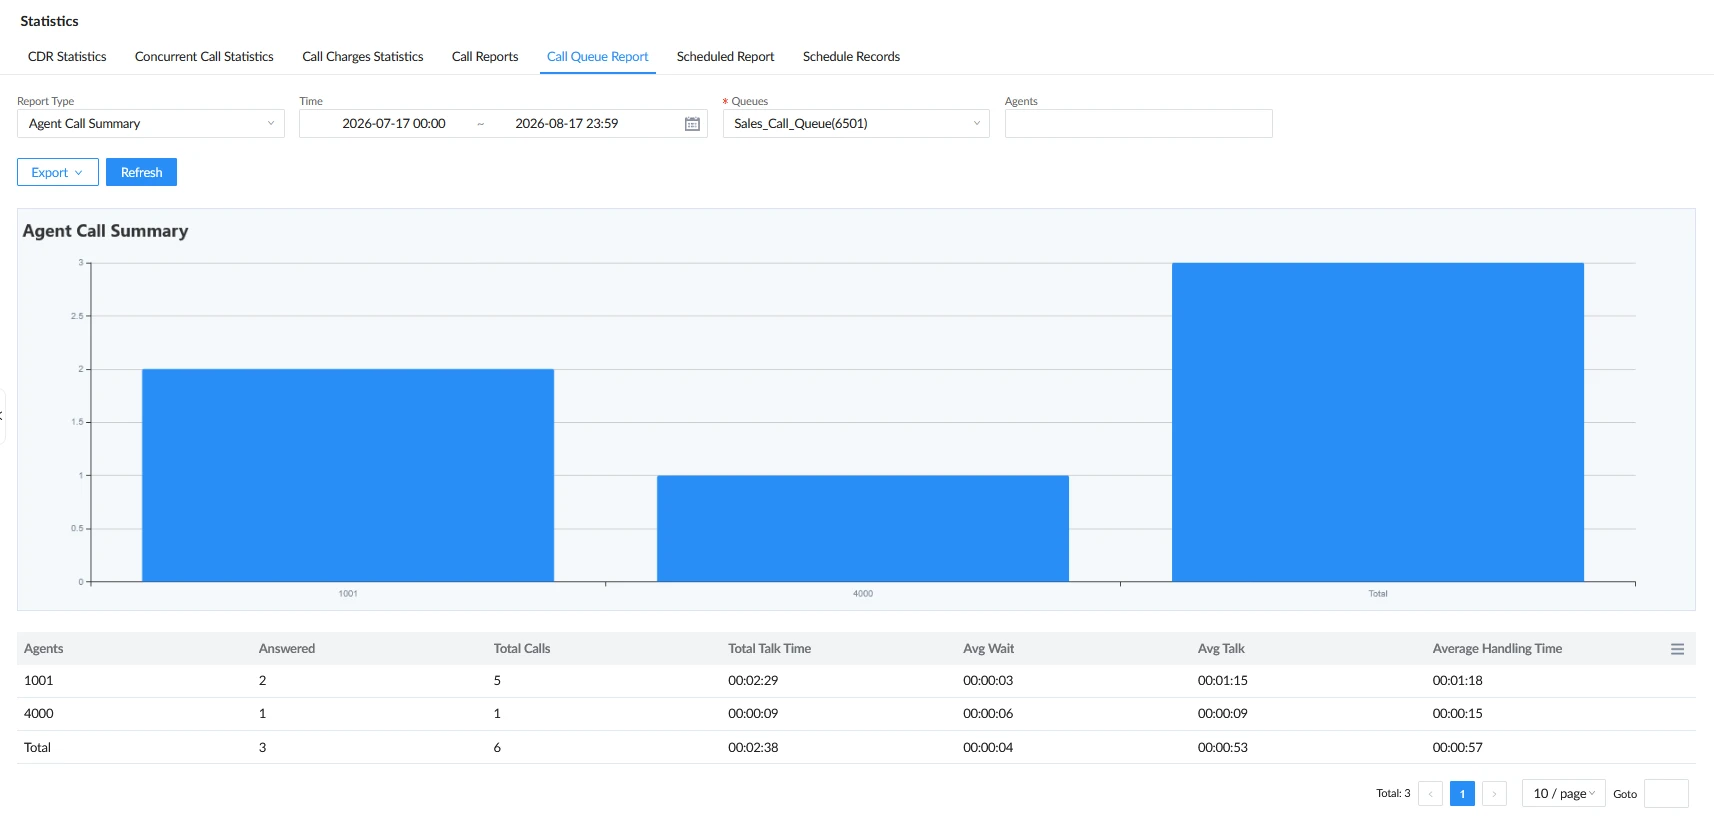
Agent Call Summary
Measures individual agent call statistics throughout a specified date range and queue. It displays total calls handled, answered volume, total talk time, average wait time, average talk time, and average handling time per agent.
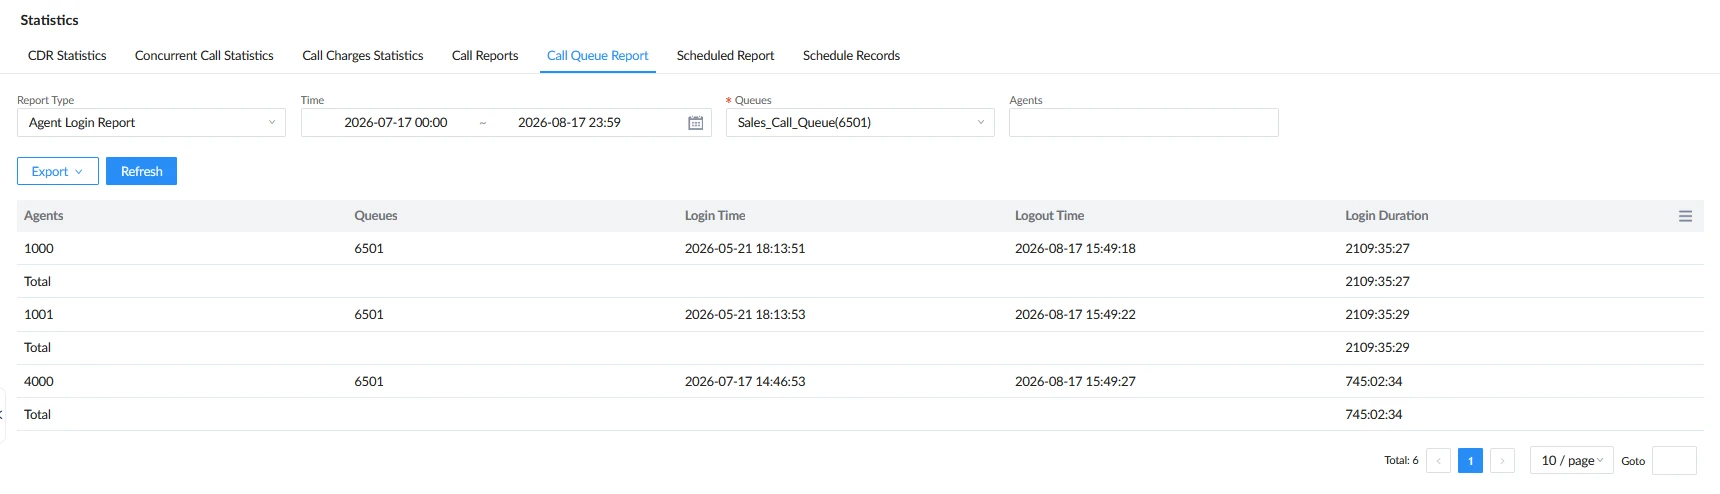
Agent Login Report
Lists individual agent login activity throughout a selected date range for a specific call queue, allowing administrators to track attendance, active duration, and login/logout timestamps.
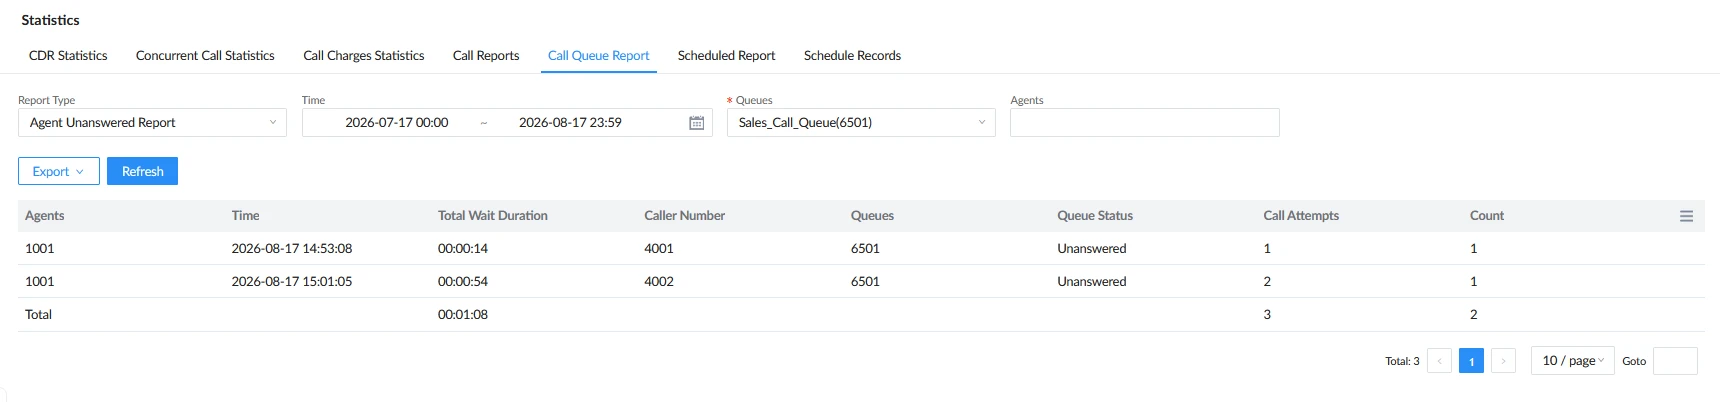
Agent Unanswered Report
Displays individual agent unanswered calls throughout a date range. It provides visibility into the number of missed calls, attempts, and caller number.
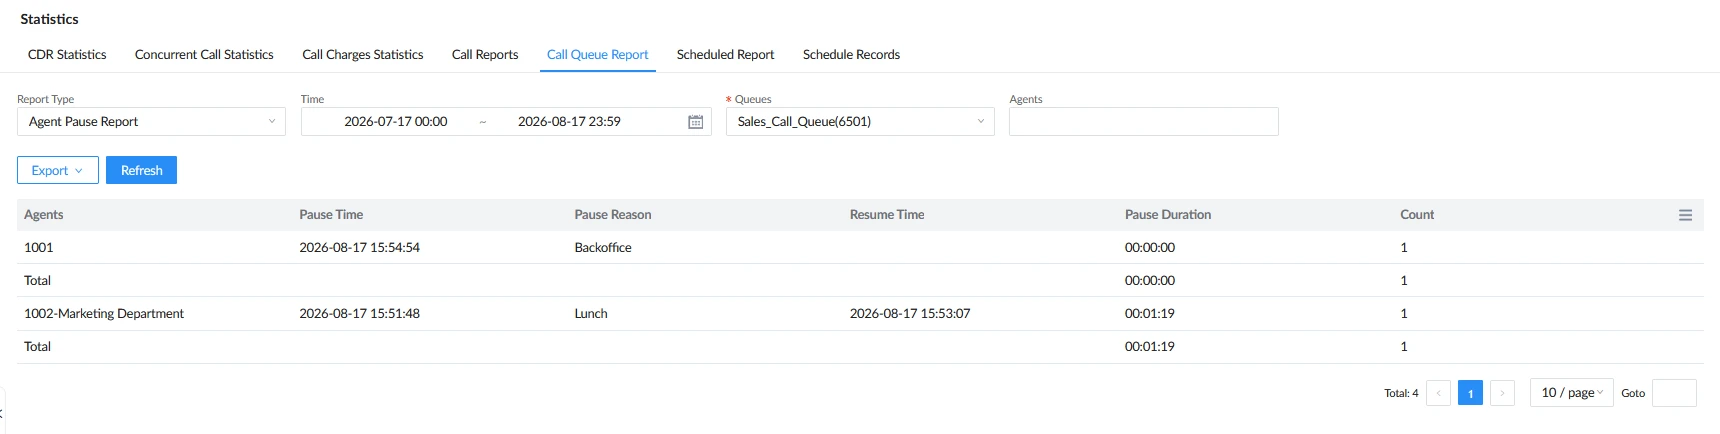
Agent Pause Report
Lists individual agent pausing activity throughout a date range, tracking pause durations, reasons, and total offline time during operational hours.
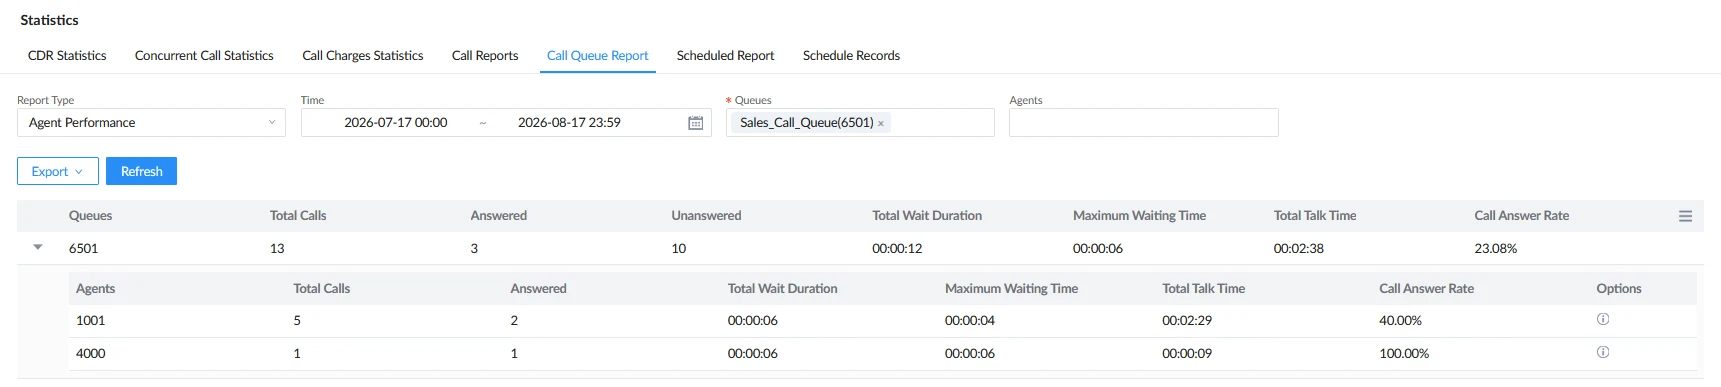
Agent Performance
Measures individual agent performance listed and grouped directly under their respective queues throughout a date range, enabling direct performance comparisons within specific teams.
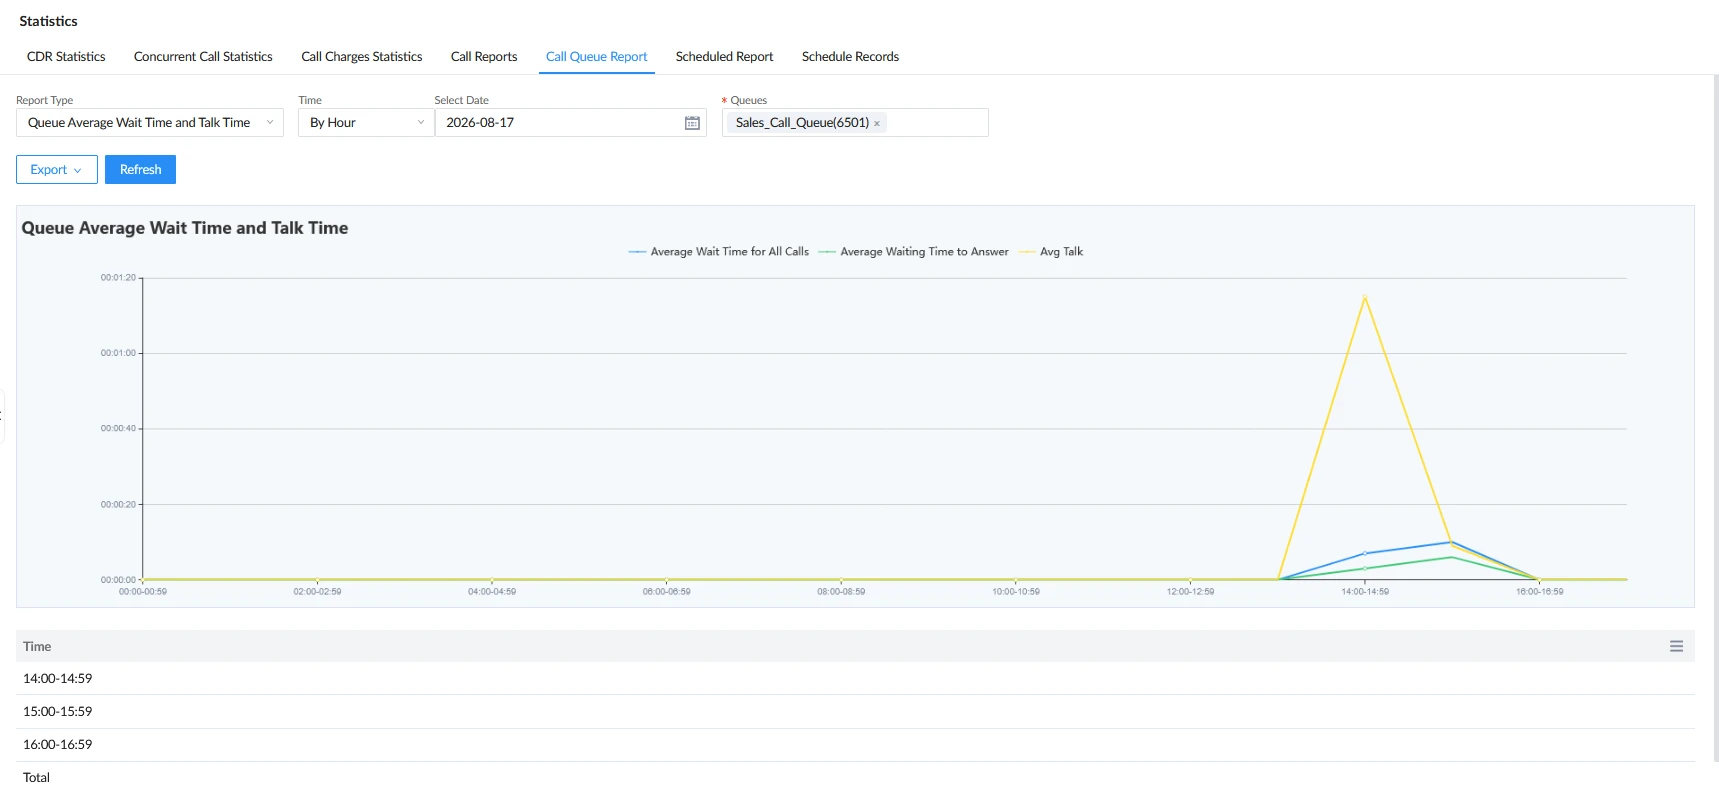
Queue Average Wait Time & Talk Time
Displays a graph showing caller wait time and talk time hourly, daily, or monthly for selected queues, averaging the data across the chosen time frame to help optimize queue staffing levels.
Queue Callback Report
Lists individual queue callback activity throughout a date range and specified queue, detailing requested callbacks, execution timestamps, and call results.

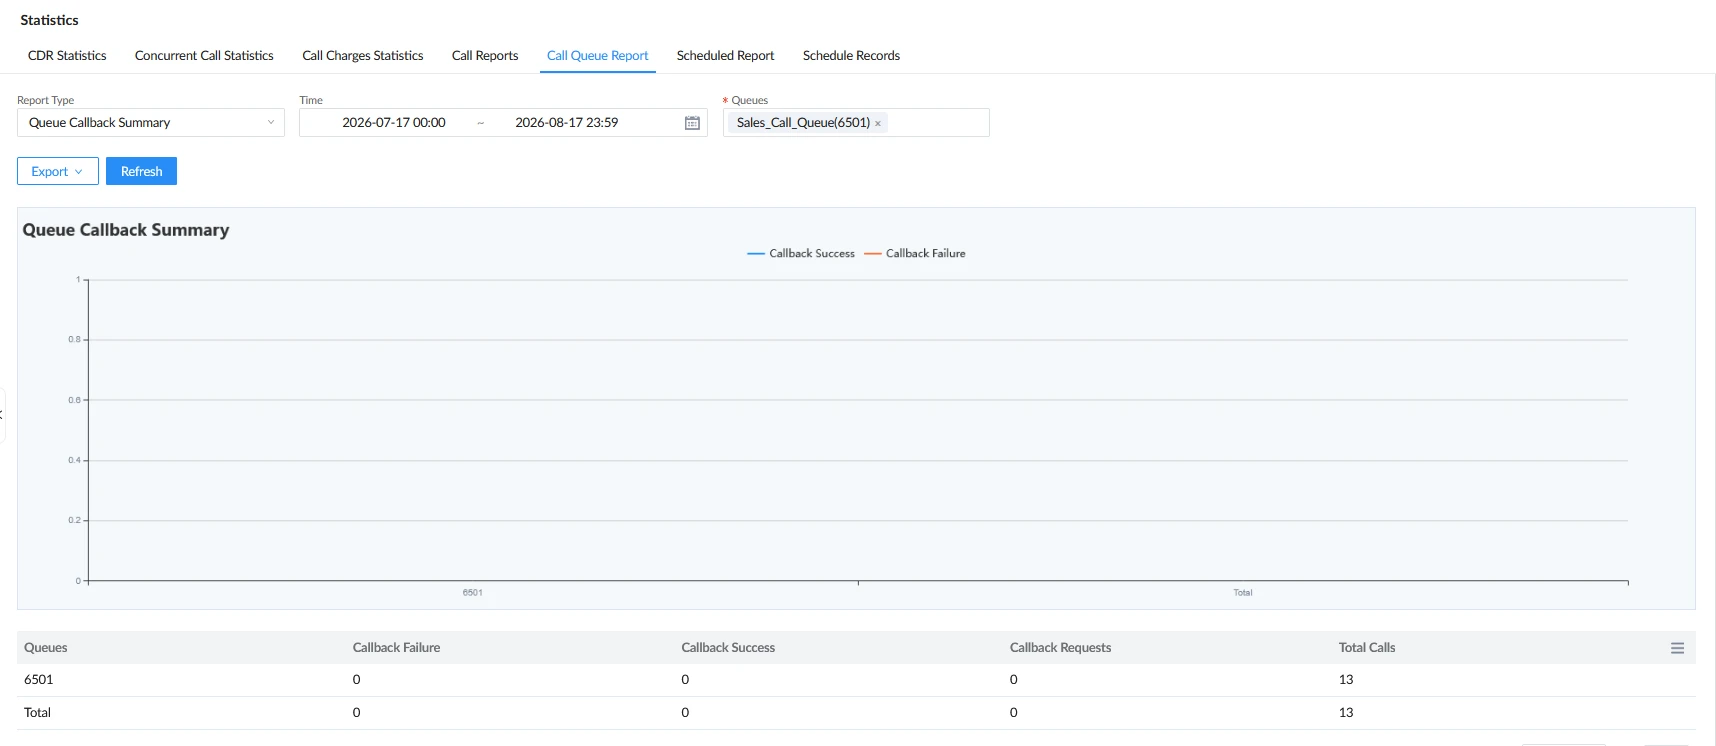
Queue Callback Summary
Displays a graphical representation of queue callback statistics over a specified date range. It provides visual insights into overall callback performance, comparing successful connections against failed callback attempts across the selected queues.
Queue Performance
Measures individual queue performance throughout a date range, focusing on total wait duration, average handling time, and overall service levels per queue.
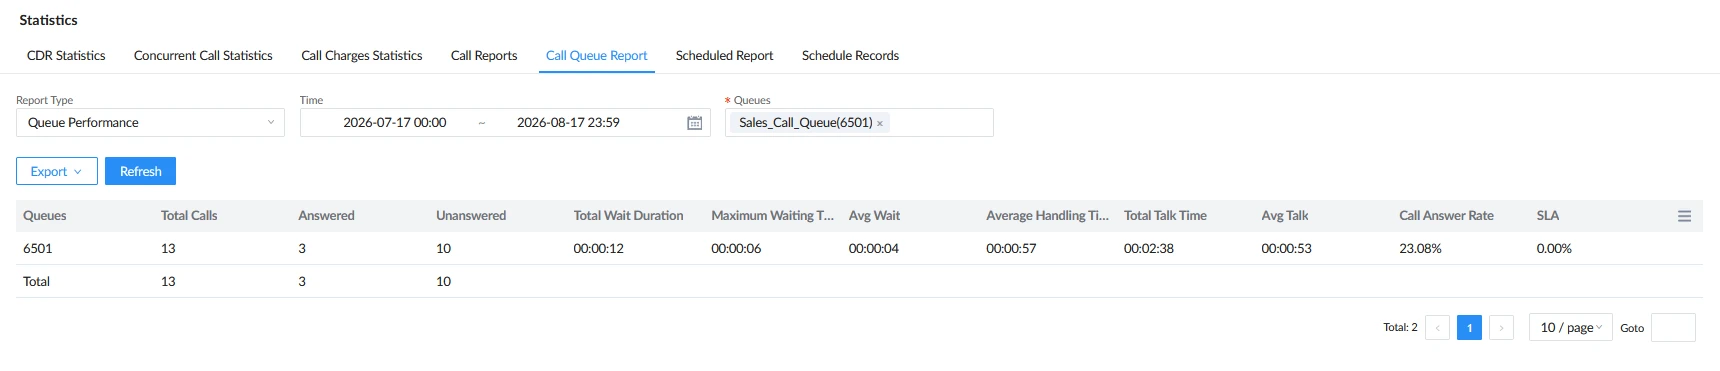
Queue Performance Activity
Provides a time-based breakdown (hourly, daily, or monthly) of call queue activity. Administrators can use this report to evaluate traffic distribution, monitor answer rates and average wait times, and track SLA performance over a selected period.
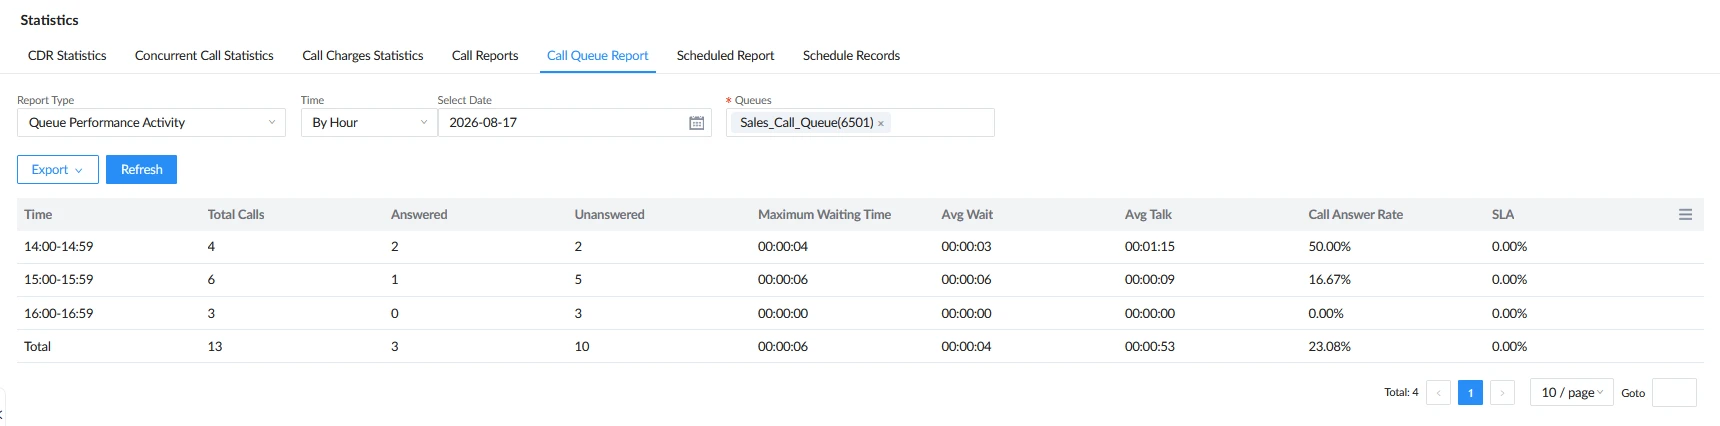
Agent Activity Report
Provides a comprehensive performance breakdown for each agent across selected queues over a specified date range. It details total call volume, answer rates, unanswered calls, wait times, talk duration, and average handling times per agent.
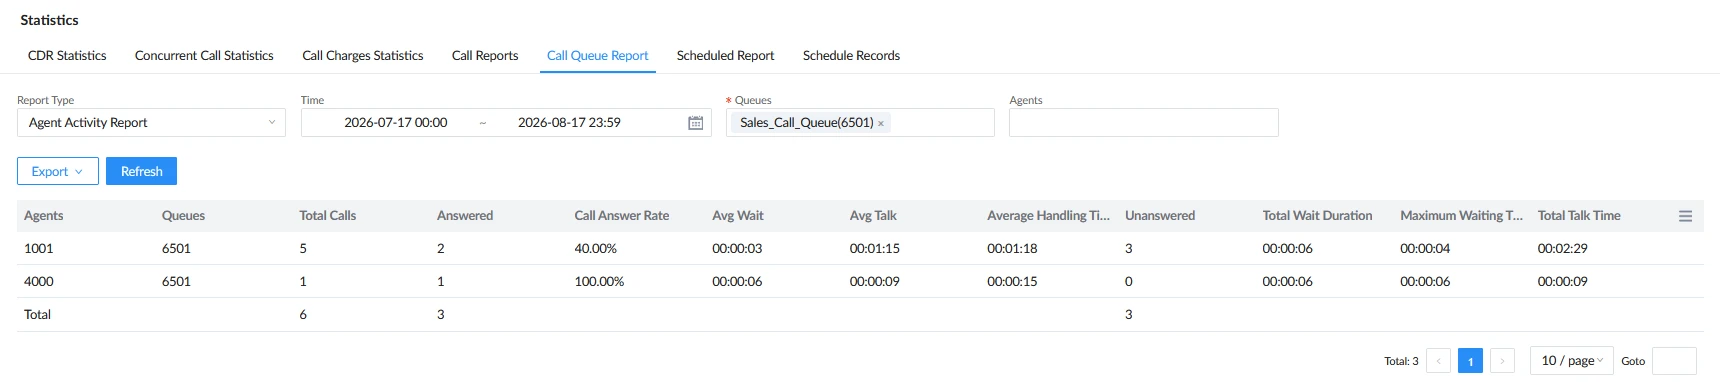
Queue Record Report
Lists every individual call made to the selected queues throughout a specified date range. It details the caller number, queue status, number of call attempts, answering agent, call timestamp, total wait duration, and total talk time.
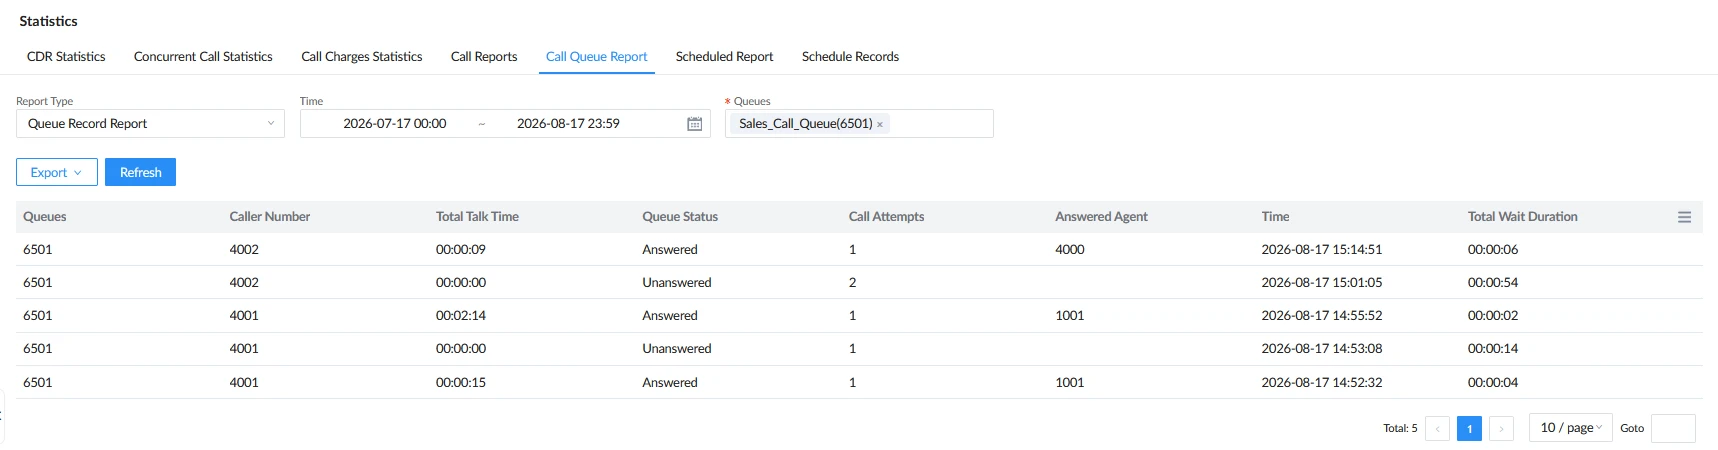
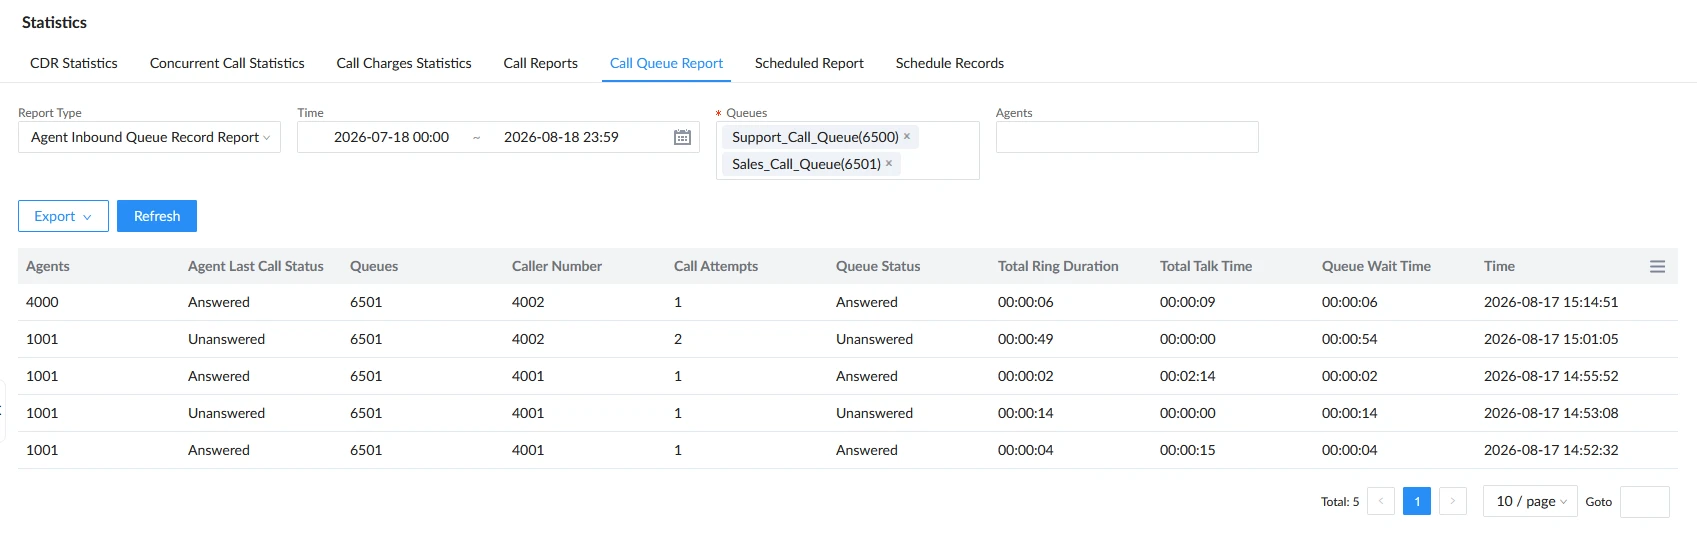
Agent Inbound Queue Record Report
Displays a granular call log for each agent within selected queues over a date range, tracking individual interactions, ring duration, talk time, wait time, and whether the agent answered or missed the call.
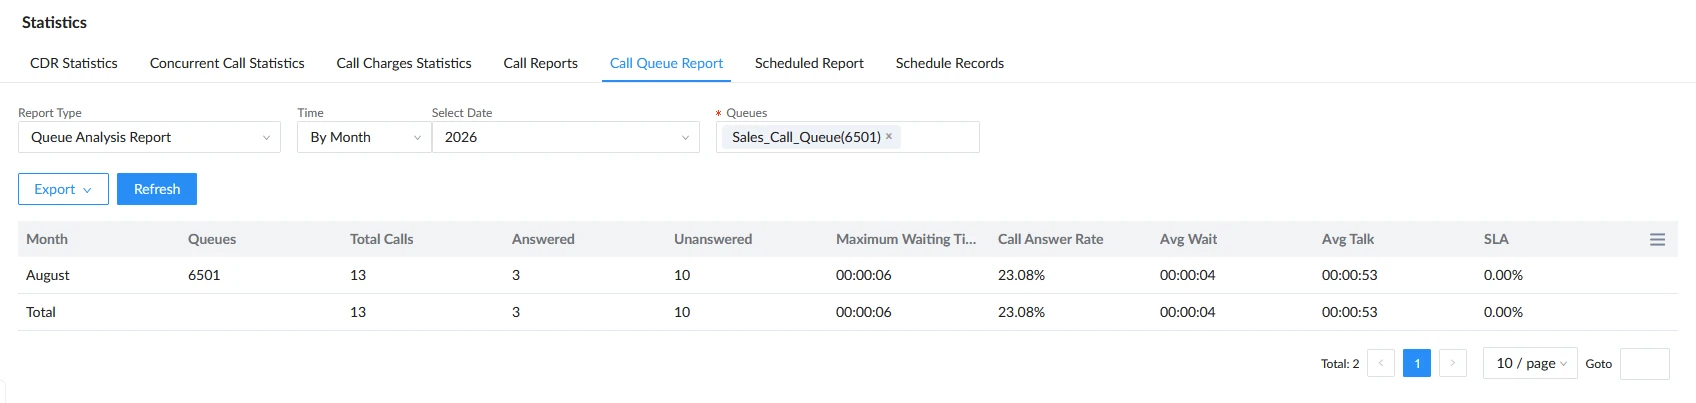
Queue Analysis Report
Sorts and measures call statistics on an hourly, daily, or monthly basis, displaying a dedicated row for each individual queue during every time interval. This provides per-queue trends, unlike Queue Performance Activity, which summarizes total system traffic.
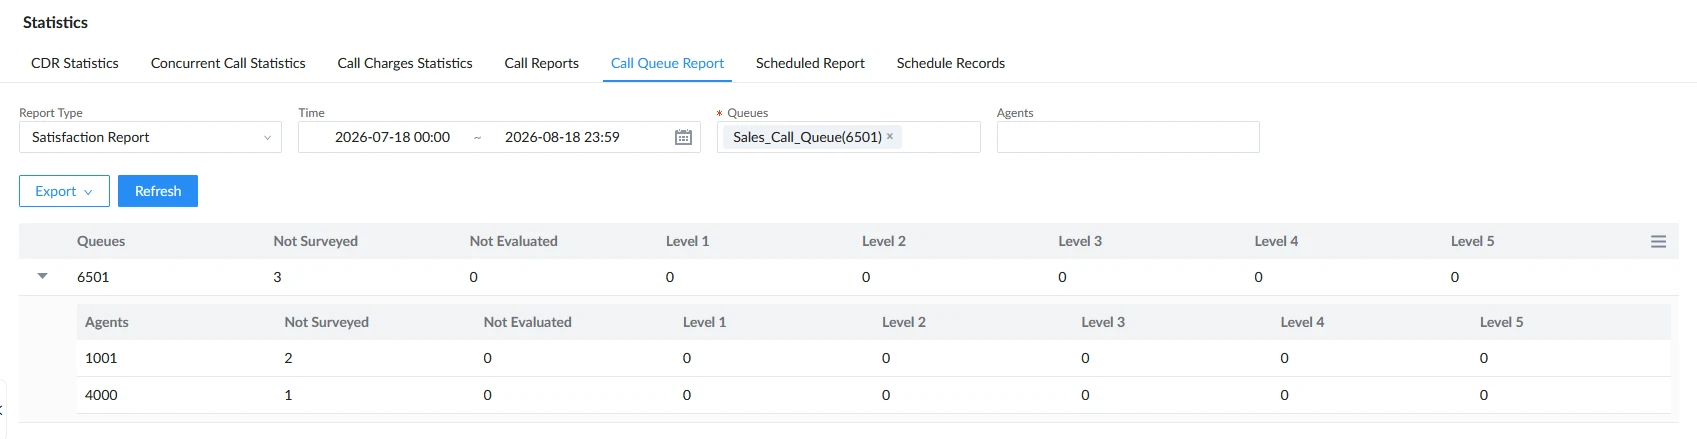
Queue Statistics Report
Generates a satisfaction breakdown for selected queues within a date range, categorizing caller rating scores into levels 1 to 5 alongside counts for non-surveyed calls.
Scheduled Report
The UCM Scheduled Report tab allows administrators to create automated report delivery schedules and have reports sent via email at regular intervals.
To configure an automated report schedule:
- Navigate to CDR → Statistics → Scheduled Report.
- Click Add to open the creation window (or click Email Template to customize the notification layout).

- Under Report Data, select the Report Type, Time frame, target Queues, Agents, and customize the List Fields to include in the output.
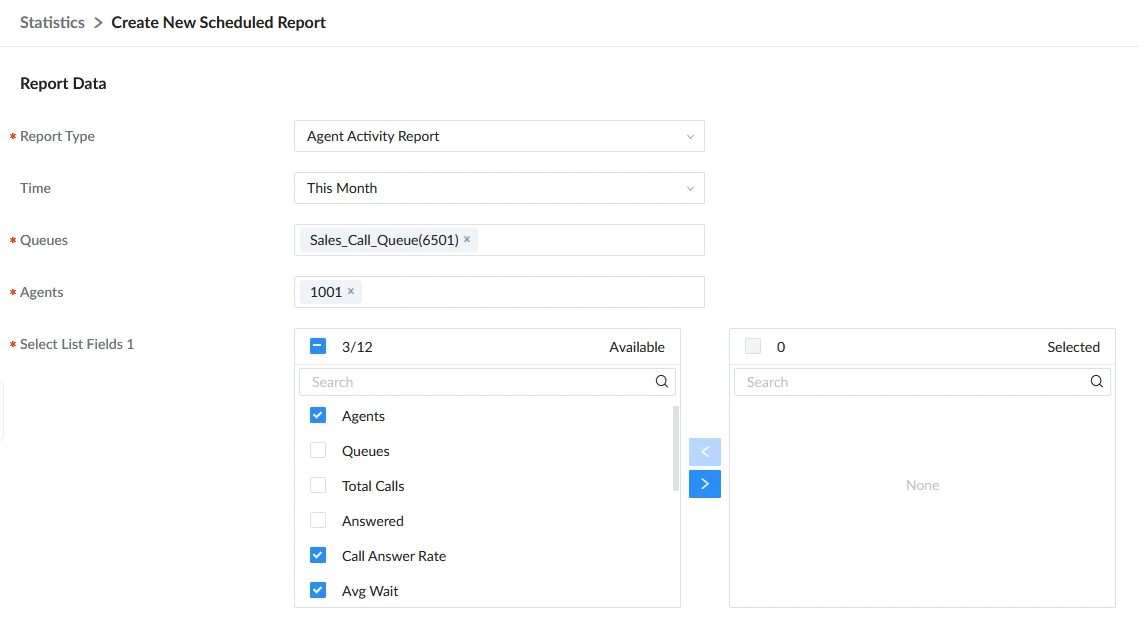
- Under Schedule Information, enter the schedule Name, recipient Email, preferred Export Type (XLSX, CSV, PDF), and execution recurrence pattern (Repeat interval and time).
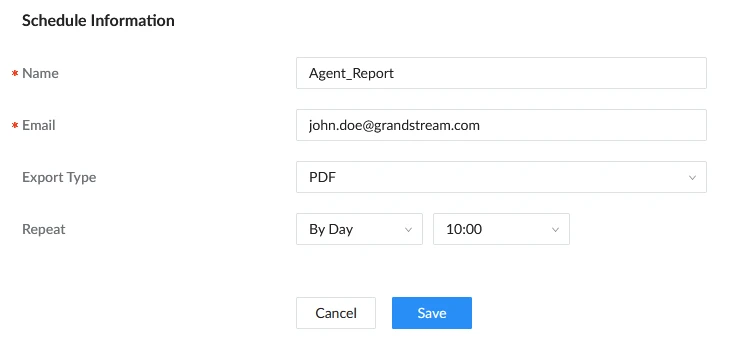
Once configured, all active schedules are listed on this page for quick editing or management.

Schedule Records
The UCM Schedule Records tab provides full historical tracking and audit logging for all automated email report transmissions. On this page users can:
- Review historical entries including the schedule Name, transmission Send Status (e.g., Sent successfully), and exact Send Time.
- Click the Info icon (i) under the Options column to preview the sent report in a different tab.
- Select individual or multiple log entries to delete historical records as needed.

Switchboard
Grandstream PBXs have a simple and easy to use switchboard for real-time monitoring of call queues and performing different operations which include:
- Listing the waiting calls and proceeding calls.
- Manipulating proceeding calls.
- Showing agent’s status.
- Manually logging in or out agents.
Users can access to call queue switchboard via two different methods:
User Portal
Users could log into their web GUI portal using the extension number and user password.
When an extension is created, the corresponding user account for the extension is automatically created. The user portal allows access to a variety of features which include user information, extension configuration, and CDR as well as settings and managing value-added features like Fax Sending, Call Queue, Wake-up Service, and CRM.
Each agent can log into his/her user portal account and access the switchboard of the call queue(s) where he belongs, below figure is an example:
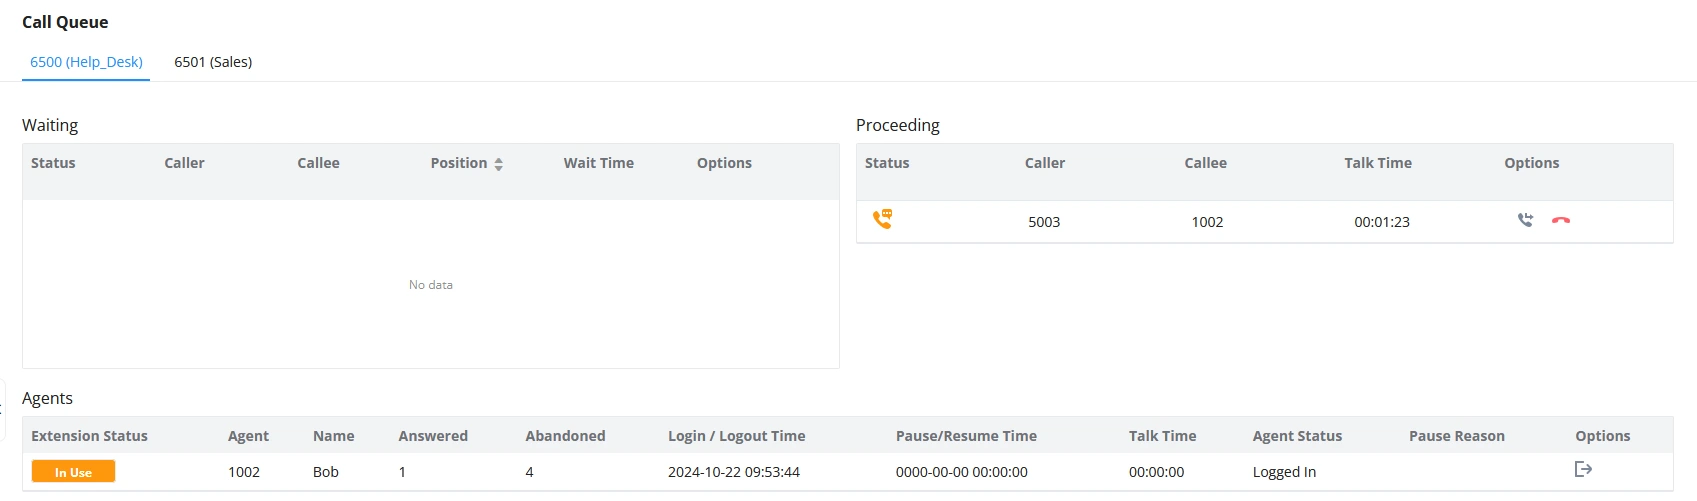
From the command button on the proceeding call, the agent has the ability to transfer the call or Hangup using a simple click.
Queue Chairman
Another way to access to switchboard is to design under the advanced settings of the call queue a “queue chairman” which will provide a CTI interface for supervisors while logging in using their user portal.
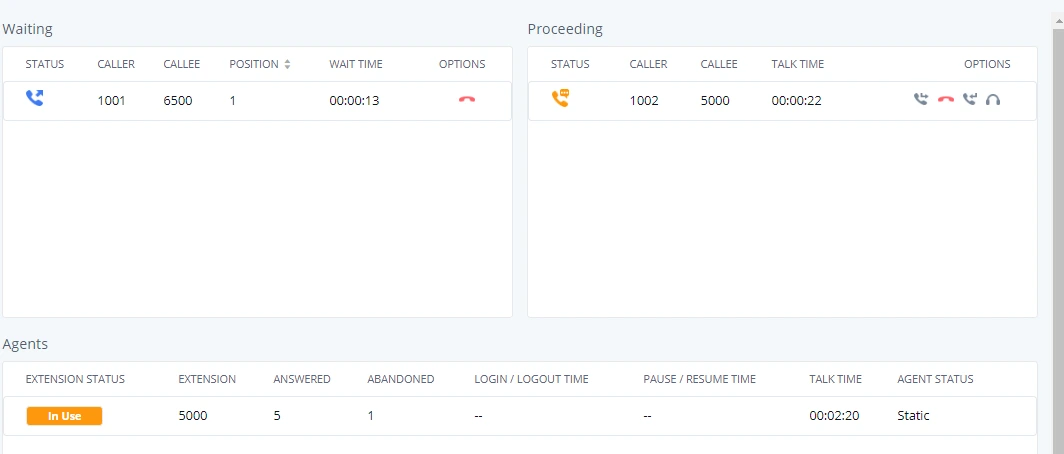
From the switchboard, the queue chairman has more advanced features and control over the call queue, which include the following:
- List the waiting calls with the ability to hang-up.
- List the proceeding calls.
- Transfer proceeding calls.
- Hang-up calls.
- Call barging (see Whisper Coaching).
- Call insert (for 3-way conference).
- List the agent’s status which are members of the call queue.
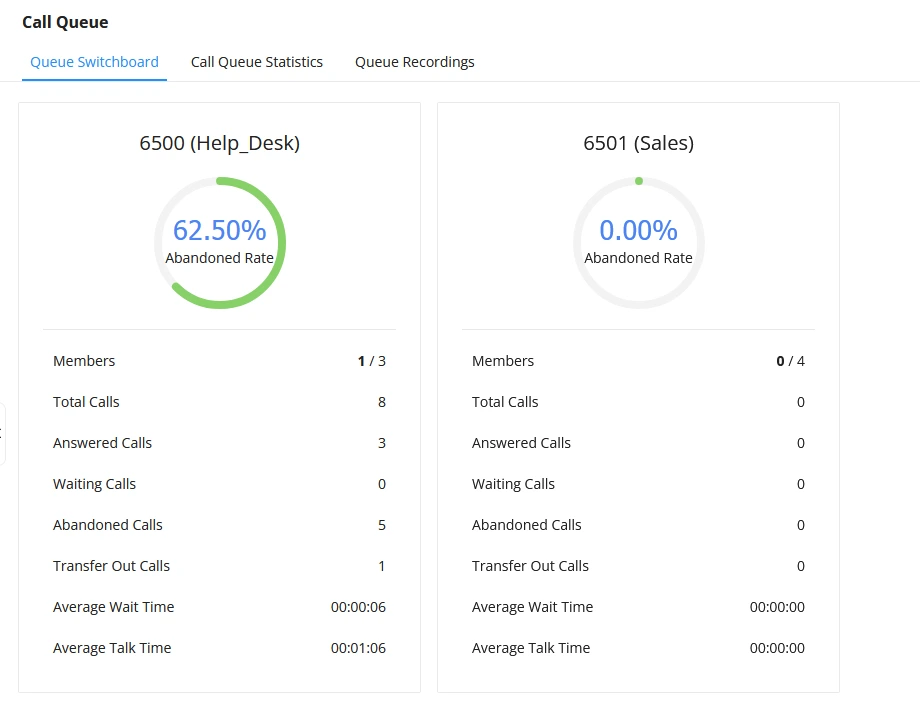
- Get some basic statistics over the call queue.
You can see from the below figure a sample switchboard of a call queue chairman or “supervisor” and which obviously has more advanced control over the call queue than the normal agent user portal access as discussed in the previous section.
CRM
Customer relationship management (CRM) is a term that refers to practices, strategies, and technologies that companies use to manage and analyze customer interactions and data throughout the customer lifecycle, with the goal of improving business relationships with customers.
Grandstream PBXs support CRM API for well-known CRM solutions such as SugarCRM and Salesforce, this allows users to look for contact information in the Contacts, Leads, and/or Accounts tables, shows the contact record on the CRM page, and saves the call information in the contact’s history.
To set up a connection between the PBX and CRM, please follow below steps:
- Access the PBX web GUI under Integrations → CRM.
- Choose the CRM desired from the supported integrations drop-down list.
- Set the CRM server address using either an IP address or a FQDN.
- Set “Add Unknown Number” to Contacts.
- Select the tables to perform the contact lookup against (Contacts, Accounts, and Leads).
- Save and Apply.
After this, each agent should log into their user portal to enable CRM connection and login via their credentials.
- Access the PBX user portal and navigate to Other Features → CRM.
- Enter connection credentials Username and Access Key.
- Save and Apply and confirm login status.
IVR and Call Recordings
IVR
Grandstream IP-PBXs support a full built-in IVR (auto-attendant) module which is required by most call center telephony system. Users could create up to a 64-level IVR system to customize callers’ experience with key-pressing events to be directed to the right customer service (sales, marketing, tech support …)
All IVR settings are centralized and can be managed under the menu Basic Call Features → IVR.
Users could achieve the following:
- Record custom prompts for the auto-attendant.
- Enable key-pressing events to guide callers through the IVR system.
- Set multi-layer IVR (up to 64 nested IVRs).
- Choose the language and customize system prompts.
- Setup blacklist/whitelist filtering.
Key Pressing Configuration
Users could follow the below steps in order to set up key pressing events for IVR cascading:
- Access the PBX Web UI under Basic Call Features → IVR then edit the main IVR.
- Navigate to the Key Pressing Events tab.
- Select a key, then select one of the available destinations (You can select another IVR to set multi-layer IVR).
Call Recording
Another feature that is considered major for any call center system, is call recording. Grandstream IP-PBXs support for call recording either to be enabled automatically on the call queue settings or via feature codes during the active calls.
The admin can enable auto-recording under each call queue to keep track of call records under the system for later agent monitoring, assessment, and verification usage.
Once the auto-record feature has been enabled on a call queue, the system will start recording all calls that are received on the specific queue in wav files which can be accessed from the following path:
Basic Call Features → Call Queue → Queue Recordings.
Then the user can:
- Download batch or single files to listen to the recording.
- Delete batch or single files to free recording space.
- See the caller number, the queue that has received the call.
- See the timestamp which indicates the date and time of the call.
After we have presented the call center features that are supported, we will move on to the next part of this document to cover a sample scenario and step-by-step configuration of these features from the web GUI.
Sample Call Center & CRM Implementation
Centralized Mode
Scenario Overview
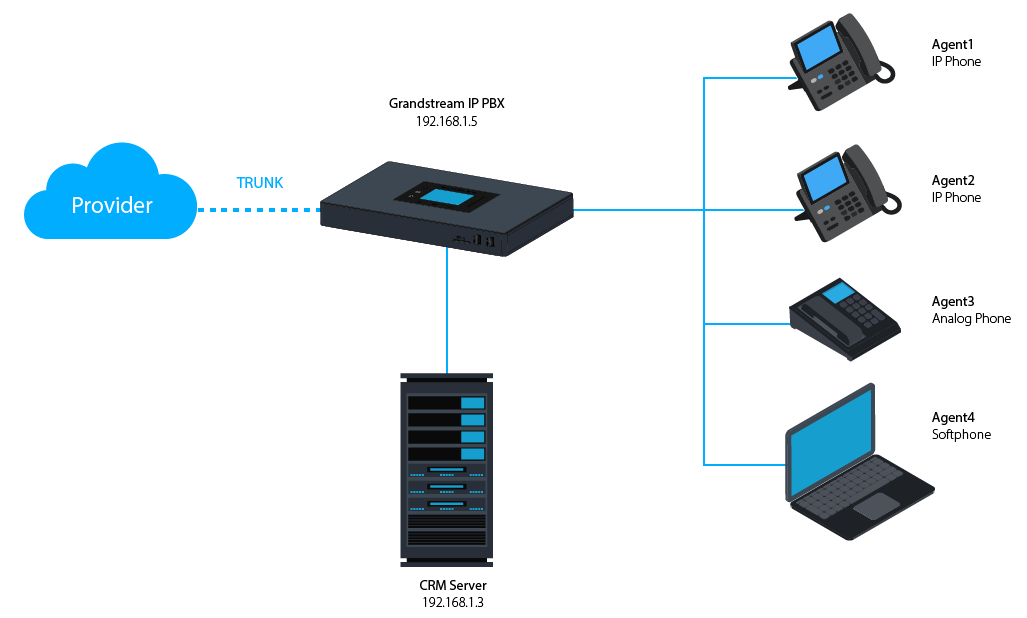
The company ABC has different departments (Sales, Marketing, Support…) and needs to manage incoming calls per department. In this scenario, we will assume the following:
- Inbound route is configured to redirect all the incoming calls to a main IVR and caller needs to specify which department to reach by pressing corresponding key (We assume IVR already created).
- Sales department has 5 members with extensions: 1000, 1001, 1002, 1003, 1004.
- Incoming calls to Sales department should ring all Sales agents.
- Marketing department has 3 members with extensions: 1005, 1006, 1007.
- Incoming calls to Marketing department should ring in order.
- Support department has 10 members with extensions: 1008, 1009, 1010, 1011, 1012, 1013, 1014, 1015, 1016, 1017.
- Agents 1015, 1016 and 1017 are dynamic agents which log in and logout depending on their availability.
- The PBX is integrated with the company CRM sever (SugarCRM).
- A supervisor is responsible to monitor and assist the tech support agents: extension 2000.
- Only the supervisor has permission for call barging on all agents calls.
- Callers to tech support should be allowed to know their position in the waiting queue and prompted on an interval of 30 seconds if they wish to stay waiting or leave a callback number to get connected once an agent is free.
- All extensions are already created, configured and registered to the corresponding end points.
Configuration Steps
In order to implement the described scenario, users can follow the below procedures:
- Create three call queues named sales, marketing and support and make sure to set the correct ring strategy.
The following table summarizes required settings for each queue respecting the requirements.
Call Queue Extension | Call Queue Name | Strategy | Static agents |
6500 | Sales_queue | Ring All | 1000, 1001, 1002, 1003, 1004 |
6501 | Marketing_queue | Linear | 1006, 1005, 1007 |
6502 | Support_queue | Round Robin | 1008, 1009, 1010, 1011, 1012, 1013, 1014 |
Call Queue Basic Settings
- Create the main IVR and set the key pressing events as below.
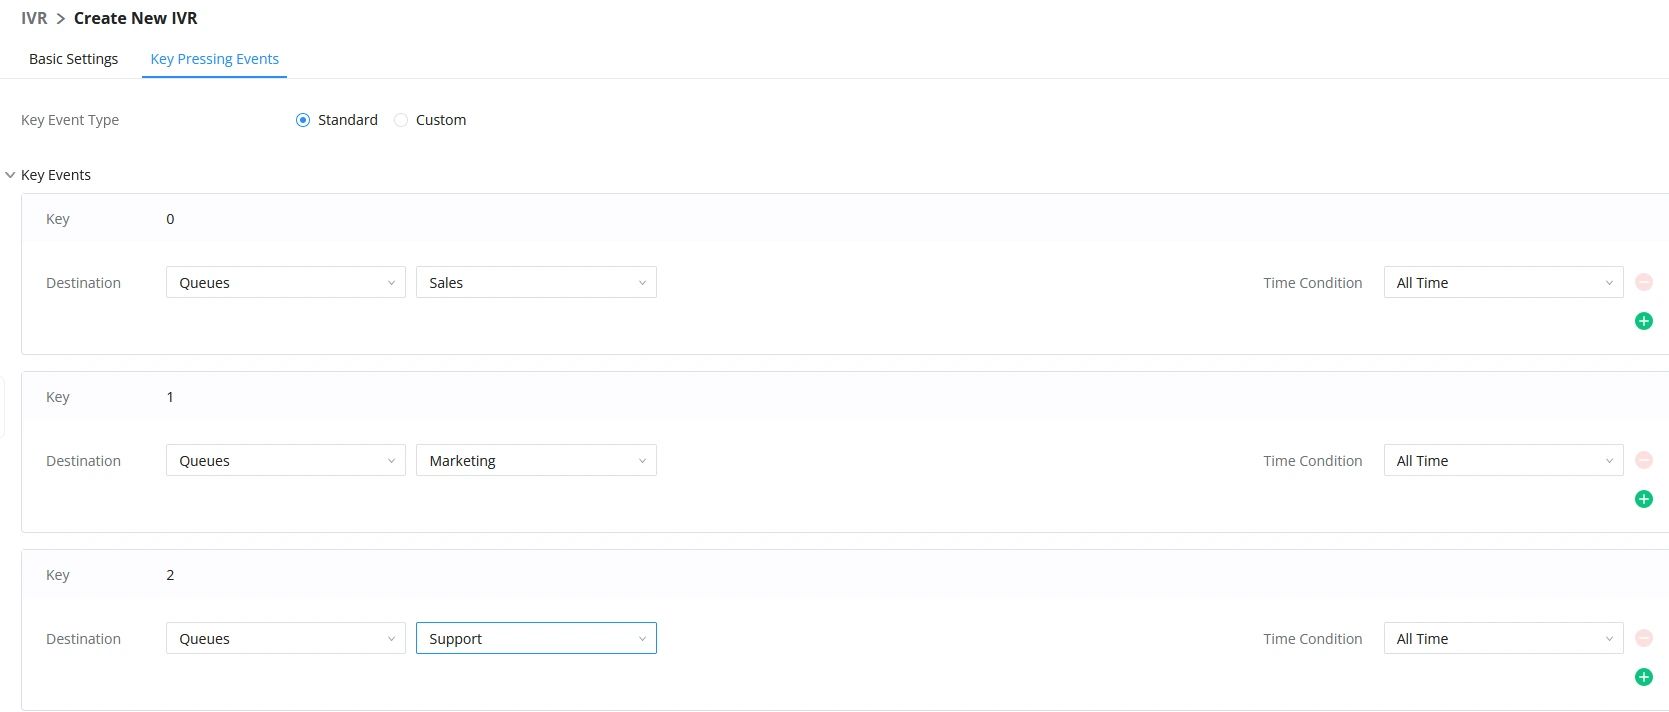
- Enable dynamic agent login for tech support personal 1015, 1016 and 1017.
- Configure extension 2000 as the queue chairman.
- Configure the virtual queue and enable position announcement on each queue.
- Setup outbound rule for client’s callback feature, as followed:
- Access the PBX web GUI under Extension/Trunk → Outbound Routes.
- Add new outbound rule and name it (you can name if for ex: call center callback).
- Set pattern as _0X. assuming 0 was the prefix configured on call queue advanced settings.
- Set Strip to 1 digit. This to remove the prefix from the number that the customer left.
- Select through which trunk you want to callback the customers.
- Save and Apply.
- Set up the connection between the PBX and SugarCRM.
The following figure shows company ABC call queue flow:
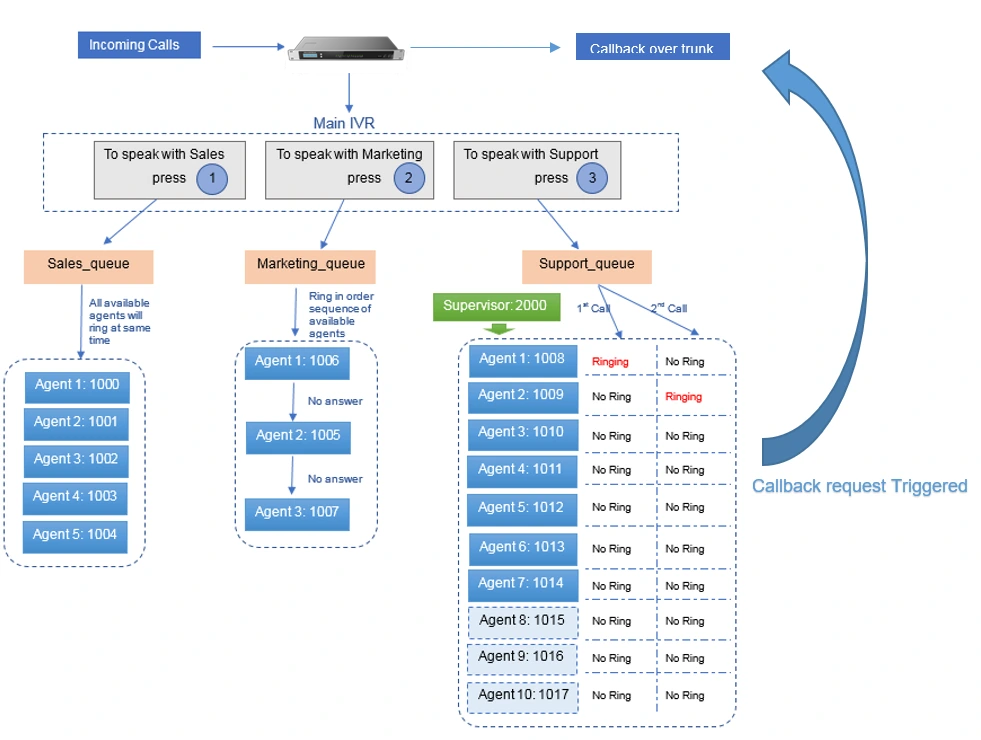
Distributed Call center mode
Scenario overview
Company ABC has been successful and expanded its existence with two additional branch offices for customer technical support, in this case, the headquarter office PBX still maintain centralized CRM integration services and call distribution to branch offices where each PBX runs its own branch sub-call center for technical support.
Once an incoming call reaches the main PBX, users will be asked to select from which region they are calling to be directed to the correct technical support office. The following figure shows the new distributed call center architecture of the enterprise.
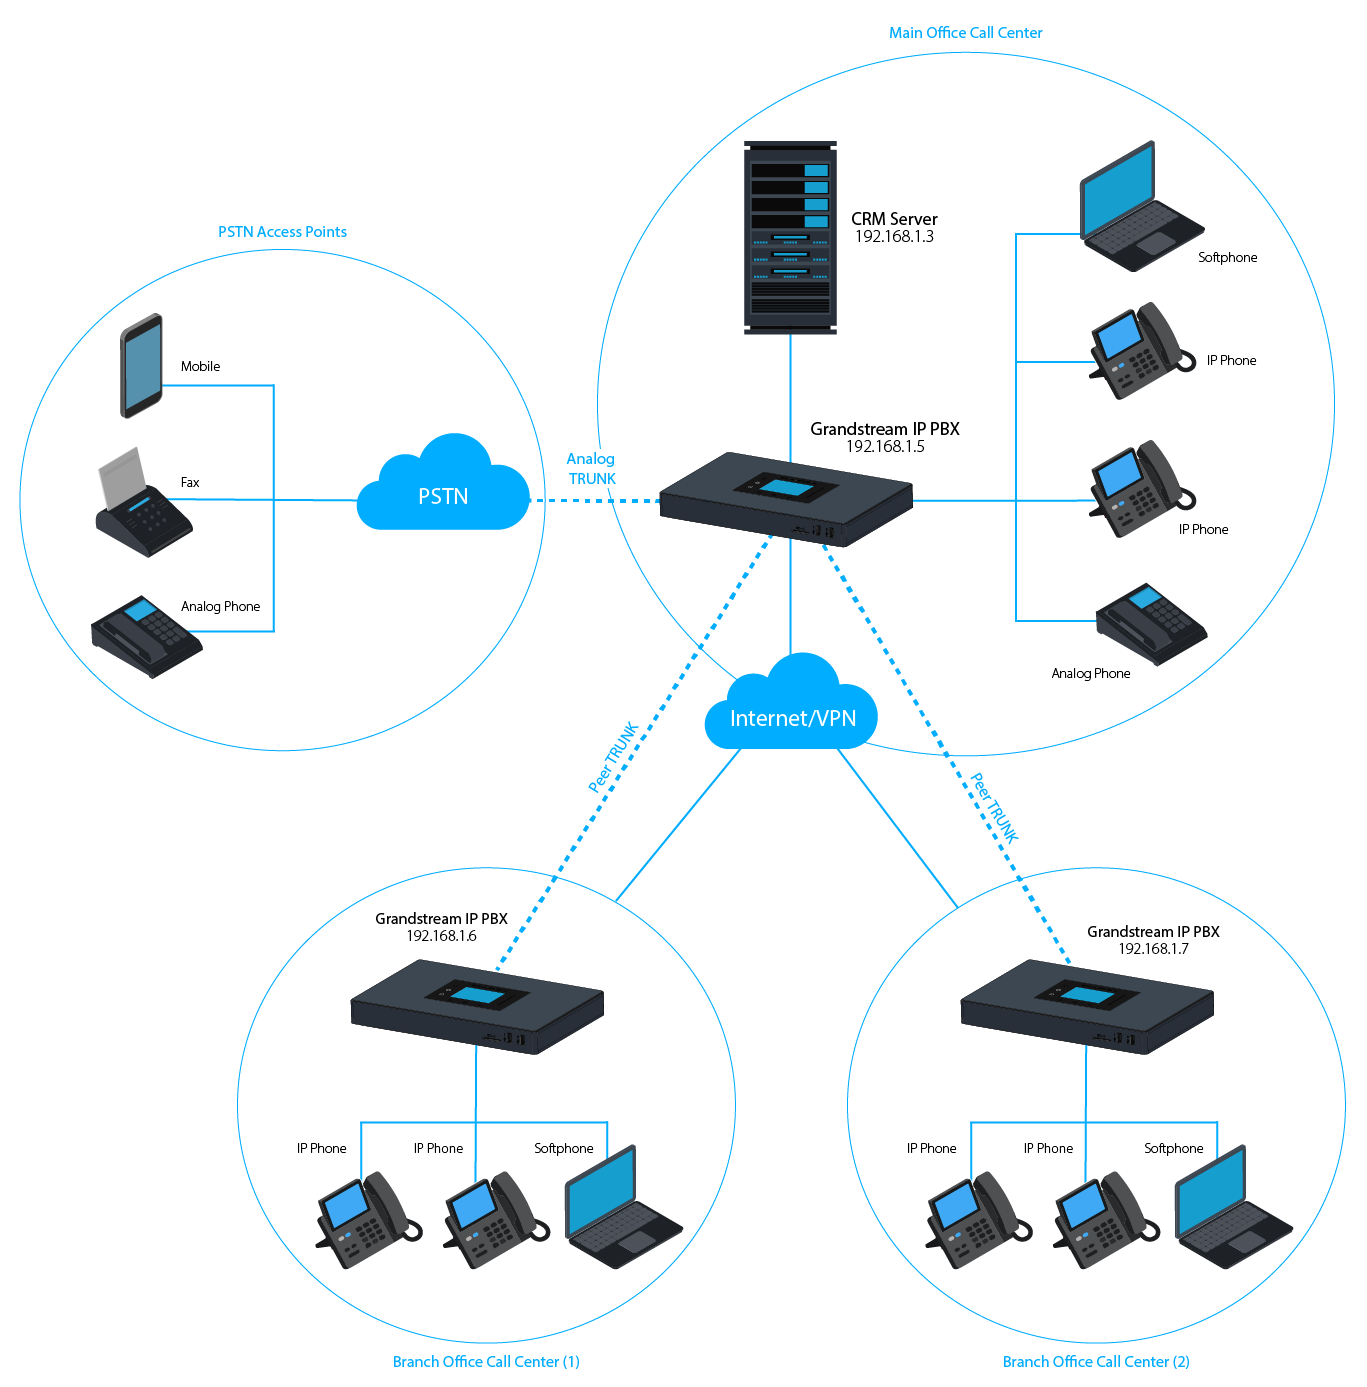
Configuration steps
Following steps can be followed in order to meet the new company requirements:
- Ensure that the PBX for Branch 1 and 2 have separate extension range than the headquarters PBX.
- Headquarter PBX extension range: 1XXX
- Branch 1 PBX extension range: 2XXX
- Branch 2 PBX extension range: 3XXX
- Configure peer trunk between headquarter and branch offices for site to site connectivity, please follow this guide in order to setup the trunk.
- Edit the main IVR to add new options for regional office redirection under key pressing events.
- Create call queues for each branch office where you put the corresponding agents extensions. And choose the adequate ring strategy (i.e. Ring All).
- Setup virtual queue and position announcement on each queue.
- Configure the outbound routes on each branch office in order to route callback calls through the SIP peer trunk to the main PBX which will reroute over